
Blog
Gather knowledge about the latest insights, updates, tips, and tricks in the Ecommerce industry.

5 Min • 20 March 2026
How Anua Unlocked 5X AOV Growth with iCart’s Smart Cart Features
delivery customization Challenges Solutions drive results Scale business delivery customization Challenges Solutions drive results Scale business delivery customization Challenges Solutions drive results Scale business delivery customization Challenges Solutions drive results Scale business Anua is a globally recognized Korean skincare brand known for its minimalist philosophy and focus on gentle yet effective formulations. Built on the idea of simplifying skincare routines, Anua develops products that deliver visible results while avoiding harsh or irritating components, making them suitable for sensitive skin types. Initially using a traditional full cart experience, Anua transitioned to iCart’s side cart solution in August 2025, to create a more seamless and engaging shopping journey. This shift allowed customers to easily explore complementary skincare products without disrupting their browsing flow, making it more intuitive to discover items that fit into a complete routine. By surfacing relevant recommendations directly within the cart, the brand enhanced product visibility across its range. Challenges Before implementing iCart’s side cart solution, Anua faced limitations with their existing full cart experience, which created friction in the customer journey. The traditional cart setup redirected users away from product pages, interrupting their browsing flow and reducing opportunities to explore additional products. As a skincare brand built around routines rather than single-item purchases, this made it difficult to effectively showcase complementary products and encourage customers to build complete regimens. Additionally, the lack of in-cart personalization and strategic upsell opportunities meant that customers were often unaware of related products that could enhance their skincare results. This limited the brand’s ability to increase average order value (AOV) and fully leverage its diverse product range. Anua needed a more dynamic and intuitive cart experience that could seamlessly introduce relevant recommendations while maintaining a smooth and engaging shopping journey. ❌ Cart Value Barriers Low average order value (AOV) due to single-item focus Most customers completed purchases with one primary product instead of building multi-step routines. Cart abandonment near shipping thresholds Customers were not clearly informed or motivated to reach free shipping or discount thresholds. Missed savings opportunities Customers were unaware of potential value in purchasing bundled routines or multiple complementary products. ❌ Absence of Progress-Based Incentives No free shipping or discount progress bar Customers were not motivated to increase their cart value due to lack of visible incentives. Missing tiered rewards system There were no structured milestones (e.g., “Spend more to unlock offers”), reducing upsell opportunities. ❌ Ineffective Cart UI/UX (Pre-Side Cart) Full-page cart disrupted shopping flowCustomers had to leave their browsing journey, increasing friction and drop-offs. No quick add/remove functionality Users couldn’t easily modify their cart or add suggested products without navigating away. Solution To overcome these challenges, Anua implemented iCart’s side cart solution to transform their traditional cart into a high-converting, interactive experience. By replacing the full-page cart with a seamless side cart, the brand ensured that customers could continue browsing while viewing their cart, significantly reducing friction in the shopping journey. Additionally, features like product recommendations & progress bars for free shipping and discounts motivated customers to increase their cart value. By combining personalization, incentive-driven messaging, and a user-friendly interface, Anua successfully turned their cart into a powerful revenue-driving touchpoint rather than just a checkout step. To maximize their cart effectiveness, they implemented two powerful features: ✅ Progress Bar with Multi-Reward Incentives Implemented a tiered progress bar to encourage higher cart value Customers are guided with a clear message like “Add $3.10 to unlock secret offer,” motivating them to continue adding products. Generated over $5M+ in revenue through incentive-driven cart progression Used product-based rewards to align with customer intent Instead of generic discounts, Anua incentivized purchases with relevant skincare items like Dark Spot Pads and mini serums. Built visual motivation for routine expansion As customers add products, they can clearly track progress toward unlocking multiple rewards, encouraging them to build a complete skincare routine. ✅ Product Recommendations Implemented “Frequently Bought Together” recommendations Customers adding a single product (e.g., toner) are shown complementary items like serums, moisturizers, or pads to complete their routine. Generated over 275K revenue through in-cart recommendations Encouraged full skincare regimen building Instead of isolated purchases, the cart suggests step-by-step product combinations aligned with common skincare routines. Increased product discovery at the final stage By surfacing relevant items directly in the cart, Anua ensured customers explore more of their catalog without leaving the checkout flow. Results Achieved in Last 180 Days 22932 Total Store Orders 45101 Total iCart Orders 5X iCart Generated AOV 65.70% Upsell Affected Conversion Rate These improvements reflect a clear shift in customer behavior on Anua’s store. Cart abandonment reduced as shoppers discovered complementary skincare products and felt encouraged to build complete routines. Engagement also increased, with customers interacting more with in-cart recommendations and exploring relevant product pairings. Results & Impact And...Results is Our Main Clarification By implementing iCart’s cart drawer, product recommendations, and progress bar, Anua transformed its cart into a high-performing conversion touchpoint. Shopping Experience Enhancement The improved cart experience encouraged customers to discover complementary products and understand the value of sustainable beauty routines. For instance, the clear presentation of subscription savings alongside one-time purchase options helped customers make more informed decisions about their long-term hair care needs. As Anua continues to optimize its cart experience, the brand is closely monitoring: Routine-based purchasing behavior - tracking how customers move from single items to multi-step regimens Engagement with in-cart recommendations - measuring interaction with suggested products Cart value progression - analyzing how incentives influence higher spending [related_cases_slider] Ready to Write Your Success Story? Try icart App Join successful businesses like Anua and Master your delivery scheduling Delight customers with precise timing Grow your special occasion orders Expand your delivery reach
Read Blog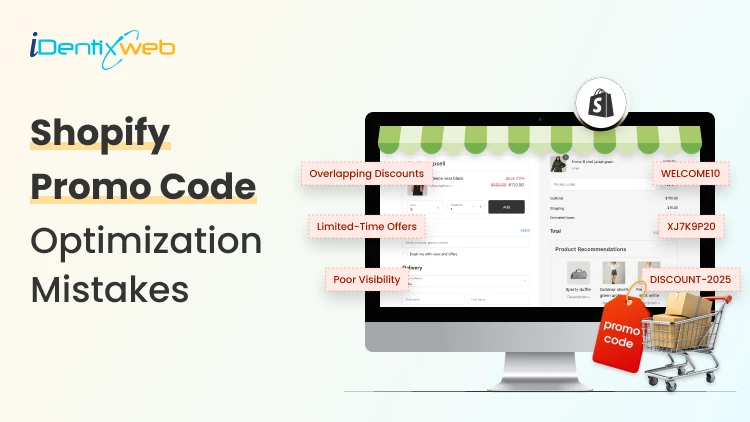
7 Min • 22 April 2026
Shopify Promo Code Optimization: 5 Mistakes That Reduce Conversion Rates
Thousands of Shopify merchants run promotions every week and walk away with mediocre results, not because their offer was bad, but because small, fixable mistakes were quietly killing their conversion rates. Here's what most guides won't tell you: a Shopify promo code is not just a discount; it's a conversion tool. And like any tool, how you use it matters more than the tool itself. In my 7 years of experience, I have audited over 100+ Shopify stores and reviewed their discount strategies. The same 5 mistakes keep showing up, killing revenue silently. Let's fix them one by one. Why Your Shopify Promo Codes Aren't Converting? Mistake #1: Using Generic Promo Codes That Anyone Can Share You've seen it. "SAVE10." "WELCOME20." "SUMMER15." These codes feel easy to create and they are. But that ease comes with a serious hidden cost. What's happening behind the scenes: When you use a generic, shareable promo code for Shopify, it escapes your ecosystem. It gets posted to coupon aggregator sites like RetailMeNot, Honey, and Coupert. From that moment on, your discount is available to every visitor including people who had zero intention of buying without it. This destroys two things: Your margins - You are giving discounts to customers who would have paid full price. Your data - You can't tell which channel actually drove the conversion. The Fix: Switch to unique, single-use discount codes for any campaign targeting known customers (email subscribers, loyalty members, retargeted visitors). Shopify's bulk discount code generator makes this easy. You can create thousands of unique codes at once and assign them individually. Mistake #2: Setting No Expiry in Promo Code for Shopify Customers "We'll run it through the end of the quarter." This is one of the most common mistakes merchants make with Shopify promo codes. Why it kills urgency: Human psychology is simple: if there's no deadline, there's no reason to act now. A shopper who sees your promo code thinks, "I'll come back later." And later almost never comes. Always show a countdowm timer with your discounts to boost cart value. There are so many popular apps like iCart which comes with this feature. Once you show a countdown timer with your discount offers, chances are high that customers will definitely buy your products as it creates an urgency. The Fix: Use countdown timers on your store to make the deadline visible. Pair it with a reminder email 4 hours before expiry - this single tactic has been shown to lift conversions by 8 -15% on abandoned cart flows. Mistake #3: Not Segmenting - You're Sending the Same Code to Everyone Here's a scenario that plays out every day on Shopify: A merchant sets up one discount code, puts it in one email campaign, and sends it to their entire list - new subscribers, loyal customers who've bought 10 times, lapsed customers from 18 months ago. One message. One offer. Everyone. Why this underperforms: Different customers are at completely different points in their relationship with your brand. What motivates a first-time visitor is completely different from what re-engages a lapsed buyer. A blanket Shopify promo code ignores this entirely. The Fix: Build segmented discount flows for at least three audience tiers: Tier 1 - New Subscribers / First-Time Visitors Goal: Get the first purchase. Offer: 10–15% welcome discount, short expiry, single-use code. Tier 2 - Active, Repeat Customers Goal: Increase order frequency or AOV. Offer: Loyalty reward (free product, free shipping threshold, early access). Tier 3 - Lapsed Customers (90+ days since last purchase) Goal: Win back. Offer: Your most aggressive discount (20-25%) with a "We miss you" message. Make them feel seen, not just marketed to. Mistake #4: Burying the Promo Code in the Checkout Process A shopper gets your email, sees the promo code, and navigates to your store. They add items to their cart. They reach checkout. And then they can't find where to enter the code. Or worse - they find the field, but the code doesn't work (expired, wrong format, minimum not met), and there's no helpful error message. They abandon. According to Baymard Institute research on checkout UX, discount code fields can actually hurt conversion rates when they're too prominent because customers without a code will leave to search for one. But hiding them entirely creates friction for customers with a code. The Fix: Shopify gives you control over the checkout experience. Here's the optimal approach: For direct campaigns (email, SMS, ads): Use automatic discounts wherever possible. Shopify's automatic discount feature applies the discount without requiring the customer to enter anything the code is embedded in a unique URL that activates it at checkout. Zero friction. For public promotions: Keep the discount field visible but not dominant. Make sure error messages are specific: "This code requires a minimum order of $50" is far more helpful than "Invalid code." Mistake #5: Not A/B Testing Your Promo Code Strategy Most merchants pick a discount percentage based on gut feeling. "20% feels right." "Let's try $10 off." But what if 15% off converts better than 20% off? What if free shipping outperforms a percentage discount at your AOV? You will never know without testing. What to A/B test with your Shopify promo codes: Discount format: % off vs. fixed $ amount vs. free shipping (Rule of thumb: for orders under $100, fixed $ amounts feel more valuable; for orders over $100, percentages feel bigger) Minimum order threshold: Does requiring a $75 minimum increase AOV, or does it kill conversion entirely at your price points? Code presentation timing: Promo in the first email vs. revealed only after a browse-abandonment trigger Landing page with vs. without promo banner: Does showing the discount on the page help or attract discount-only buyers? Shopify natively doesn't support A/B testing of discount experiences, but tools like Convert, VWO, or Google Optimize (via GTM) integrated with Klaviyo flows can help you run clean experiments. Final Thoughts The merchants who consistently drive strong conversion rates from their Shopify promo codes don't just offer bigger discounts. They offer smarter ones. They know which customers to target. They build urgency without desperation. They protect their margins while still giving buyers a reason to act. They test relentlessly and measure what actually matters. A promo code for Shopify is not a magic button. It's a tool and in the right hands, with the right strategy, it becomes one of the most powerful levers in your entire growth engine. Fix these 5 mistakes. Run leaner, smarter campaigns. And watch your conversion rates reflect the difference. Frequently Asked Questions 1. What is promo code optimization in Shopify? Promo code optimization in Shopify means setting up and presenting discount codes in a way that encourages more shoppers to complete their purchase. It is not just about offering a discount, but about making the code easy to understand, easy to apply, and relevant to the customer. 2. Where should I show promo codes on a Shopify store? The best places usually include the announcement bar, product page, cart drawer, and cart page. The key is to show the offer early enough to influence the purchase without interrupting the checkout flow. 3. Is it better to use percentage discounts or fixed amount discounts? Both can work, but the better choice depends on your product pricing and audience. 4. How do I track whether a Shopify promo code is working? You can track promo code performance through Shopify discount reports, conversion data, average order value, and campaign-level analytics.
6 Min • 22 April 2026
Shopify Analytics Setup Mistakes: 5 Tracking Errors That Kill Data Accuracy
Here's something most Shopify merchants don't realize: your analytics can look completely normal while being completely wrong. Sessions populate. Revenue reports fill up. Everything seems fine. But underneath, tracking errors are quietly skewing every number you rely on. If you've ever wondered why your Shopify analytics and Google Analytics never seem to match, this is why. Let's fix it. This guide breaks down the most common Shopify analytics setup mistakes; the ones that silently corrupt your data and cost you money. Common Shopify Analytics Mistakes and How to Avoid Them Mistake #1: Treating Shopify's Built-In Analytics as "Good Enough" Shopify's native analytics dashboard is genuinely useful for surface-level reporting: total sales, sessions, top products, returning customer rate. For a brand-new store, it's plenty. But the moment you're running paid traffic, testing landing pages, or trying to understand why your conversion rate dropped last Tuesday, Shopify's native reports hit a ceiling fast. The core limitation: Shopify analytics reports attribute everything to the last touchpoint before purchase. A customer who clicked a Pinterest ad three weeks ago, came back via email, then converted from a Google search? Shopify credits Google. That's not wrong, exactly, but it's deeply incomplete. What merchants miss: Shopify's native dashboard also has no cross-device tracking, no funnel visualization, no event-level behavior data (scroll depth, video plays, add-to-cart timing), and no audience segmentation beyond basic purchase history. The fix: Use Shopify's native analytics for what it's good at - operational reporting. For anything strategic, you need Google Analytics connected and properly configured. Think of them as complementary, not interchangeable. Mistake #2: Installing the Google Analytics Shopify Integration Without Verifying It's Actually Working This is the most common mistake on this entire list, and it's brutal because it looks like it's working. You go to your Shopify admin, navigate to Online Store > Preferences, paste your GA4 Measurement ID, hit save, and see data flowing into Google Analytics within 24 hours. Setup complete, right? What actually happens in a lot of stores: The base GA4 tag fires correctly on most pages, but the purchase event doesn't fire on the order confirmation page because the theme's checkout customization blocks it. The GA4 tag fires, but enhanced ecommerce events (view_item, add_to_cart, begin_checkout) are either missing or duplicated. The Measurement ID is correct, but the data stream settings in GA4 weren't configured, so key features like enhanced measurement are disabled. The integration was set up months ago, a theme update quietly broke the tag, and no one noticed because sessions data was still populating. The fix: After setting up your Google Analytics Shopify connection, run a live verification. Open GA4's DebugView (Admin > DebugView), open your store in a separate browser tab, add a product to cart, and begin a checkout. You should see events populating in real time. Mistake #3: Duplicate Tracking Tags Inflating Your Data If Mistake #2 gives you missing data, Mistake #3 gives you the opposite problem - too much data that looks like success but is actually noise. Duplicate tracking happens when the same tag fires twice on the same pageview or event. In GA4 terms, this means every session gets counted as two, every purchase fires twice, and your conversion rate doubles not because your store improved, but because you're counting everything twice. The fix: Use Google Tag Manager's Tag Assistant Chrome extension or GA4's DebugView to audit which tags are firing on your key pages. In Shopify's theme code, search for your Measurement ID (format: G-XXXXXXXXXX) if it appears more than once in your liquid files or is present in both the theme code AND your GTM container, you have duplication. Remove one source. Mistake #4: Skipping the Checkout Extensibility Migration If your store is still running on Shopify's legacy checkout (pre-Checkout Extensibility), your purchase tracking is almost certainly broken or severely limited and this situation is only getting more urgent. What this means for your data: Legacy checkout customizations using checkout.liquid don't support certain GA4 event firing methods. The purchase event either doesn't fire at all, fires without complete order data (missing revenue, item details, or quantity), or fires but can't be enhanced with customer data for better attribution. The cascading effect: If your GA4 purchase events are incomplete, your Google Ads conversion tracking (which often uses GA4 as its source) is also wrong. Your ROAS calculations are wrong. Your Smart Bidding campaigns are optimizing toward incomplete signals. Your whole paid advertising engine is working from corrupted inputs. The fix: Migrate to Checkout Extensibility if you haven't already. For GA4 specifically, use Shopify's native GA4 integration (which is Checkout Extensibility-aware) or a well-maintained app like Elevar or Littledata that handles server-side tracking to compensate for client-side limitations. Mistake #5: Misattributing Shopify Email Marketing Traffic When a customer clicks a link in your Shopify Email (or Klaviyo, or Omnisend) campaign and lands on your store, GA4 needs to know that traffic came from email. Without proper UTM parameters on those links, GA4 either: Attributes the session to "Direct" - because there's no referrer data it recognizes Attributes it to the ESP's domain - which is useless for channel analysis The result: your email channel looks like it's underperforming, your direct traffic looks bizarrely high, and your channel-level ROAS calculations are completely misleading. The fix: Tag every marketing email link with UTM parameters: utm_source=klaviyo (or shopify-email, omnisend, etc.) utm_medium=email utm_campaign=your-campaign-name utm_content=optional-link-identifier Most ESPs have built-in UTM builders. In Klaviyo, it's under Account > Settings > UTM Tracking. In Shopify Email, you'll need to add them manually to links or use a URL builder. It takes 5 extra minutes per campaign and completely transforms the reliability of your channel attribution data. The Shopify Analytics Setup Checklist Before you close this tab, here's a quick reference for what a properly configured Shopify analytics setup should include: Native Shopify Analytics: ✅ Shopify reports accessed regularly for operational metrics (sales, sessions, top products) ✅ Shopify Email and marketing campaigns tagged with UTMs ✅ Test orders excluded from reports (use Shopify's test gateway) Google Analytics Shopify Integration: ✅ GA4 property created with correct data stream for your Shopify store URL ✅ Shopify's native GA4 integration active or GTM container with GA4 config tag (not both) ✅ Enhanced measurement enabled in GA4 data stream settings ✅ Internal traffic defined and filtered ✅ Cross-domain tracking configured if using external domains ✅ Purchase events verified in DebugView with complete ecommerce parameters Google Ads & Conversion Tracking: ✅ Google Ads conversion action linked to GA4 purchase event (not just a standalone tag) ✅ Enhanced Conversions enabled and verified ✅ Attribution model reviewed and understood Ongoing Maintenance: ✅ Post-update QA checklist run after every theme or app change ✅ Full analytics audit scheduled quarterly ✅ GA4 DebugView bookmarked for quick verification Final Thought The merchants who scale consistently aren't necessarily the ones with the biggest budgets or the best products. They're the ones who make better decisions and better decisions start with data you can actually trust.
6 Min • 22 April 2026
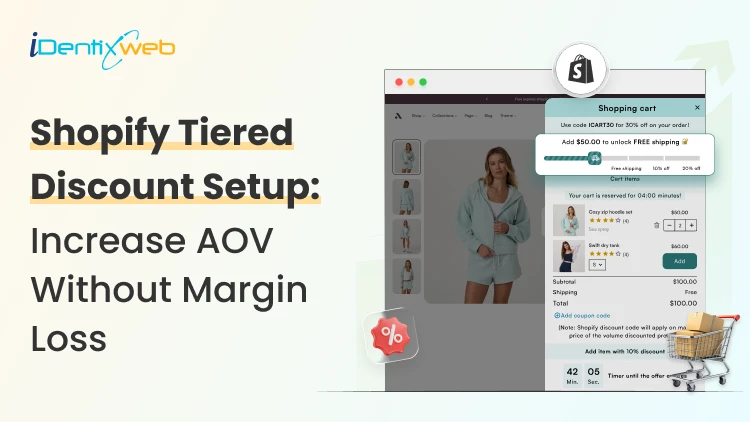
How to Create Tiered Discounts in Shopify? (2 Best Methods Explained)
Tiered discounts in Shopify are a pricing strategy where customers get rewards as they unlock each tier. This can be done in multiple ways, like adding more items or increasing the total spend. I recommend this based on how new stores sell. If you just want a simple backend setup, the native method is enough. If you want shoppers to clearly see the multiple discount tiers in the cart, I suggest the app method. I have worked with stores with both methods and have seen their AOV increase within weeks. First, let’s have an overview of the two methods to create tiered discounts in your Shopify store. How to do tiered discounts on Shopify? (The 2 methods) MethodBest forWhat it doesNative Shopify methodSimple tiered offersLet's you create amount-off or Buy X Get Y discounts with a minimum quantity or minimum spendShopify app method with iCartMore visible cart-based tiersLet's show a multi-tiered discount bar in the cart. I have used the iCart Cart Drawer Cart Upsell app the most because it helps me show a multi-tiered discount bar in the cart drawer. For example, here’s a store I worked with called Garb Classics. We worked together to increase their AOV and installed iCart in their store. The discount bar with multiple tiers in their cart decreased their cart abandonment rate and increased their sales. You can also do a tiered discount without an app. Let’s first understand that. How to create tiered discounts in Shopify? (native method) This works well for offers like Buy 2, get 10% off or Spend $50, get 10% off. The setup is simple, but it is better for simple tiers than for a fully visual bulk discount experience. Step 1: Go to Shopify Discounts From your Shopify admin, open Discounts and click Create discount. Shopify lets you build discounts as code or as an automatic discount. Choose the format that fits your store. Want to create discounts? Here's a complete guide to creating discounts on Shopify. Step 2: Choose the right discount type For most Shopify tiered discounts, I start with Amount off if I want a percentage or a fixed discount once the shopper reaches a threshold. If the offer is more quantity-driven, I use Buy X Get Y. Step 3: Set your threshold Inside the discount setup, add the rule that triggers the offer. Shopify lets you use a minimum purchase amount or a minimum quantity of items. This is the part that creates the tier logic. For example, you can set one discount when a shopper buys 2 items, and another when they buy 4 items. Step 4: Add Tier 1 and Tier 2 Now set your discount levels clearly. For example, Tier 1 can buy 2 items and get 10% off, and Tier 2 can buy 4 items and get 15% off. This makes your Shopify tiered discounts easy to plan before you publish them. Step 5: Choose products or collections Now select which products, variants, or collections the discount should apply to. I always tell merchants to start small here. Test the offer on one collection first. That makes it easier to see if the discount is increasing your AOV. Step 6: Decide if it should be a code or automatic If you want customers to enter a code, use a discount code. If you want the tier to apply once the cart qualifies, use an automatic discount. Step 7: Set dates, usage rules, and combinations Add the active dates, usage limits, and customer eligibility. Shopify also allows discount combinations, but there are rules around how many discounts can apply to the same order. Step 8: Test the discount Before publishing, test the discount tiers yourself. Add products, hit the minimum quantity, and make sure the offer applies exactly when it should. Now I prefer discount tiers to be visible on the cart drawer; that’s why I use apps like iCart. Here’s how to create tiered discounts in Shopify with an app. How to create tiered discounts in Shopify? (with an app) Step 1: Install the iCart app Go to the app store and install the app ‘iCart Cart Drawer Cart Upsell’ Step 2: Enable the app After installing, go to Online store > Edit theme and enable the iCart app embed. Click save after applying the changes. Step 3: Select your cart type Next, choose how you want the cart experience to appear. iCart has a multi-cart feature that lets you add both a full cart and a cart drawer in your storefront. After selecting the cart, click Customize. Step 4: Select the progress bar widget Backend view of the Progress Bar widget in iCart From the Widgets section, select the Progress Bar widget. Here’s how I add a multi-tier discount bar in the cart drawer. The discount tiers can be selected based on cart price above X and cart items above X. You can add multiple tiered discounts based on free shipping, percentage, and fixed amount. I find this method better than native because it gives me more choices to do tiered discounts where shoppers make decisions. That is in the cart. Here’s a great case study on how the Shopify store Dice Dungeons boosted their sales using progress bars and other widgets of iCart. Key tips while adding tiered discounts Start with 2 or 3 tiers, not 5 or 6. I have experienced stores get better results when the offers are easy to read. Keep the discount math simple. “Buy 2, save 10%” is easier to act on than a complicated progress bar. Test tiered discounts on one collection first, then expand only after you see what happens to the conversion rate and average order value. Make the next reward level visible. That is where cart messaging and progress bars are a much better option. Always check the offer on mobile. Your AOV will decrease when the discount is hidden on smaller screens. Tiered discounts decrease cart abandonment rate The biggest benefit of adding a tiered discount on Shopify is they help decrease cart abandonment rate. This is because customers want bigger rewards as they unlock tiers and complete the checkout. Use the native method for a basic setup. Use apps like iCart when you want shoppers to clearly see the discount tiers in the cart and feel pushed toward the next saving level. FAQs 1. How to create tiered discounts in Shopify? You can create simple tiered discounts in Shopify by using native discount types like Amount off or Buy X Get Y and setting a minimum quantity or minimum purchase amount. You can use apps like iCart to add tiered discounts in the cart through a discount bar. 2. Can you stack discounts on Shopify? Yes, Shopify does allow discount combinations, but stacking depends on the discount types and how you configure them. 3. What is a tiered discount strategy? A tiered discount strategy is a pricing approach where the discount gets better as the customer buys more or spends more. 4. What is an example of a tiered discount? A simple example is: buy 2 items and get 10% off, buy 4 items and get 15% off. This works well because the customer can clearly see the next saving level.

Vineet Nair
7 Min • 30 September 2025
660 Views

Bhavesha Ghatode
6 Min • 26 September 2025
571 Views

Vineet Nair
5 Min • 25 September 2025
548 Views

Vineet Nair
7 Min • 25 September 2025
472 Views

Bhavesha Ghatode
7 Min • 25 September 2025
530 Views
")
Bhavesha Ghatode
5 Min • 25 September 2025
524 Views

Bhavesha Ghatode
7 Min • 24 September 2025
554 Views

Vineet Nair
5 Min • 24 September 2025
475 Views

Bhavesha Ghatode
6 Min • 23 September 2025
459 Views
![How to Change View Cart Color in Shopify? [2026 Updated]](https://www.identixweb.com/wp-content/uploads/2025/09/23-09-Tue-Blog-How-to-Change-the-Color-of-My-View-Cart-Button-on-Shopify-2.webp "How to Change View Cart Color in Shopify? [2026 Updated]")
Vineet Nair
6 Min • 23 September 2025
423 Views

Bhavesha Ghatode
6 Min • 22 September 2025
585 Views

Bhavesha Ghatode
5 Min • 19 September 2025
543 Views


