iDentixweb
Gather knowledge about the latest insights, updates, tips, and tricks in the Ecommerce industry.

5 Min • 29 April 2026
How Anua Unlocked 5X AOV Growth with iCart’s Smart Cart Features
delivery customization Challenges Solutions drive results Scale business delivery customization Challenges Solutions drive results Scale business delivery customization Challenges Solutions drive results Scale business delivery customization Challenges Solutions drive results Scale business Anua is a globally recognized Korean skincare brand known for its minimalist philosophy and focus on gentle yet effective formulations. Built on the idea of simplifying skincare routines, Anua develops products that deliver visible results while avoiding harsh or irritating components, making them suitable for sensitive skin types. Initially using a traditional full cart experience, Anua transitioned to iCart’s side cart solution in August 2025, to create a more seamless and engaging shopping journey. This shift allowed customers to easily explore complementary skincare products without disrupting their browsing flow, making it more intuitive to discover items that fit into a complete routine. By surfacing relevant recommendations directly within the cart, the brand enhanced product visibility across its range. Challenges Before implementing iCart’s side cart solution, Anua faced limitations with their existing full cart experience, which created friction in the customer journey. The traditional cart setup redirected users away from product pages, interrupting their browsing flow and reducing opportunities to explore additional products. As a skincare brand built around routines rather than single-item purchases, this made it difficult to effectively showcase complementary products and encourage customers to build complete regimens. Additionally, the lack of in-cart personalization and strategic upsell opportunities meant that customers were often unaware of related products that could enhance their skincare results. This limited the brand’s ability to increase average order value (AOV) and fully leverage its diverse product range. Anua needed a more dynamic and intuitive cart experience that could seamlessly introduce relevant recommendations while maintaining a smooth and engaging shopping journey. ❌ Cart Value Barriers Low average order value (AOV) due to single-item focus Most customers completed purchases with one primary product instead of building multi-step routines. Cart abandonment near shipping thresholds Customers were not clearly informed or motivated to reach free shipping or discount thresholds. Missed savings opportunities Customers were unaware of potential value in purchasing bundled routines or multiple complementary products. ❌ Absence of Progress-Based Incentives No free shipping or discount progress bar Customers were not motivated to increase their cart value due to lack of visible incentives. Missing tiered rewards system There were no structured milestones (e.g., “Spend more to unlock offers”), reducing upsell opportunities. ❌ Ineffective Cart UI/UX (Pre-Side Cart) Full-page cart disrupted shopping flowCustomers had to leave their browsing journey, increasing friction and drop-offs. No quick add/remove functionality Users couldn’t easily modify their cart or add suggested products without navigating away. Solution To overcome these challenges, Anua implemented iCart’s side cart solution to transform their traditional cart into a high-converting, interactive experience. By replacing the full-page cart with a seamless side cart, the brand ensured that customers could continue browsing while viewing their cart, significantly reducing friction in the shopping journey. Additionally, features like product recommendations & progress bars for free shipping and discounts motivated customers to increase their cart value. By combining personalization, incentive-driven messaging, and a user-friendly interface, Anua successfully turned their cart into a powerful revenue-driving touchpoint rather than just a checkout step. To maximize their cart effectiveness, they implemented two powerful features: ✅ Progress Bar with Multi-Reward Incentives Implemented a tiered progress bar to encourage higher cart value Customers are guided with a clear message like “Add $3.10 to unlock secret offer,” motivating them to continue adding products. Generated over $5M+ in revenue through incentive-driven cart progression Used product-based rewards to align with customer intent Instead of generic discounts, Anua incentivized purchases with relevant skincare items like Dark Spot Pads and mini serums. Built visual motivation for routine expansion As customers add products, they can clearly track progress toward unlocking multiple rewards, encouraging them to build a complete skincare routine. ✅ Product Recommendations Implemented “Frequently Bought Together” recommendations Customers adding a single product (e.g., toner) are shown complementary items like serums, moisturizers, or pads to complete their routine. Generated over 275K revenue through in-cart recommendations Encouraged full skincare regimen building Instead of isolated purchases, the cart suggests step-by-step product combinations aligned with common skincare routines. Increased product discovery at the final stage By surfacing relevant items directly in the cart, Anua ensured customers explore more of their catalog without leaving the checkout flow. Results Achieved in Last 180 Days 22932 Total Store Orders 45101 Total iCart Orders 5X iCart Generated AOV 65.70% Upsell Affected Conversion Rate These improvements reflect a clear shift in customer behavior on Anua’s store. Cart abandonment reduced as shoppers discovered complementary skincare products and felt encouraged to build complete routines. Engagement also increased, with customers interacting more with in-cart recommendations and exploring relevant product pairings. Results & Impact And...Results is Our Main Clarification By implementing iCart’s cart drawer, product recommendations, and progress bar, Anua transformed its cart into a high-performing conversion touchpoint. Shopping Experience Enhancement The improved cart experience encouraged customers to discover complementary products and understand the value of sustainable beauty routines. For instance, the clear presentation of subscription savings alongside one-time purchase options helped customers make more informed decisions about their long-term hair care needs. As Anua continues to optimize its cart experience, the brand is closely monitoring: Routine-based purchasing behavior - tracking how customers move from single items to multi-step regimens Engagement with in-cart recommendations - measuring interaction with suggested products Cart value progression - analyzing how incentives influence higher spending [related_cases_slider] Ready to Write Your Success Story? Try icart App Join successful businesses like Anua and Master your delivery scheduling Delight customers with precise timing Grow your special occasion orders Expand your delivery reach
Read Blog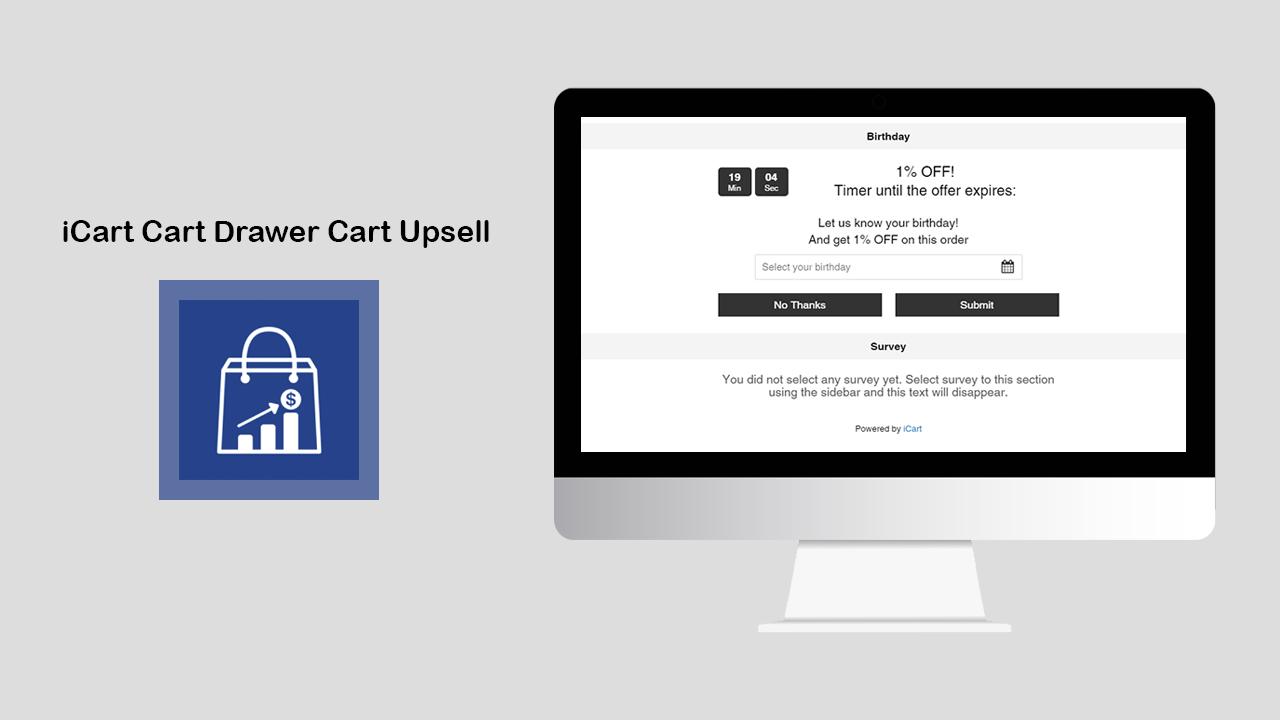
7 Min • 10 February 2026
How Birthday and Survey Widget of iCart Works on the Full Cart
iCart has made it simpler to collect the birthdays of your customers and collect feedback with its birthday collector and survey widget. The birthday collector widget will help you to collect the birthdays of your customers and offer them special discounts on their purchases. And the survey widget will help you to collect the experience of customers from your store. Let’s understand both widgets one by one. How to use birthday collector on the full cart? Birthday collector allows you to customize the following options: Widget heading With this option, you can change the heading text of the widget so that you can easily identify your widget from the widget list. Title Under this option, you can show/hide the title, change the heading of the title, change the heading background color, and widget background color. Settings Free text With the help of this option, you can add free text. Date format This option allows you to change the format of the date. Placeholder text Here you can add and edit the text of the placeholder Calendar icon color This option allows you to change the color of the calendar icon. Discount Discount type This option allows you to select the type of discount you want to offer your customers. You can select any of the 3 options from this: free shipping, percentage, fixed amount. Let’s see one by one how all these options work. To know how discounts work read this blog. Time-limited offer If you want to give a specific time for the offer then you can enable/disable it. By enabling it you can set the timer duration for the offer which would be seen by your customers. When timer runout When the timer runs out you can set any of the options i.e hide widget, show message & disable submit button, hide timer, reset timer. Button Under this option, you can add the text for the submit button, change the background color and text color of the submit button. No thanks button text You can change the text of this button and can change the background color and text color of this button. Thank you message Here you can add the thank you message text. Error message This option allows you to add the error message text Rules Rules are used to hide/show the birthday collector widget. This option allows you to change your condition based on different parameters like: Parameter You can show this widget based on different parameters like cart sum, number of items in the cart, a specific item, a specific collection, product tags, and user location. Condition You can set the condition from any of these options: is greater than, is lesser than, equals. Value Here you can enter the value that your customer’s cart must contain.Now let’s jump into an example to understand how these conditions work. This Rules option provides you 2 conditions i.e AND, OR.First we will see how the AND condition works: Suppose parameter > cart sum, condition > is greater than, value > 300. AND Parameter > a specific item, condition > is in the cart, value > shirtSo in this scenario, if both the condition meets the customer’s cart i.e if his cart sum is greater than 300 and one of the items added in his cart is a shirt then the birthday collector widget will be visible to him.Similarly, it works for other parameters too in AND condition.Now let’s see how OR condition works:Suppose parameter > number of items in cart, condition > is greater than, value > 2 OR Parameter > a specific item, condition > is the only item in the cart, value > shirtSo in this scenario, if any of the conditions meet the customer’s cart i.e if the number of items in his cart is greater than 2 or the shirt is the only item his cart contains then the birthday widget will be visible to him.Remember after applying any options, click on the Save button. Delete widget If you want to delete the widget then click on the delete widget button. After adding the birthday widget and customizing it using all these options finally it will look like as shown in the screenshot below: How to create a survey form on the full cart with iCart Cart Drawer Cart Upsell? Log in to your store and go to Settings > Surveys. By clicking on it you can create a survey form. Also, you can export CSV under this option. The survey widget allows you to customize the below options: Widget heading With this option, you can change the heading text of the widget so that you can easily identify your widget from the widget list. Title Under this option, you can show/hide the title, change the heading of the title, change the heading background color, and widget background color. Settings Select survey From this option, you can select the survey form that you have already created. Submit button text Here you can add the text for the submit button, change the background color of the submit button, and the text color of the submit button. Thank you message text Here you can add the message text that you want to display with the widget in the cart drawer. Error message text This option allows you to add the text for the error message. Placeholder text for free text questions Here you can add and edit the text of the placeholder. Placeholder text for dropdown questions Here you can add and edit the text of the placeholder for the dropdown questions. Discount By enabling this option you can give discounts for customers if they fill up the survey form. To know more details about this discount widget read this guide. Time limited offer If you want to offer a specific time for the offer then you can add it by enabling this option. So if the customer fills the form within the timer duration then they will get the discount that you have added. Apart from this you can change the placement of the timer, location of the widget, duration of the timer, color of the timer text, and timer background color. When timer runout When the timer runs out you can set any of the options i.e: hide widget, show message & disable submit button, hide timer, reset timer. Rules Rules are used to hide/show the survey widget. This option allows you to change your condition based on different parameters like: Parameter You can show this widget based on different parameters like cart sum, number of items in the cart, a specific item, a specific collection, product tags, and user location. Condition You can set the condition from any of these options: is greater than, is lesser than, equals. Value Here you can enter the value that your customer’s cart must contain. Now let’s jump into an example to understand how these conditions work. This Rules option provides you 2 conditions i.e AND, OR. First will see how AND condition works: Suppose parameter > cart sum, condition >? Is greater than, value > 300 AND parameter > a specific item, condition > is in the cart, value > shirt. So in this scenario, if both the condition meets the customer’s cart i.e if his cart sum is greater than 300 and one of the items added in his cart is a shirt then the survey widget will be visible to him. Similarly, it works for other parameters too in AND condition. Now let’s see how OR condition works; Suppose parameter > number of items in cart, condition > is greater than, value > 2 OR Parameter > a specific item, condition > is the only item in the cart, value > shirt. So in this scenario, if any of the conditions meet the customer’s cart i.e if the number of items in his cart is greater than 2 or the shirt is the only item his cart contains then the survey widget will be visible to him. Remember after applying any options click on the Save button. Delete widget If you want to delete the widget then click on the delete widget button.
10 Min • 25 June 2026
Get Instant Sales with QR Codes for Your Shopify Store (Best Methods to Add)
A customer scanning a code on your packaging or printed flyer can land on a pre-loaded checkout in seconds. I have added a QR code in the Shopify store in under two minutes, and Shopify now offers more native options than ever before. Whether you want a free Shopify QR code generator, a product-specific Shopcode, or a dynamic code with full scan analytics, I have covered every QR code Shopify merchants need in 2026. What makes a QR code Shopify's most underused growth tool? A QR code for Shopify is a scannable 2D barcode that links customers directly to a specific page in your store. It can be a product listing, a pre-loaded checkout, or a discount landing page. Every modern smartphone reads one through the camera app with no additional download required. The numbers back this up. A GS1 US consumer survey found that 79% of shoppers are more likely to purchase a product with a scannable QR code. For Shopify merchants specifically, the opportunity is clear. Every QR code Shopify merchants place in the physical world is a direct link to a sale. There are two types of QR codes you should know about before choosing a method: Static QR codes encode a fixed URL. Once printed, the destination cannot be changed. Good for permanent product pages. Dynamic QR codes point to a redirect URL you control. You can update the destination without reprinting, and you get scan analytics, including scans, unique visitors, and location data. Method 1: Free Shopify QR code generator Shopify's free QR code generator lets you create a code in about 60 seconds with no Shopify account required. Enter a URL, your email address, and the tool sends you a downloadable code file. Best for: Quick one-off codes for your homepage, a specific product page, a sale collection, or a campaign URL. Key limitation: These are static codes. Once printed, the destination URL is locked. If the URL changes, you need to reprint. Steps: Go to Shopify's free QR code generator. Select your content type. The four options are website URL, phone number, SMS, and plain text. Website URLs are the most useful for store traffic. Paste your destination URL: product page, collection, homepage, or discount URL. Enter your email address. Click Send QR code. Download from your inbox and deploy. The code never expires and has no scan limit. For a single campaign or permanent signage, this Shopify QR code generator's free option is all you need. Method 2: Shopcodes, Shopify's native QR code creator Shopcodes is Shopify's native QR code creator. Of all the Shopify QR code creator options available, Shopcodes is the most tightly integrated. Unlike the free generator, Shopcodes ties codes to specific products and lets you attach a discount code to the scan destination. Best for: Product-specific codes that send customers straight to a product page or a pre-loaded checkout. Key limitation: Shopcodes generates standard codes with limited visual customization. You cannot add brand colors or logos to the code itself. Steps to install and create a Shopcode: From your Shopify admin, go to Apps and search for Shopcodes. Click Install, then Install app. Open the Shopcodes app and click Create Shopcode. Enter an internal title for the code. Under Scan Destination, choose one of the following: > Link to a product page: Send the customer to the product listing. > Link to checkout page with product in cart: Skips browsing entirely and puts the product in the customer's cart. If you selected checkout, optionally choose a specific variant. To attach a discount code, select one from the Discount section. Note: the discount attachment option only appears when you select the checkout destination, not the product page option. Click Save, then Download. Downloaded codes come as a zip file containing a PNG for digital use and an SVG for print. For events, packaging inserts, or pop-up displays, the SVG is the version to give your printer. Method 3: Third-Party Shopify QR code generator apps When you need dynamic codes, bulk generation, or UTM tracking that flows into Google Analytics, I would always suggest a third-party app. Best for: Marketing campaigns with multiple destinations, branded packaging, and bulk code creation across a large product catalog. Here are three Shopify QR code apps that I have tried and tested. o2o – QR Codes Unlimited: Dynamic codes with customizable branding, bulk creation, discount integration, and detailed scan analytics. Free plan available. Spice QR Codes Generator: All codes are dynamic by default. Automatically generates UTM codes so scans show up correctly in Google Analytics. Also adds QR codes to invoices, packing slips, and post-purchase emails automatically. QodeVault QR Code Generator: Built for merchants who need bulk generation and real-time scan analytics across large catalogs. For more on building a high-converting page that captures traffic after the scan, read my guide on Shopify product page optimization for merchants. Shopify gift card QR code Every Shopify gift card automatically generates a unique QR code identifier. When a customer receives a digital gift card by email, Shopify adds a unique QR identifier into the card that can be scanned at POS. Here is how the Shopify gift card QR code works: A customer purchases or receives a digital gift card from your store. Shopify emails the gift card with a redemption code and, if you have activated Apple Wallet Passes, an Add to Apple Wallet button. The Apple Wallet pass displays your store information, the gift card's active balance, and a unique QR code. At your physical store or event, staff can scan the QR code using a 2D scanner or the camera on an iPad running Shopify POS. How to activate Apple Wallet Passes for your gift cards: Go to Shopify Admin > Settings > Payments. Scroll to the Apple Wallet Passes section and click Customize. Check Activate Apple Wallet Passes for gift cards. Optionally, customize the text, colors, and banner image that appear on the pass. Click Save. For a complete guide to setting up gift cards and understanding how they work, see my guide on how Shopify gift cards work in 2026. 6 high-converting ways to use QR codes in your store 1. Product packaging for repeat purchases Place a QR code on your packaging that links to a pre-loaded checkout with the same product in the cart. Attach a discount code to the Shopcode to reward repeat purchases. Shopcode app handles this natively. Check out my complete guide to creating a discount code in Shopify in 2026. 2. Pop-up events and in-person markets Running an event with limited stock on hand? Place a QR code at your booth that links to the full product collection on your Shopify store. Customers who want a different size or color can order on the spot without you needing to carry every variant. Shopify POS handles the in-person sales, and the QR code handles overflow orders. My detailed guide to Shopify POS covers how to set up the hardware and sync inventory across both channels. 3. Printed flyers and direct mail for discount campaigns Flyers and direct mail benefit from QR codes because they eliminate the need to type a URL. Customers can scan the code, and the discount is already applied at checkout. Merchants can use a dynamic code from a third-party app, so they can update the destination if a campaign extends or the discount changes. 4. Store window displays to sell after hours A "Scan to shop" QR code in your window display lets your store make sales even when the doors are closed. Anyone walking by who stops to look can scan and browse the full collection on their phone. Display a dynamic QR code here so you can change the destination for seasonal campaigns. 5. Out-of-stock products to capture interest When a product runs out, place a QR code near it or on any empty shelf display. Link it to a waitlist form or to similar in-stock products. The interested shopper does not have to leave empty-handed. You capture the intent instead of losing it. To wrap it up, here are the QR code best practices I use Minimum print size: A QR code needs to be at least 2 cm x 2 cm to scan reliably. For large format signage, size up proportionally. Smaller codes on packaging should still meet the minimum. Quiet zone: Keep a clear white border around the code equal to at least four modules (the small squares that make up the code). Contrast: A high contrast between the dark modules and the background is required. The safest option I have experience with is a dark code on a light background. Avoid reversing it to light on dark unless your code generator tests for readability. Add a CTA near every code: "Scan to shop," "Scan for 15% off," or "Scan to reorder" tells the customer why they should scan. Test on multiple devices before printing: Print a test copy at actual size and scan it with at least two different phones. What scans perfectly on a high-end device can fail on an older one. Use UTM parameters for trackability: Add UTM source, medium, and campaign tags to your destination URL. Dynamic QR code apps handle this automatically. For static codes, build the UTM URL manually using Google's Campaign URL Builder before generating the code. FAQs 1. Are Shopify QR codes free? Yes. Shopify has a free QR Code Generator that anyone can use, and it allows unlimited usage with no hidden costs or limitations. For Shopify merchants, the official Shopcodes app is also free 2. How do I create a QR code in Shopify? For a general QR code, use Shopify’s free QR Code Generator, select the data type like website URL, phone number, SMS, or plain text, add the details, enter your email, and generate the code. For a product-based QR code inside Shopify, install Shopcodes, go to Apps > Shopcodes > Create Shopcode, choose whether it should open the product page or checkout with the product in cart, then download the QR code. 3. Does Shopify have a QR code? Yes. Shopify has Shopcodes, an official Shopify app that creates scannable QR codes connected to specific products. These QR codes can send customers to a product page or directly to checkout, and Shopify also supports scan and conversion tracking through Shopify Analytics. 4. What is the best free Shopify QR code generator? Shopify's own free QR code generator tool is the easiest option. It is completely free, requires no account, and delivers the code to your email in under a minute. The only limitation is that it creates static code. For dynamic codes with scan analytics, you will need the Shopcodes app or a third-party Shopify QR code generator app. 5. What is a Shopify gift card QR code? Every Shopify digital gift card includes a unique QR identifier that can be scanned at Shopify POS. When you activate Apple Wallet Passes in Shopify Settings, gift card emails include an "Add to Apple Wallet" button. The wallet pass displays the balance and a QR code that staff can scan to apply the gift card at checkout. 6. Are Shopify QR codes dynamic or static? Shopify's free QR code generator creates static codes only. Shopcodes creates static codes tied to a specific product destination. Third-party apps like o2o and Spice QR Codes Generator create dynamic codes by default, which means you can update the destination URL after printing and track scan analytics. 7. Can I track who scans my Shopify QR code? With dynamic QR codes from third-party apps, you get scan data including total scans, unique scanners, scan timing, and geographic data. Shopcodes provides a basic analytics report inside your Shopify admin, showing scans and conversions. Static codes from the free Shopify QR code generator tool provide no native tracking.
8 Min • 12 February 2026
Why Identixweb’s IPO Matters for Shopify Merchants & Developers
It is with great excitement that we expand our footprint in the e-commerce technology space in India through the IPO of Identixweb Limited. As Shopify continues to revolutionize global e-commerce, Identixweb is positioned at the forefront of this transformation, creating a unique investment opportunity at the intersection of technology and digital retail. We are gearing up for our entry into the public market, and here’s a comprehensive overview of everything Shopify merchants, developers, investors and stakeholders need to know about our offering and the Identixweb growth story. Here's everything you need to know about our offering and the growth story behind Identixweb. About Identixweb Limited’s Journey At Identixweb Limited, we manifested our growth and evolution in the plethora of Shopify ecosystem. We are an established name in creating personalized solutions for the design and development of Shopify apps, tailoring them for better merchant experience while they are running their Shopify stores built on the platform of new advanced technology. As our vast majority of revenue comes from serving the merchant ecosystem from Shopify, which makes us the beating heart of creating one of the fastest-growing and evolving Shopify app development platforms. We make sure to provide highly scalable solutions for all kinds of industries that help businesses streamline operations and optimize sales for their Shopify stores. Behind the Decision! Explore Why Identixweb Chose to Go Public and what it means for the future of eCommerce. Getting to Know the Shopify Ecosystem: Our Growth Engine The e-commerce industry, and the Shopify ecosystem specifically, has become one of the biggest growth driver of the global digital economy. The IT & BPM sector is contributing around 6.8% in fiscal 2023 to India’s GDP with specialized e-commerce technology services witnessing the strongest growth. The Shopify ecosystem is flourishing and Identixweb is at the centre of it due to our exclusive business model which caters to Shopify merchants. We generate our revenue primarily from our only major customer, Shopify Inc., which operates a platform for over two million merchants around the world. Our focus also enables us to seize a growing demand from enterprises looking for niche solutions to improve their Shopify stores. Identixweb IPO Details: What You Need to Know Understanding the Offering and Price The IPO is being made through what's called a "Book Building Process" – a method where investors bid within a price range, helping determine the final offer price. Here are the key details in simple terms: Price Range: ₹51 to ₹54 per share (each share has a face value of ₹10) Floor Price: 5.10 times the face value (the minimum price) Cap Price: 5.40 times the face value (the maximum price) P/E Ratio: This measures the company's share price relative to its earnings. At our offering, this ratio is between 13.21-13.99 times, which tells you how many years of current earnings you're paying for when buying the share. Minimum Investment: 2000 shares (and in multiples of 2000 thereafter) Key Dates to Remember Anchor Investor Bidding: Tuesday, March 25, 2025 Public Offering Opens: Wednesday, March 26, 2025 Public Offering Closes: Friday, March 28, 2025 How the Shares Will Be Distributed The offering is structured to accommodate different types of investors: Qualified Institutional Buyers: Up to 50% of the offering Non-Institutional Investors: At least 15% of the offering Retail Individual Investors: At least 35% of the offering Market Makers: 1,54,000 shares (about 5% of the offering) to ensure liquidity Invest in the Future! Learn the step-by-step process on How to Apply for Identixweb IPO and secure your stake in the company. Financial Highlights: Growth You Can See Identixweb has shown strong financial performance, reflecting our efficiency and market acceptance. Here's a simplified look at our recent results: Return on Investment (Return on Net Worth) Financial Year Return on Net Worth Weight 2024 27.30% 3 2023 29.32% 2 2022 68.78% 1 Transaction Fees Standard fees Lower transaction fees with Shopify Payments Our weighted average return stands at an impressive 38.26%, showing how effectively we've used our resources to generate value for our shareholders. The company has maintained healthy profit margins while strategically growing our service offerings, resulting in solid financial fundamentals that support our future growth plans. Income and Profit Growth With prudent management of resources and disciplined expansion of our service offerings, the company has demonstrated significant growth in revenue and profitability. This has led to better margins and increased shareholder value over the long run. Why Invest in Identixweb IPO? The Shopify Merchant Advantage Shopify Growth Trajectory: We are directly parallel to Shopify’s explosive growth and its expansion in global markets as businesses increasingly transition online. Under the platform, we have a large customer base allowing us to customise our apps based on their feedback. Niche Expertise: Unlike other IT service providers who have to spread their resources across many platforms, we are only engaged with Shopify applications and have deep expertise and a competitive advantage in this high-growth sector. Robust Financial Growth: Our steady financial growth proves the growing demand and efficient operation for specialized Shopify development. Shopify Partnership: Our partnership with the elements of the Shopify ecosystem leaves us well-positioned to ride the success wave of Shopify as it continues its development and expansion. Well Defined Growth Strategy: We have a clear blueprint in place outlining how we will develop new Shopify apps and expand our offering into the global Shopify merchant market. Our Future Proceedings: Expanding Our Shopify Solutions The new addition to the Shopify ecosystem, the net proceeds we raise from the IPO will be deployed strategically to accelerate our momentum in the Shopify ecosystem: Building innovative new applications for Shopify merchants that meet new e-commerce needs. Bringing in additional Shopify-focused resources onto our dedicated Shopify development team. Expanding our marketing capabilities so that we can access more Shopify merchants around the world. Making investments in R&D in order to keep ahead of changes to the Shopify platform and requirements from merchants. These advances are in line and consistent with our aim to be the leading solutions developer for all Shopify merchants around the world. They allow us to scale quickly while remaining true to our ability to deliver quality and innovation in the Shopify ecosystem. Shopify-Focused Competitive Advantages While gearing up for our public offering, we’d like to play up a few core strengths that uniquely position us in the Shopify ecosystem: That's why we have developed deep and expert-level skills in tailoring Shopify application development and building your needs into a solid solution for difficult e-commerce pain points. We also have solid relations with the Shopify platform, creating apps that work smoothly with their ecosystem and improve merchant options. Because we have a deep understanding of the needs of Shopify merchants, we’re able to create targeted solutions that drive measurable business results. Agile development methodology that works excellently within the fast-moving Shopify ecosystem allows for speedy delivery and iterative enhancement of applications. Servicing merchants with deep domain knowledge of changing e-commerce trends and Shopify capabilities, our team is a trusted advisor on tech excellence. Leadership and Vision The team at Identixweb consists of experienced and qualified professionals from the IT industry. Our promoters combine years of expertise that helped fuel our growth and shape our market expansion. By doing so, they have successfully instilled a legacy of their vision of guiding the company with a focus on their clients and technology. The Bottom Line: Be a Part of Our Shopify Success Story Join us in our journey to becoming one of the pioneering companies in the rapidly growing Shopify ecosystem. We are thrilled they invite us to reach new heights and become publicly traded. Tangible globally and impactful locally, the IPO is much more than finance. It is a reaffirmation of our mission to deliver innovation that allows Shopify merchants across the globe to access everything they need to power their businesses. The company has received in-principal approval from BSE Limited on the BSE SME platform for listing the shares, with BSE Limited being the designated stock exchange for the issue. We're solely set up to help Shopify merchants and our business model places us smack bang in the middle of one of the fastest growing global e-commerce platforms. The more merchants that adapt to online selling through Shopify, the more growth opportunities exist for us. For other details of the IPO, please refer to the Red Herring Prospectus and make investment decisions as per your financial goals and risk appetite. Frequently Asked Questions 1. When is the Identixweb IPO opening?The IPO opens on Wednesday, March 26, 2025, and closes on Friday, March 28, 2025. The anchor investor bidding date is Tuesday, March 25, 2025. 2. Where will Identixweb shares be listed?Identixweb shares will be listed on the SME platform of BSE Limited ("BSE SME"). BSE Limited will be the designated stock exchange for this issue. 3. What is the price band for Identixweb IPO?The price band for the Identixweb Limited IPO is ₹51 to ₹54 per equity share of face value ₹10 each. 4. What is the financial performance of Identixweb?Identixweb has demonstrated consistent financial growth. The company's weighted average return on net worth stands at 38.26% (based on the financial data provided in the prospectus), showcasing its ability to generate substantial returns for shareholders.

Sajini Annie John
2 Min • 10 February 2026
7869 Views

Sajini Annie John
11 Min • 10 February 2026
8094 Views

Sajini Annie John
5 Min • 10 February 2026
9578 Views

Sajini Annie John
3 Min • 10 February 2026
8345 Views

Sajini Annie John
3 Min • 10 February 2026
9941 Views

Sajini Annie John
3 Min • 10 February 2026
13958 Views

Sajini Annie John
2 Min • 10 February 2026
13664 Views

Sajini Annie John
1 Min • 10 February 2026
13258 Views

Sajini Annie John
1 Min • 10 February 2026
13280 Views

Sajini Annie John
2 Min • 10 February 2026
13047 Views

Sajini Annie John
2 Min • 10 February 2026
14180 Views

Sajini Annie John
4 Min • 11 November 2025
7700 Views


