




To set up a custom shipping profile in Shopify, go to Shopify Admin → Settings → Shipping and delivery → Shipping profiles → Add custom profile. Add the required products or variants, assign fulfillment locations, create shipping zones, and configure shipping rates based on your requirements. Custom shipping profiles help merchants manage different shipping rules for products like fragile, heavy, oversized, or region-specific items without affecting their entire catalog.
Shipping gets complicated when you can't treat every product the same way.
A T-shirt, glass vase, and 20-pound bag of pet food might all sit in the same Shopify store. But charging the same shipping rate for each can hurt your margins.
Shopify shipping profiles solve this by grouping products with similar shipping needs. It controls where they ship from, where they can ship to, and what customers pay.
This guide covers products, variants, fulfillment locations, shipping zones, rates, multiple warehouses, and the checkout issues merchants should test before going live.
What Are Shopify Shipping Profiles?
Shopify defines a shipping profile as a set of shipping rules for specific products and locations. Stores get a General shipping profile by default, while custom profiles handle products that need different rates.
| Shipping profile | Best for | What happens |
| General shipping profile | Products using the same shipping rates | Products stay here unless moved to a custom profile |
| Custom shipping profile | Fragile, oversized, heavy, or other special products | Selected products or variants get their own locations, zones, and rates |
Shopify currently allows up to 99 custom shipping profiles for stores using the shipping-profile system.
A product or variant can belong to only one profile at a time. Adding it to another profile automatically removes it from the previous one.
When do you need a custom shipping profile?
You need a custom shipping profile when certain products need different shipping rules from the rest of your catalog.
I will explain this better with a few examples below:
- Furniture or oversized products: Use a separate profile when these products need higher flat rates or special delivery charges.
- Fragile items: Create one when products such as glassware require extra packaging and higher shipping costs.
- Heavy products: Use a separate profile if shipping charges need to be calculated differently based on weight.
- Products sold only in selected regions: Use a separate profile when certain items should ship only to specific countries, states, or regions.
- Products with free shipping: Create a profile when only selected products should qualify for a $0 shipping rate.
- Products needing carrier-calculated rates: Use a separate profile when only certain products need live carrier rates instead of your standard flat rates.
If most products follow the same shipping rules, keep them in the General shipping profile and create custom profiles only where there is a real difference in cost, location, or delivery requirement.
What to prepare before setting up a shipping profile
Before creating a profile, I normally map these four things.
1. Products
Decide which products or variants genuinely need different shipping treatment.
For example, a home decor store will keep cushions and small accessories in the General profile. They move large mirrors into a custom profile because they require protective packaging and higher shipping charges.
2. Fulfillment locations
Check where the products are stocked and fulfilled. Locations can represent warehouses, retail stores, fulfillment partners, and other order origins.
When a shipping profile is created, eligible online-fulfillment locations are added to it. Locations can share one location group when they use the same zones and rates, or be separated when shipping rules differ.
3. Shipping zones
A shipping zone is a group of countries or regions that share shipping rates. You might create zones such as Domestic, Canada, Europe, or selected international countries.
4. Shipping rates
Shopify supports flat rates, order-value-based rates, weight-based rates, carrier or app-calculated rates, and free shipping.
How to create a Shopify shipping profile step by step
Step 1: Open Shipping and Delivery
From the Shopify admin, go to:
Settings > Shipping and delivery
Under Shipping profiles, you will see the General profile and any existing custom profiles.
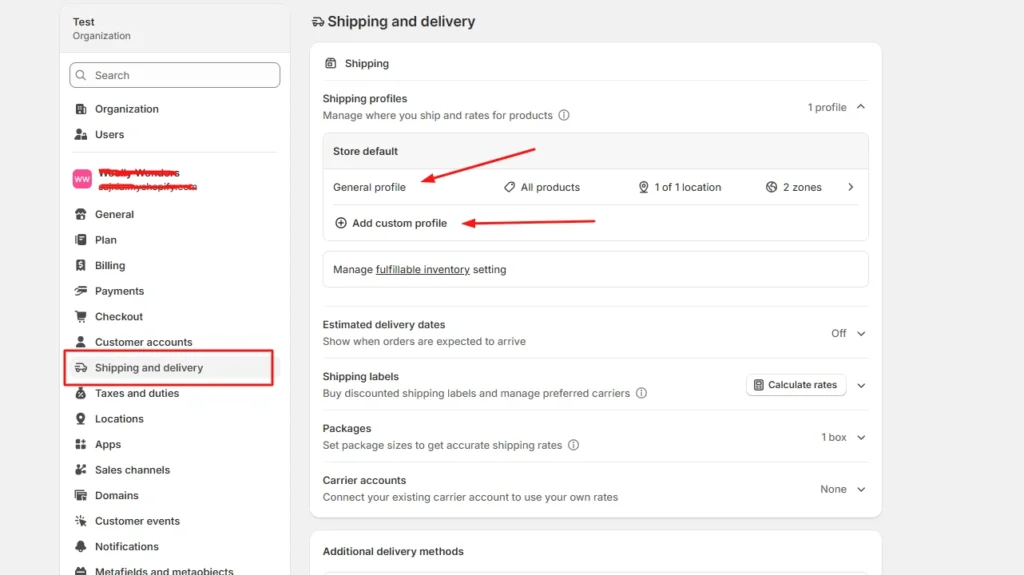
Step 2: Create a custom shipping profile
Click Add custom profile and enter a clear name, such as:
- Heavy Products
- Fragile Items
- Furniture
- Free Shipping Products
- US Warehouse Products
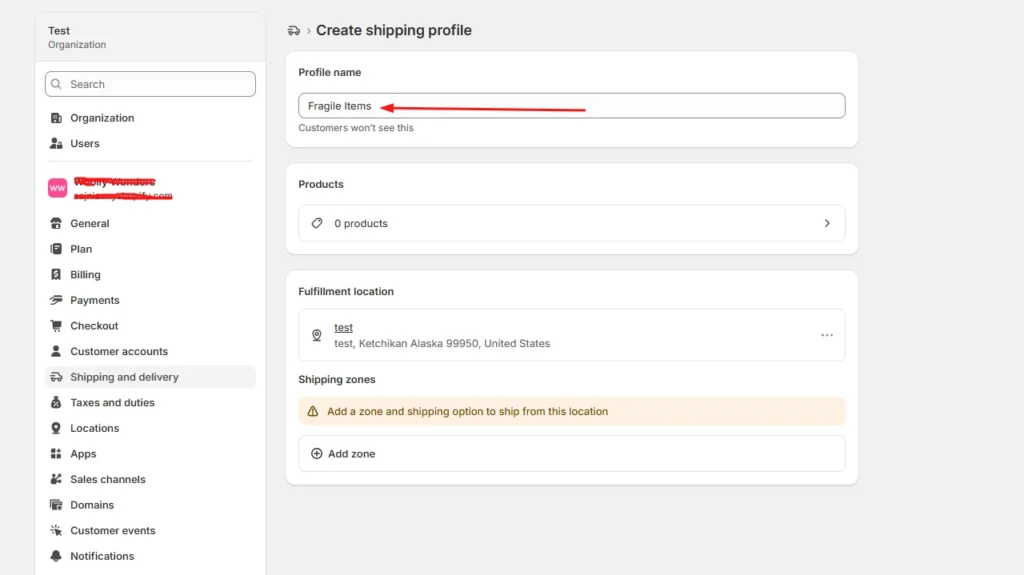
Step 3: Add products or variants
You can also see the Products section just below the Profile name section.
A product or variant can belong to only one shipping profile at a time. This becomes especially useful when only certain variants need different shipping rules, while the rest of the product can stay in the General profile.
For example, a merchant selling framed prints might keep the standard-size variants in the General profile. They will move only the oversized frame variant into a custom profile if it needs higher shipping charges, different packaging, or a different fulfillment method.
Step 4: Configure fulfillment locations
Review Fulfillment locations.
If several warehouses should use the same zones and prices, keep them in the same location group. If one warehouse needs different rules, separate it.
For example:
- New York: United States
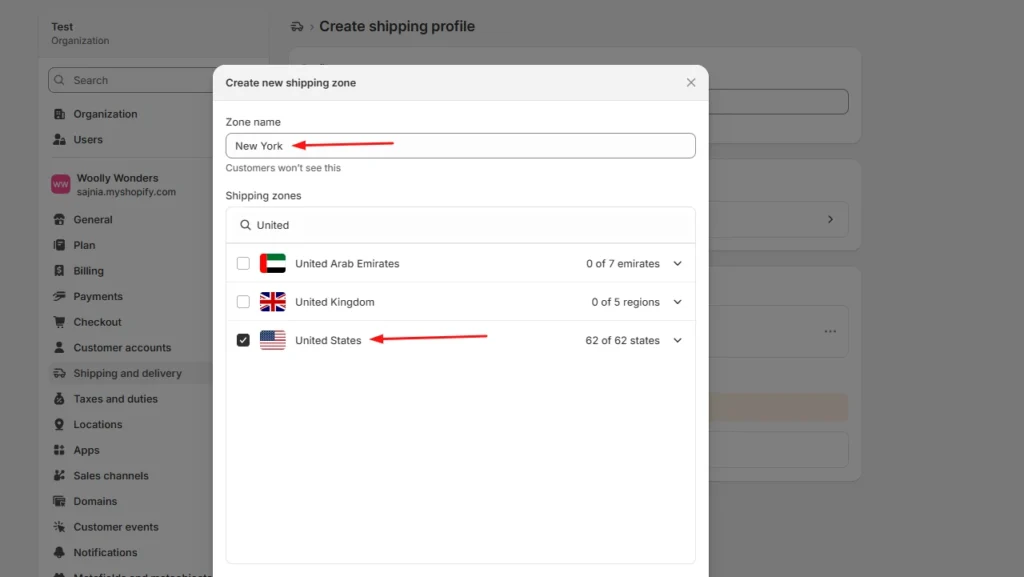
Each location group can have its own zones and rates.
Step 5: Create shipping zones
For each location group, click Add zone, name it, select the countries or regions, and click Done.
For example, a US merchant may create a West Coast zone for California, Oregon, and Washington with a lower shipping rate. They may place Alaska and Hawaii in a separate zone because delivery there costs more.
Separate zones help merchants charge rates that better reflect the actual cost of shipping to different regions.
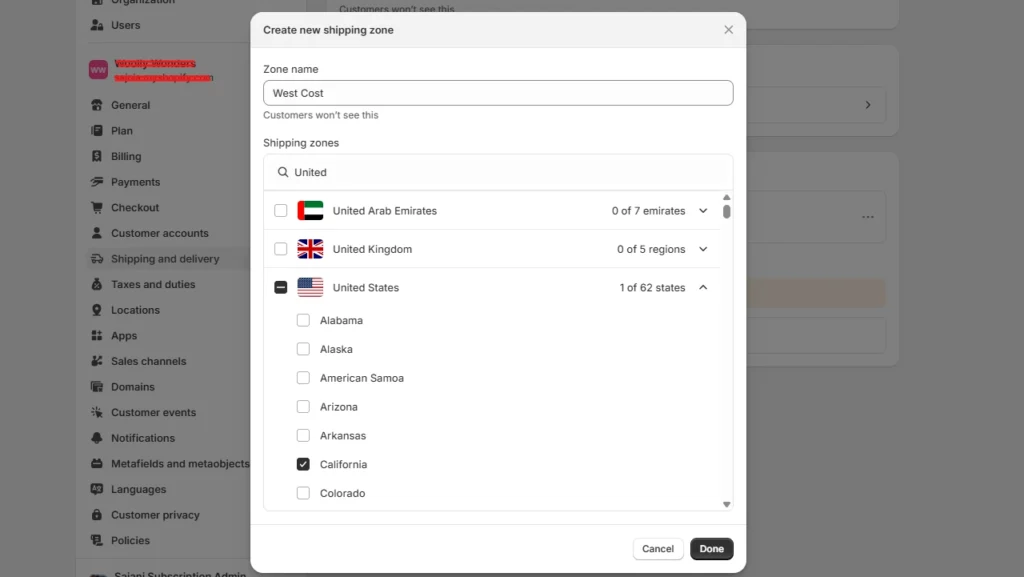
Build zones around actual delivery coverage and cost. If certain regions are significantly more expensive to serve, separate rates will be more practical.
Step 6: Add shipping rates
Inside each zone, click Add shipping option and choose the rate type.
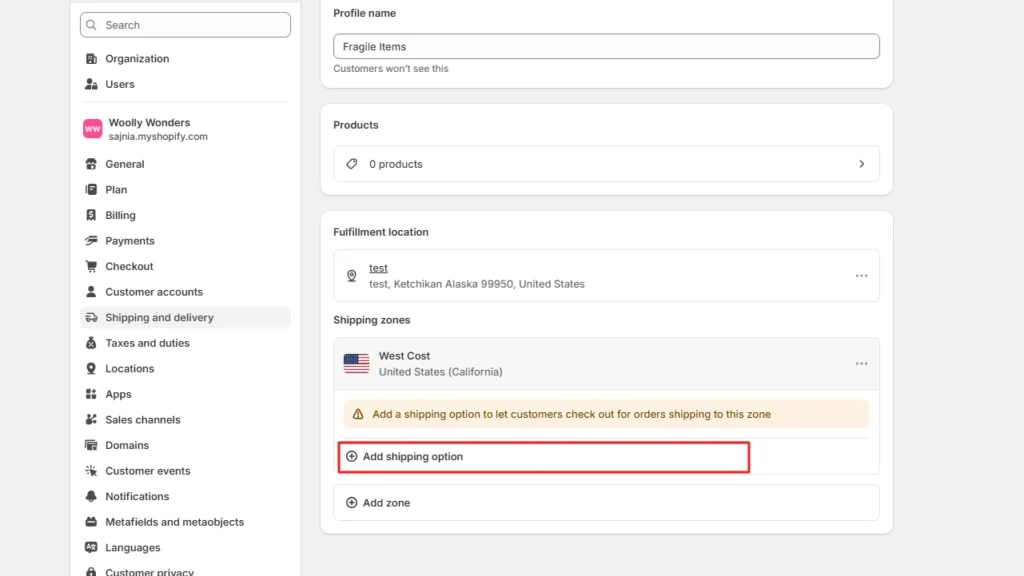
- Flat rate: Charge one fixed amount, such as $7 for Standard Shipping. This works well when shipping costs are predictable.
- Order amount-based rate: Change shipping by cart value. A store could charge $8 below $50, $5 from $50 to $99.99, and offer free shipping from $100.
- Weight-based rate: Charge according to shipment weight. This suits food, hardware, liquids, bulk goods, and similar products. Make sure product weights are accurate, and your tiers cover the full expected weight range.
- Carrier or app-calculated rate: Let an eligible carrier or app calculate shipping from information such as weight, destination, and package details.
Step 7: Save and test
Click Save, then place test orders using realistic combinations:
- A product from the General profile
- A product from a custom profile
- Products from two profiles
- Products fulfilled from different locations
- Different domestic or international addresses
- Orders above and below free-shipping thresholds
Need Help Configuring Your Shopify Shipping Settings?
As product catalogs, fulfillment locations, shipping zones, and rate rules grow, managing everything accurately can become difficult.
For example, a merchant may sell standard products from one warehouse, oversized items from another, and charge different rates for Alaska and Hawaii.
If these rules are not configured properly, customers may see the wrong rate, duplicate charges, or no suitable shipping option at checkout.
That’s where Identixweb can help. Our Shopify Store Settings Configuration service helps merchants configure complex shipping, payment, tax, and checkout settings so everything works correctly together.
What happens when products come from different profiles?
I get this question a lot. Under the current shipping-profile system, Shopify can combine shipping rates when an order contains products from different profiles or requires different location groups.
Example:
| Product | Profile shipping rate |
| T-shirt | $4 |
| Fragile mug | $7 |
| Possible combined charge | $11 |
In this case, the customer may see an $11 shipping charge at checkout because Shopify is combining the applicable rates from both profiles.
The setup may be technically correct, but the final charge can still feel high to the customer.
That’s why merchants should test mixed-profile orders before going live, especially when customers commonly buy products from different profiles together. This helps confirm that the final shipping cost is reasonable and avoids unexpected checkout charges.
Common Shopify shipping profile mistakes I see
#1 Creating too many profiles
This is the most common mistake I encounter with merchants. More profiles do not automatically improve shipping. Start with the General profile and add a custom profile only when a real cost, destination, or fulfillment difference exists.
#2 Ignoring mixed-cart costs
A rate that looks reasonable for one item but when the customer adds another item with a different profile, the shipping rates increase. Always test mixed carts before creating a profile.
#3 Using inaccurate weights
Weight-based and calculated rates depend on accurate product data. Incorrect weights can lead to inaccurate checkout charges.
#4 Creating zones without checking markets
A country appearing in a shipping zone is not enough if that country is not in an active market.
Set up Shopify shipping profiles the right way
A well-planned Shopify shipping profile helps merchants charge more accurate shipping rates without making fulfillment unnecessarily complicated.
The key is to group products only when their shipping costs, destinations, or fulfillment requirements are genuinely different.
Start simple, test mixed-product carts, review location-based rates, and update profiles whenever products, warehouses, or shipping costs change. A clean setup makes checkout easier for customers and shipping easier to manage as the store grows.
FAQs
1. How to add products to a shipping profile in your Shopify store?
Go to Settings > Shipping and delivery > Shipping profiles, open or create a custom profile, and select the products you want to add from the Products section. A product or variant can belong to only one shipping profile at a time, so adding it to a custom profile automatically removes it from its previous profile.
2. What is the difference between a general and custom shipping profile?
The General shipping profile is Shopify's default profile and automatically applies to products that aren't assigned to a custom profile. A custom shipping profile is used when certain products need different shipping rates, zones, or fulfillment rules, such as fragile, heavy, or oversized items.
3. Can I offer free shipping for any selected products?
Yes. To offer free shipping only on selected products, add those products to a custom shipping profile and create a flat shipping rate with the price set to $0 or enable free shipping for that rate.
4. Does shipping increase when customers buy two products in different shipping profiles?
Yes. When products from different shipping profiles are purchased together, Shopify combines their applicable shipping rates and displays one total rate at checkout, which will make the final shipping charge higher.
5. Should I use flat or carrier-calculated shipping rates in Shopify?
Use flat rates when shipping costs are predictable, and you want a simple, consistent checkout experience. Use carrier-calculated rates when costs vary significantly by destination, package weight, dimensions, or delivery speed.

About the author
Vineet Nair
Vineet is an experienced content strategist with expertise in the ecommerce domain and a keen interest in Shopify. He aims to help Shopify merchants thrive in this competitive environment with technical solutions and thoughtfully structured content.