Once you create a new size chart, you’ll be redirected to the “Edit Page”, where you can easily modify the data within your size chart to suit your needs.
If you’ve already created a size chart earlier and wish to make changes to it, simply go to the “Dashboard”. From the list of tables, click on “Edit” under the “Action” column next to the chart you want to update.
While editing a size chart, you’ll see the tabs at the top of the editor. These tabs give you complete control over how your size chart looks, behaves, and is managed. The tabs are as follows:
1. Table Data
2. Table Display Rules
3. Table Design
4. Import
5. Export
6. Preview
Let’s now go through each of these tabs in detail to help you understand their purpose and how you can use them effectively.
Table Data
Whether you’re managing clothing sizes or detailed product info, this section lets you fully customize your chart content to fit your needs — and more importantly, make things clear and easy for your customers.
Let’s walk through each option available in the Table Data section and how you can make the most of them.
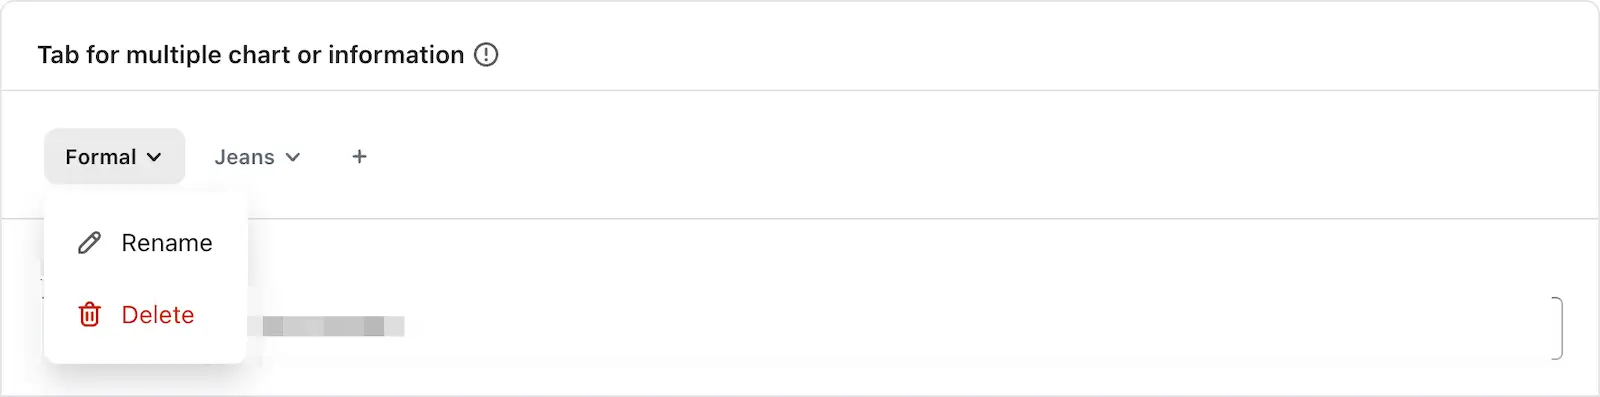
➞ Tab for Multiple Charts or Information
Have different variations of the same product? No problem! With this feature, you can create separate tabs within a single chart to showcase different size guides. You can click on the arrow next to tab name for “Rename” or “Delete” the tab.
Example:
For a “Pants” category, you might want a separate chart for Formal Pants and another for Jeans. Instead of cluttering everything together, just create a tab for each — keeping it clean and simple for your shoppers.
This not only looks better but makes navigation easier too!
➞ Header
Headers help identify your chart at a glance.
You can add a title at the top of your chart that describes what it’s about — for example:
“Men’s Formal Pants Size Chart”
A clear title helps customers immediately understand which product the size chart is for.

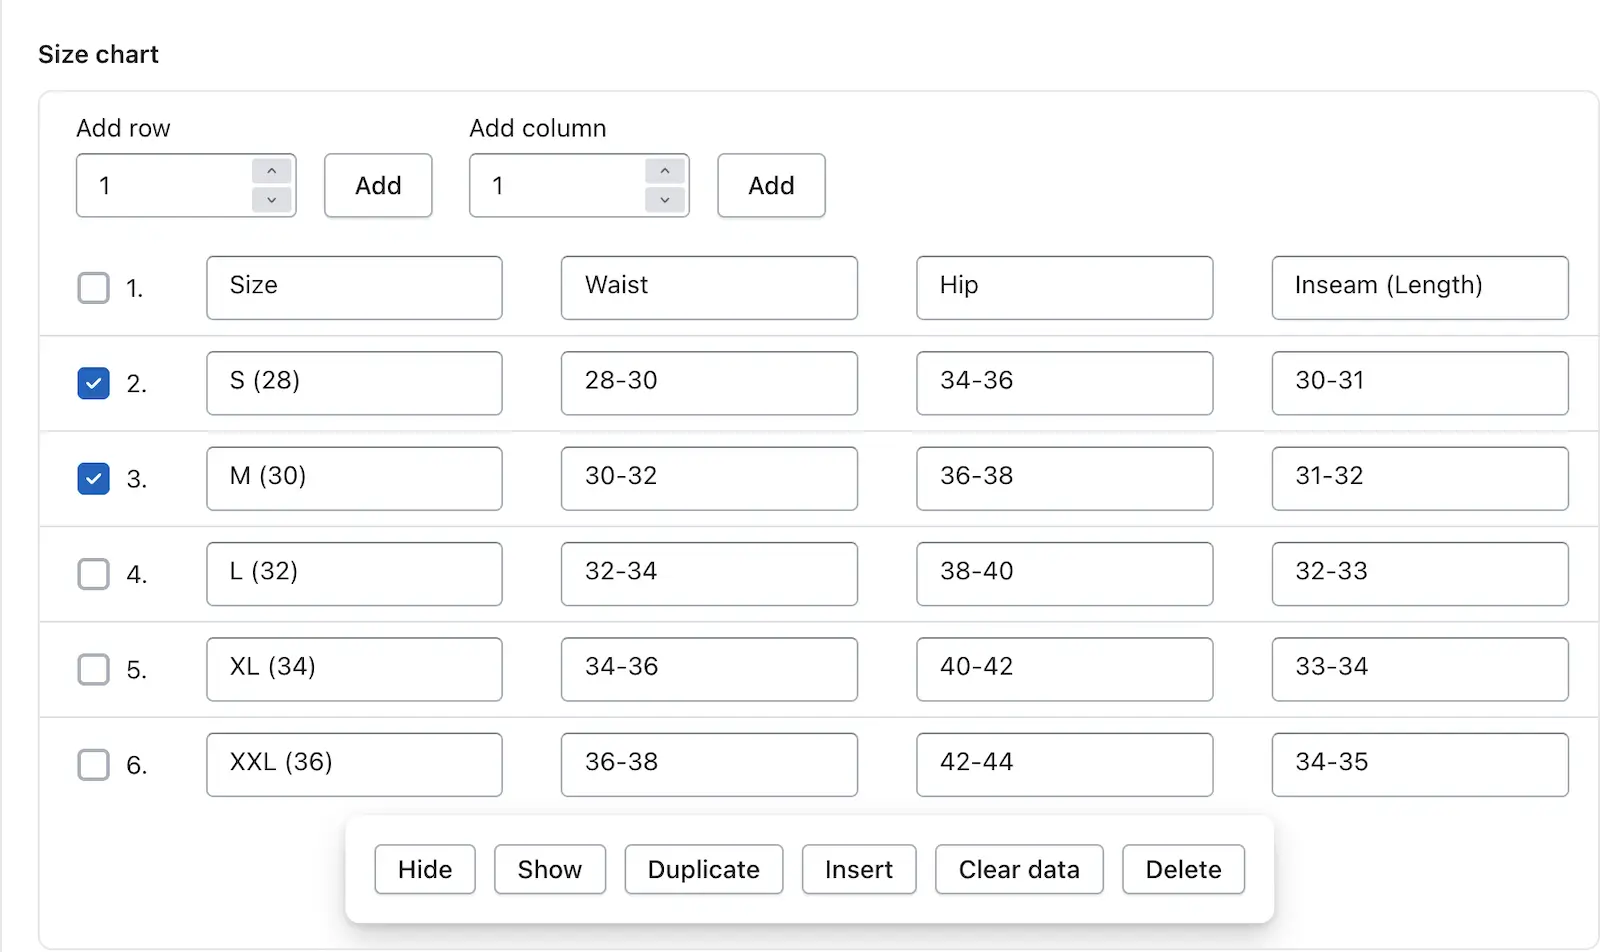
➞ Size Chart
This is where your actual chart data lives.
In this section, you can:
- Add rows and columns to fit your data
- Click to edit each individual cell
- Use quick actions by selecting a row or column:
Hide: Temporarily hide selected row/column
Show: Reveal hidden rows or columns
Duplicate: Create a copy of a row or column
Insert: Add a new row or column next to the selected one
Clear Data: Remove data from row/column without deleting the structure
Delete: Permanently remove the selected row or column
These tools help you manage data quickly, especially if you’re making updates often.
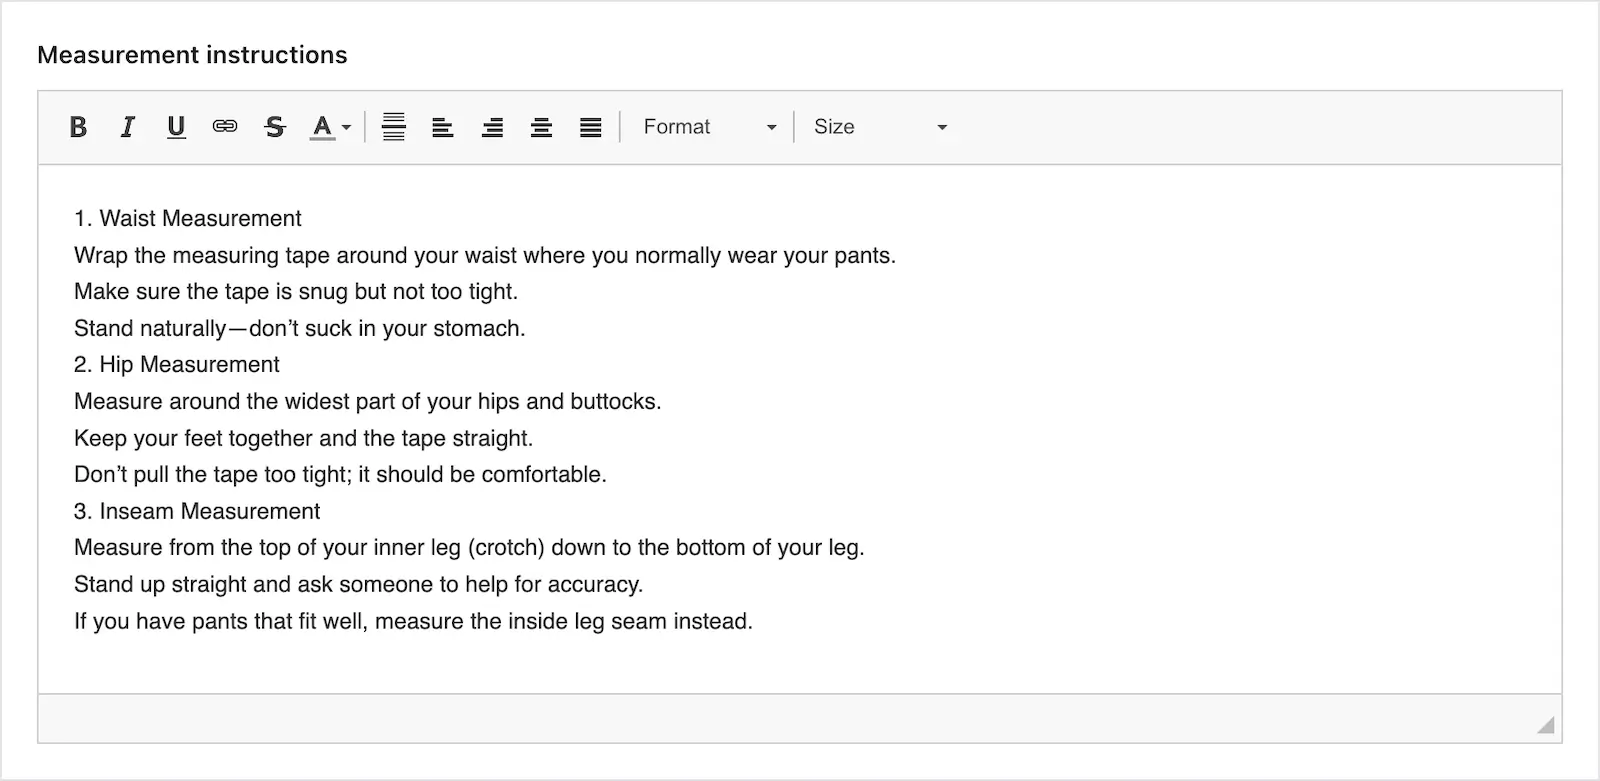
➞ Measurement Instructions
Help your customers measure correctly with clear, simple guidance.
Use this section to add detailed instructions on how to take accurate body measurements. You can include tips like:
- Waist Measurement – Measure around the narrowest part of the waist.
- Hip Measurement – Measure the widest part of the hips.
- Inseam Measurement – Measure from the crotch to the bottom of the ankle.
This can make a big difference in reducing returns and increasing customer satisfaction.
➞ Image
A visual guide can make your size chart even more helpful!
By default, a basic size measurement image is included — but you can upload your own custom image (in .jpg or .png format) to better match your products.
For example, a sketch showing where to measure for jackets, or even your brand’s official size diagram.

➞ Footer
Need to add a disclaimer or note at the bottom of your chart?
The Footer option lets you add additional info, such as:
“Note: Measurements are in inches. Sizes may slightly vary depending on fabric.”
This is helpful for setting clear expectations and offering more transparency.
➞ Automatic Unit Conversion
Reaching international customers? This one’s for you! With this feature, you can automatically convert your data from one unit to another — like inches to centimeters.
You’ll set:
- Base Unit: The unit you entered in your chart (e.g., Inches)
- Conversion Type: The unit you want to display (e.g., Centimeters)
This feature ensures your chart stays relevant for customers, no matter where they are in the world. Below is a list of base units and their available conversion types supported in the TablePress app:

| Base Unit | Conversion Type |
|---|---|
| Length | Inches → Centimeters |
| Feet → Meters | |
| Feet → Centimeters | |
| Yards → Meters | |
| Weight | Ounce → Grams |
| Pound → Kilograms | |
| Ton → Metric Ton | |
| Volume | Teaspoon → Milliliters |
| Tablespoon → Milliliters | |
| Cup → Milliliters | |
| Pint → Liters | |
| Quart → Liters | |
| Gallon → Liters |
These conversions are applied automatically, making your size charts and product tables more accessible for international customers.
To know how the Table data is working in the Data Table, click here.
Table Display Rules
The Table Display Rule helps you decide where to show the size chart on your website. There are two types of rules available in the Table Rules section:
- Inline Link & Floating Button
- Using Shortcode
Now, let’s understand both of these methods in detail.
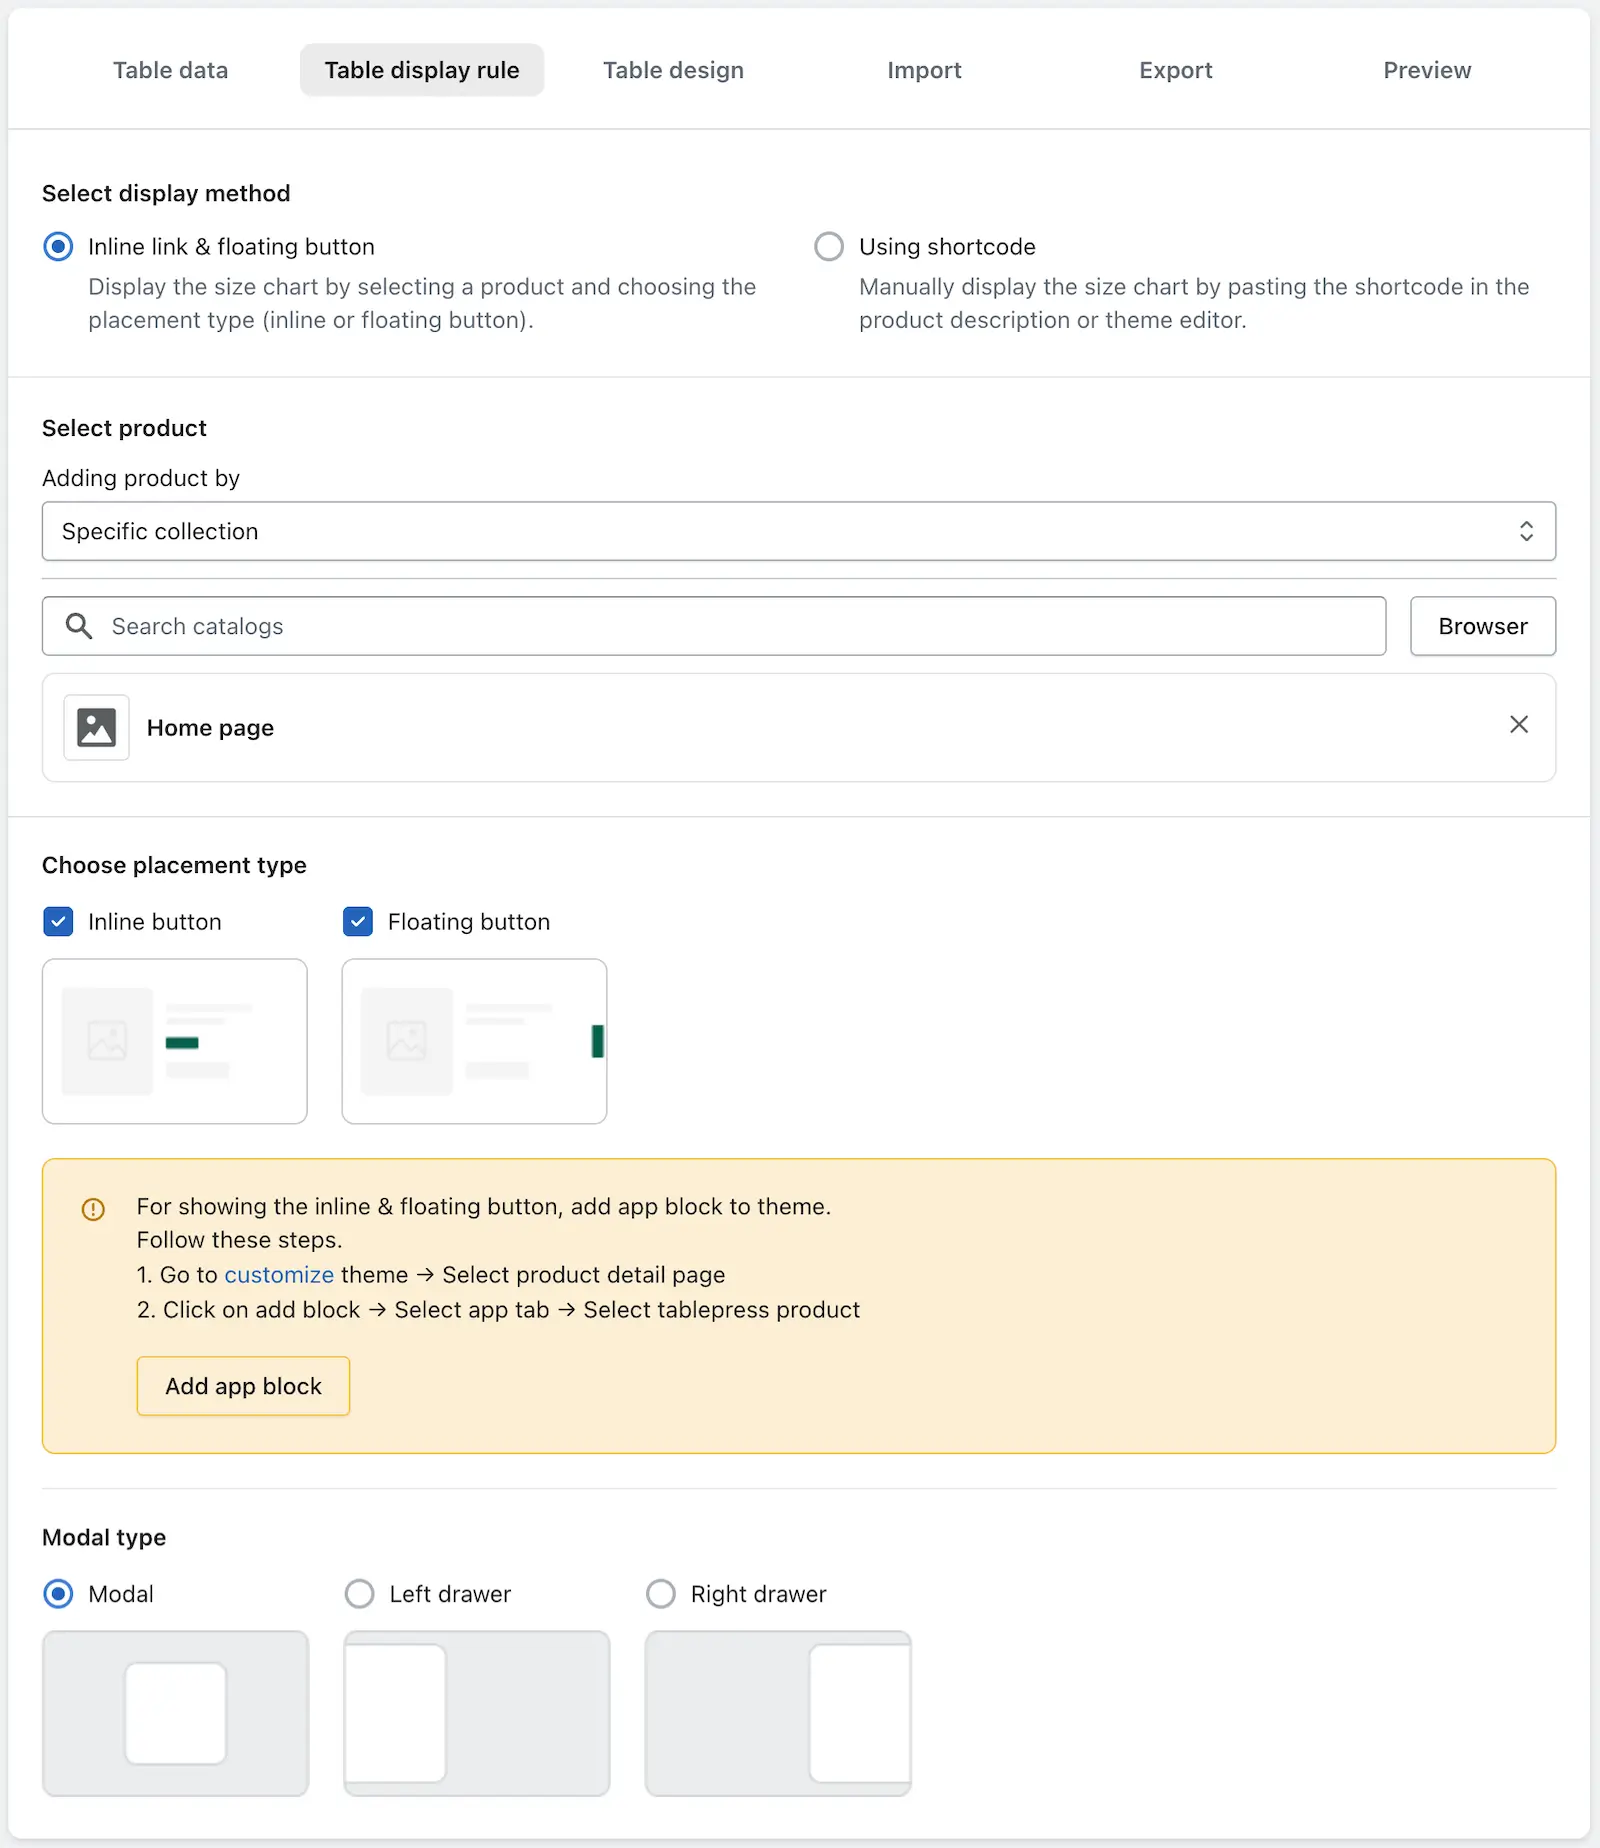
Inline Link & Floating Button
Display the size chart by selecting a product and choosing the placement type (inline or floating button).
➞ Select Product
In the Select Product section, you can choose specific products where you want to display the size chart. There are four types of options available to add products:
- Specific Product – You can select individual products where you want the chart to appear. Once you choose this option, a product selector will appear below where you can pick the desired products.
- Vendor – You can select a vendor, and the size chart will be shown on all products associated with that vendor.
- Specific Collection – After selecting this option, you can choose a specific collection. The chart will be displayed on all products within that collection.
- Tag – After selecting this option, you’ll get an input field to enter product tags. The chart will appear on all products with the specified tag.
➞ Choose placement type
In the Choose Placement Type section, you need to select whether you want an Inline Button or a Floating Button. You can also activate both at the same time, which will display both the floating and inline buttons on the product page for the size chart.
➞ Modal type
In the Modal Type option, you can choose how the size chart will appear — whether it should open in a modal, a left drawer, or a right drawer.
Using shortcode
By using the shortcode, you can place the size chart anywhere on the product page, wherever you prefer.
To do this, first copy the shortcode from here, and then paste it either in the theme customization or in the product description.
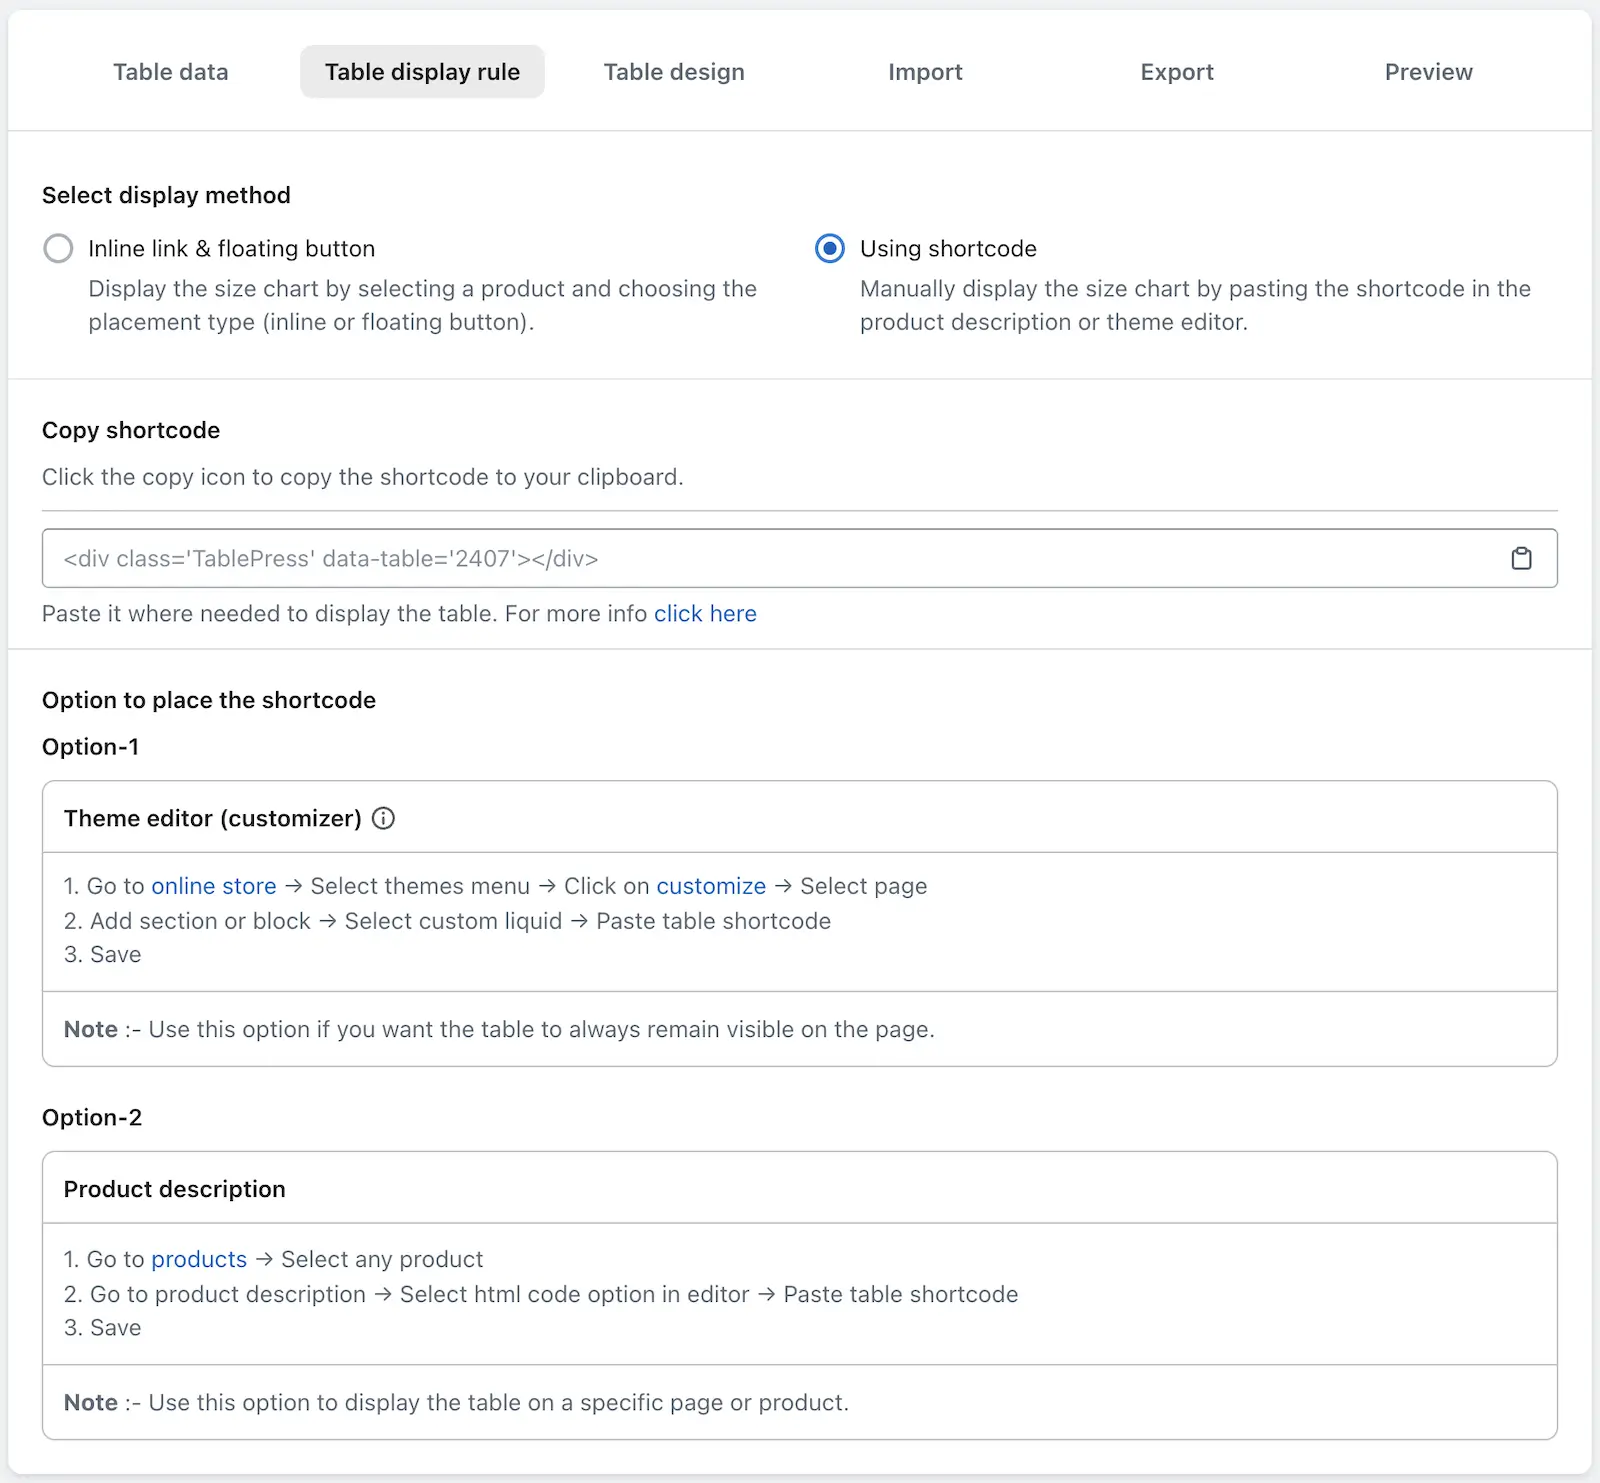
The size chart will appear exactly where you’ve added the shortcode.
Table Design
In the Table Design section, you’ll find options similar to the Data Table’s table design, such as Table Title, Table Description, etc.
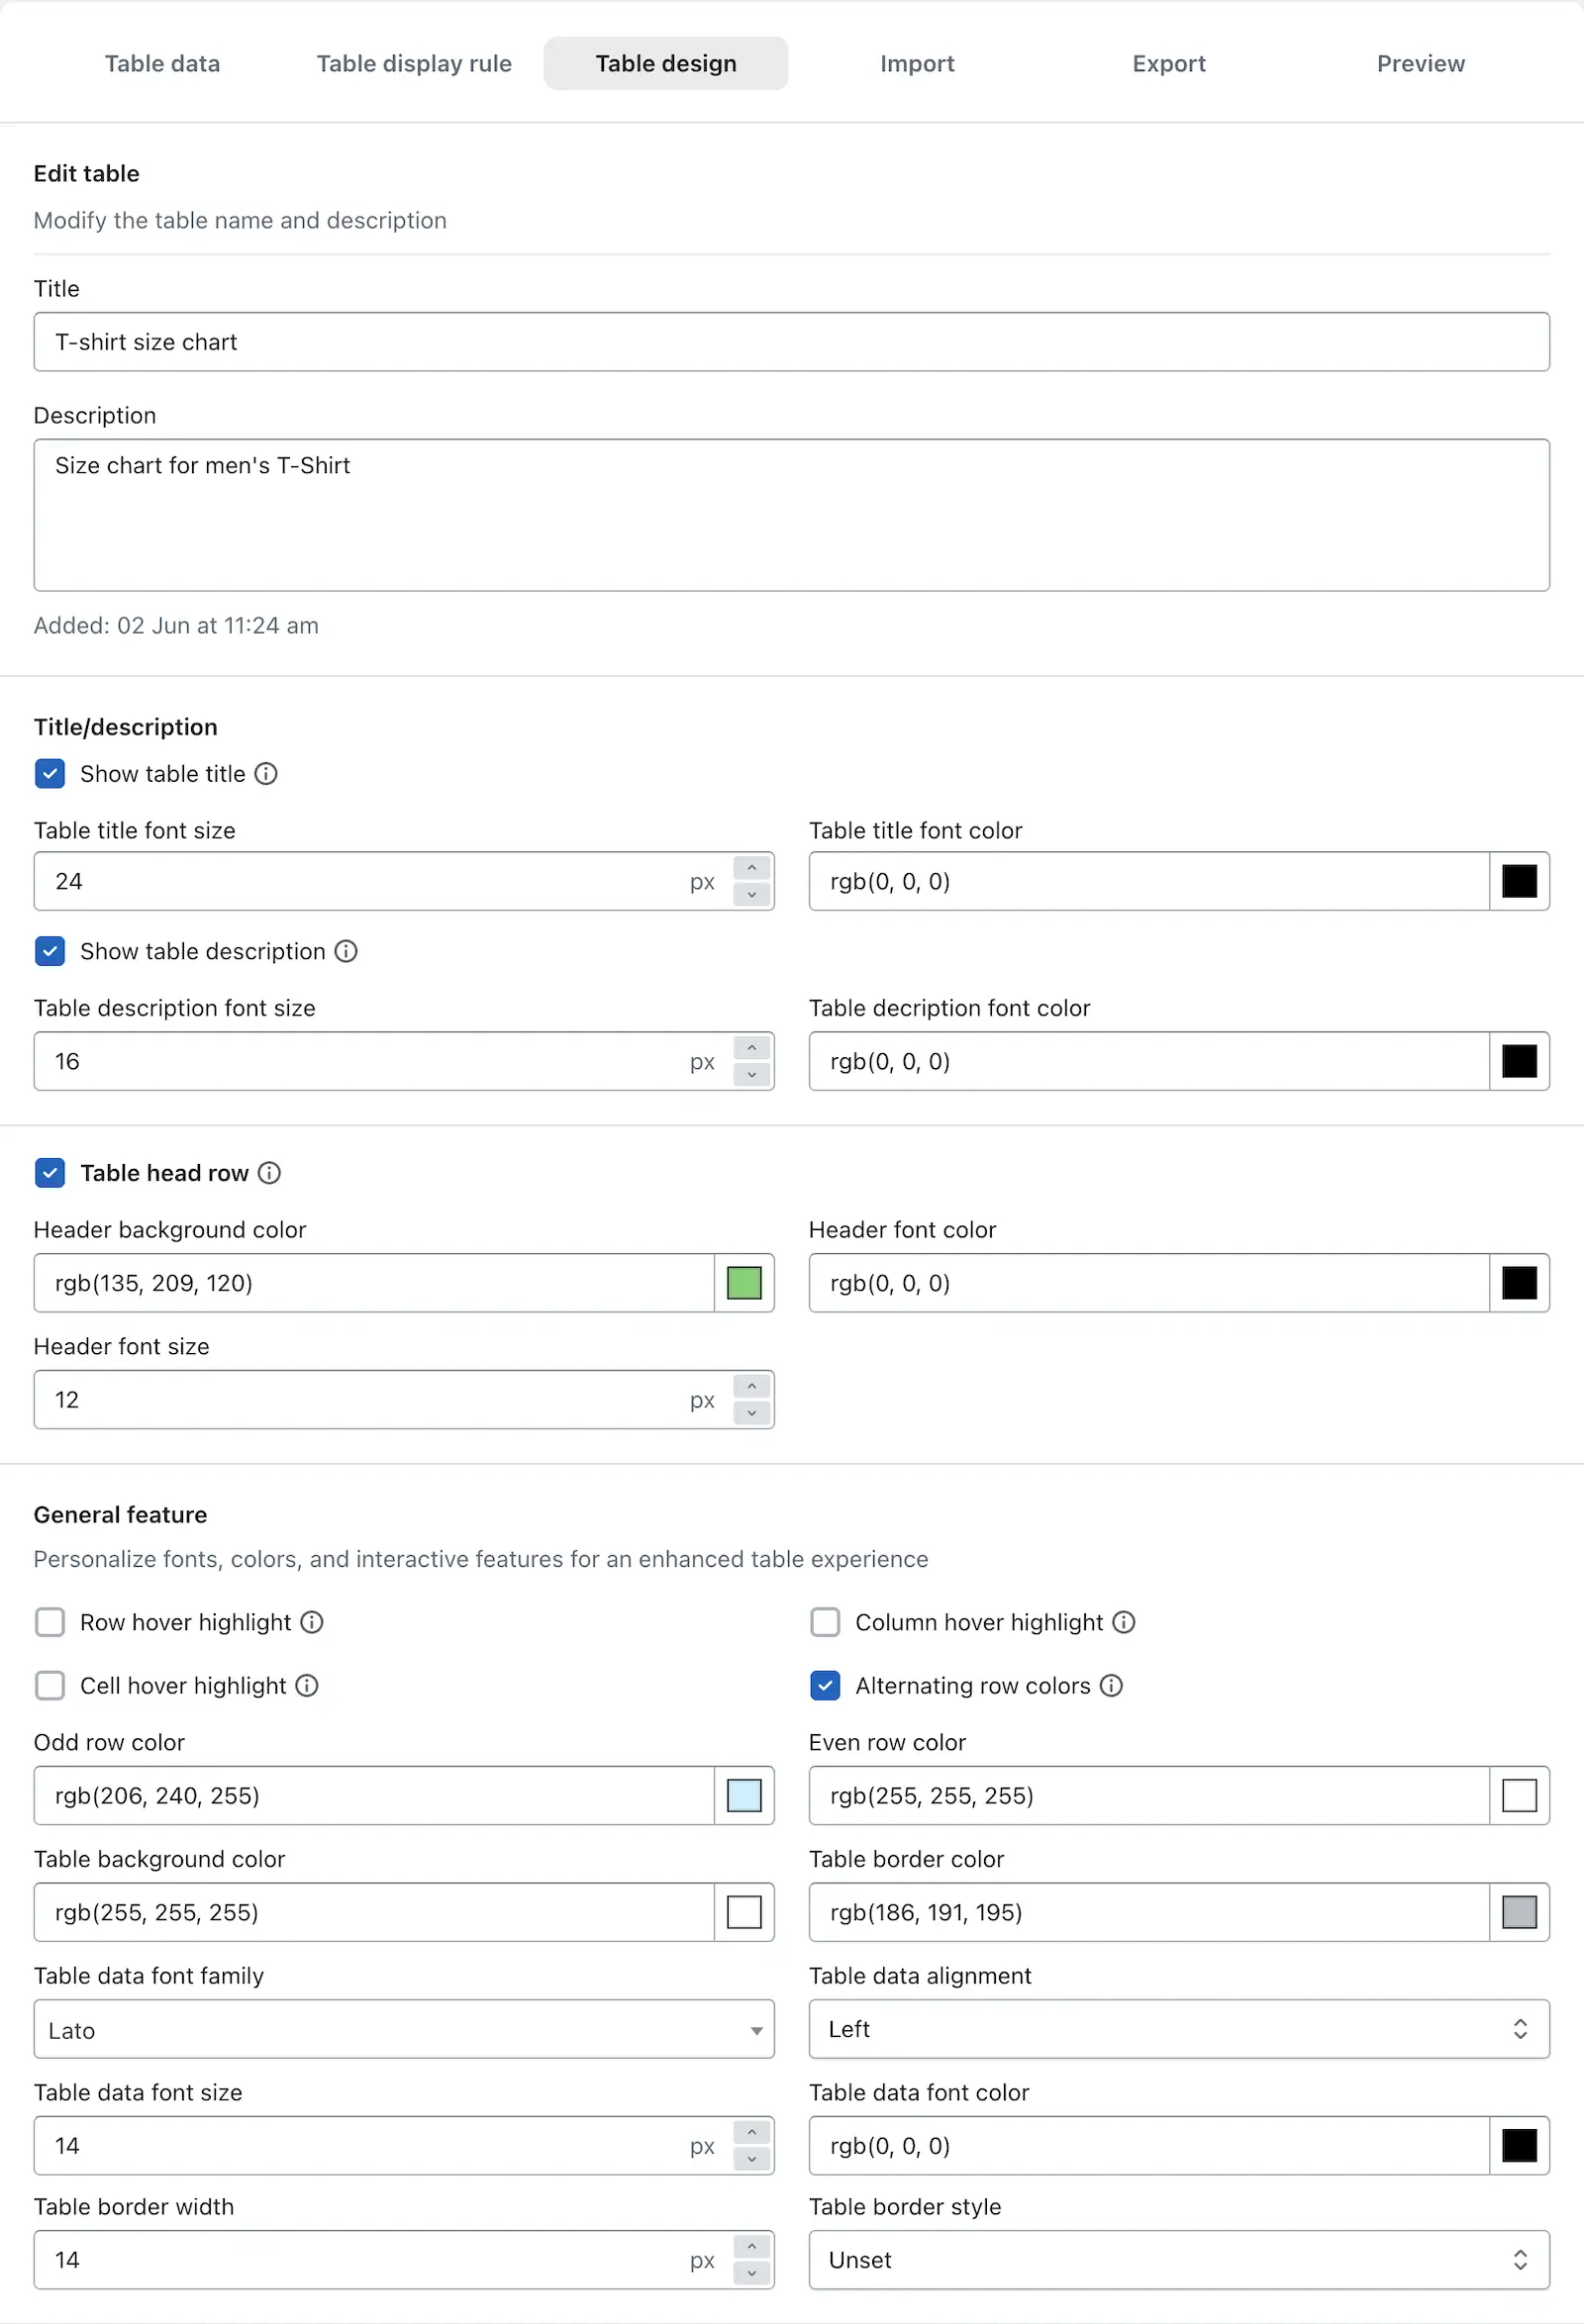
However, some options are specifically provided for the size chart. These unique options are explained below:
➞ Button Settings
In the button settings, you’ll find various customization options:
- Button Icon – Choose an icon to be displayed on the button.
- Button Text – Set the text that appears on the button.
- Button Text Font Family – Select the font style for the button text.
- Button Font Size – Set the size of the button text.
- Button Font Weight – Choose how bold the button text should appear.
- Button Text Color – Pick the color for the button text.
- Button Background Color – Choose the background color for the button.
- Hover Background Color – Set the button background color when hovered.
- Button Border Color – Define the border color of the button.
- Button Border Width – Set the thickness of the button border.
- Hover Border Color – Choose the button border color when hovered.
- Vertical Padding – Set the vertical spacing inside the button.
- Horizontal Padding – Set the horizontal spacing inside the button.
- Button Border Style – Choose the style of the button’s border (solid, dashed, etc.).

➞ Modal Settings
In modal settings, you’ll find the following customization options:
- Animation Type – Select how the modal appears on the screen.
- Modal Border Radius – Set the roundness of the modal corners.
- Modal Background Color – Choose the background color of the modal.
- Header Font Size – Set the font size for the modal’s header text.
- Header Font Color – Pick a color for the header text.
- Header Background Color – Choose a background color for the header section.
- Footer Font Size – Define the font size for the footer text.
- Footer Font Color – Pick a color for the footer text.
- Footer Background Color – Choose a background color for the footer section.
- Logo Border Radius – Adjust the roundness of the logo’s corners.
- Logo Visibility – Show or hide the logo in the modal.
- Modal Border Style – Set the style of the modal’s border.
- Shop Logo – You can upload and display your custom shop logo within the modal.

➞ Custom CSS
If you want to apply your own custom design to the size chart, you can use the Custom CSS option. Here, you can add your own CSS code to further personalize the size chart’s appearance.

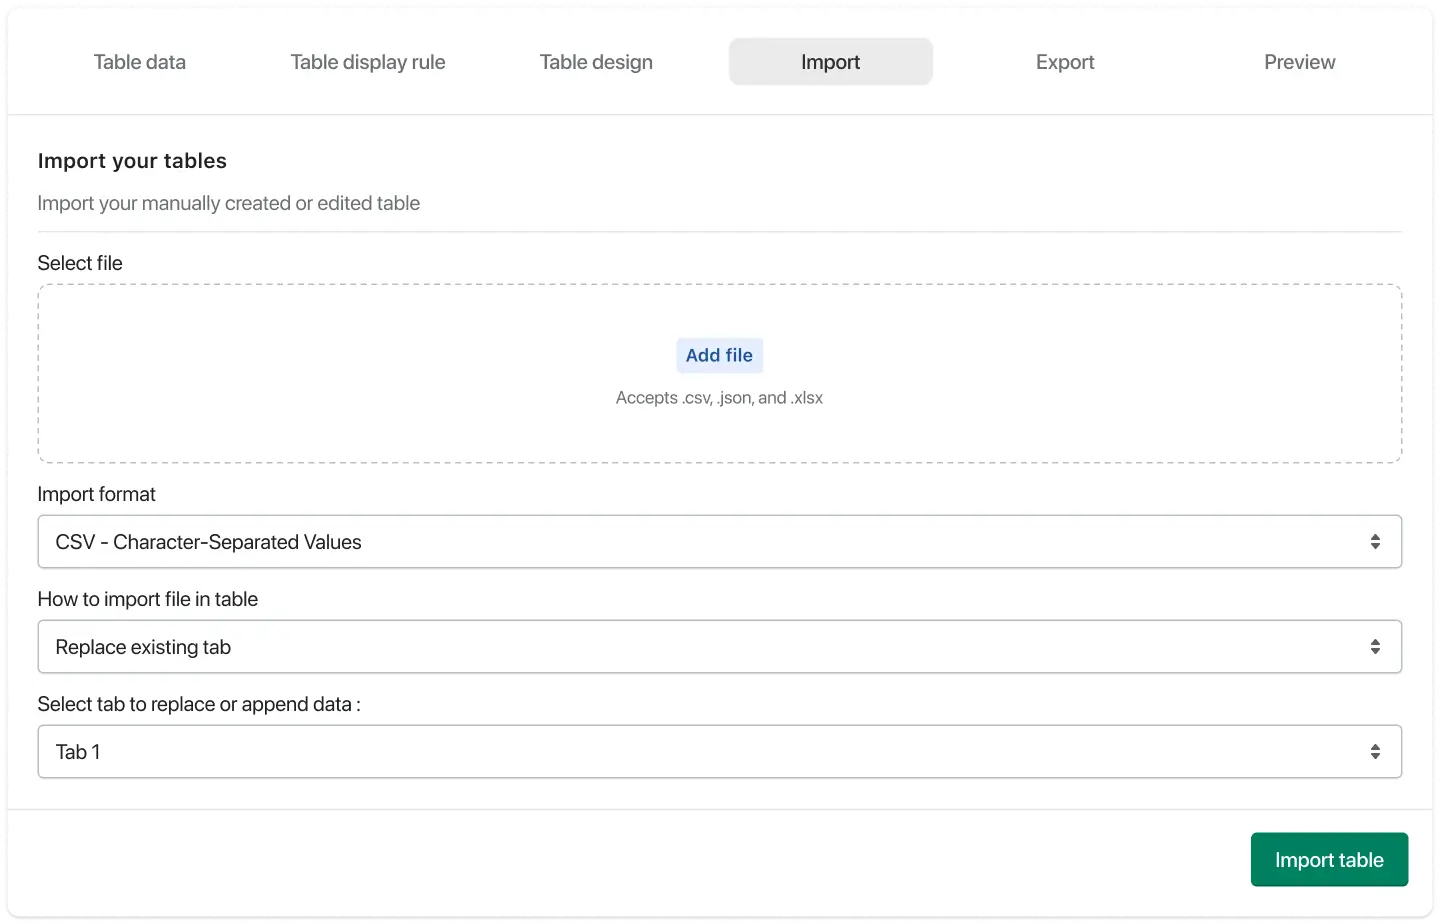
Import
The Import feature in the Size Chart works just like the one you’ve seen in the Data Table — simple, familiar, and reliable. You can upload data in the same supported file formats, making the process quick and easy if you’ve used it before.
But there’s a little twist that gives you even more control.
After importing, you get to decide how that data should be added. Here are the actions you can choose from:
- Add in new tab – Want to keep your imported data separate? This option creates a fresh new tab just for that.
- Replace existing tab – Need to start over or update outdated content? Use this to overwrite the current tab with your new data.
- Append row above to selected tab – Adds the new rows above your existing content — helpful if the latest info needs to appear first.
- Append row below to selected tab – Adds the new rows below your current ones, keeping the order as it is.
No matter how you choose to import, the goal is to make your workflow smoother and your size charts more efficient — all while saving you time.
If you’re ever unsure, feel free to experiment with the options. You can always make changes later — we’re here to support you every step of the way.
This gives you full control over how you want to merge or organize your data within the size chart.
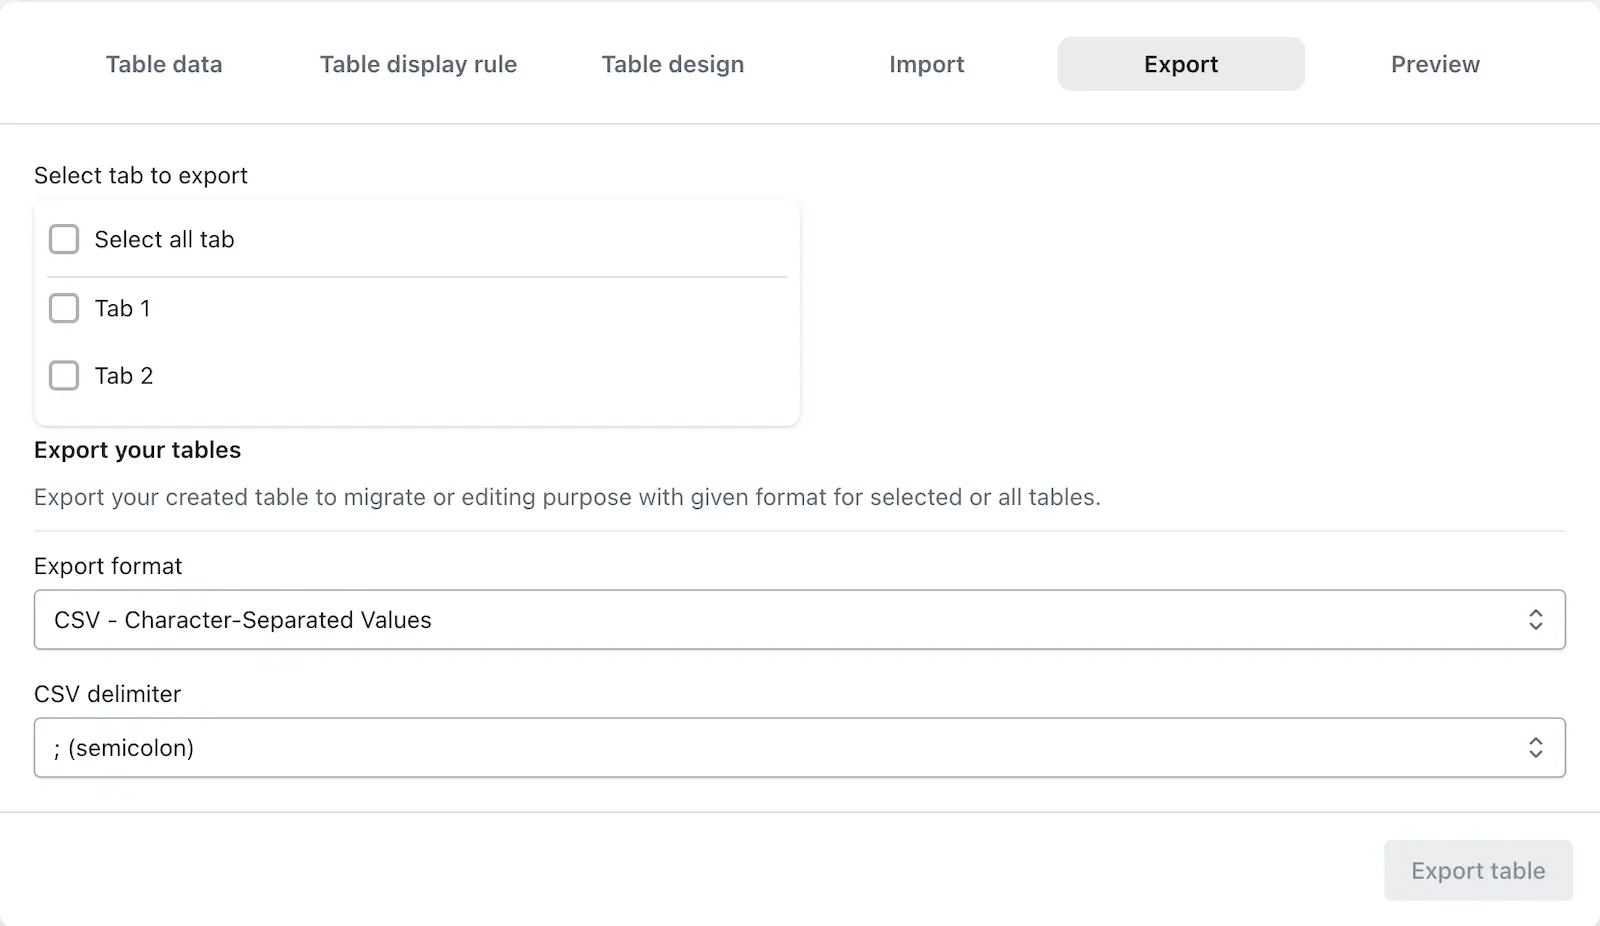
Export
The export feature for size charts works quite similarly to the one available for data tables. Just like you can export a data table while editing it, you can also export a size chart while you’re editing it.
The main difference lies in what gets exported. In data tables, you export the entire individual table. But with size charts, you get the option to export the complete size chart data — including all the tabs you’ve created within the chart.
So, if you’ve organized your size chart using different tabs (like for different product types or styles), you can choose to export them individually or all at once. This makes it really convenient to back up or reuse your size chart data anytime you need.
Preview
Once you create a size chart, you might want to see how it actually looks before publishing it — and that’s exactly where the Preview feature comes in handy.
The preview option allows you to view your entire size chart exactly as it would appear on your store. It saves you the trouble of switching back and forth to your website to check changes, which not only makes the process smoother but also saves your valuable time.
The preview brings together all essential parts of your chart — including the table header, description, header title, chart data, measurement instructions, image, and footer title — giving you a complete picture in one place. If you notice anything that needs a tweak, you can go back and adjust it right away.
