



Yes, you can build and launch a Shopify store from your phone.
The Shopify mobile app lets you add products, customize your theme, create pages, manage menus, configure payments, review orders, and track performance. You can also make theme changes through Shopify’s mobile online store editor.
You can complete the setup and start accepting orders from an iPhone or Android phone.
Still, I would not treat a phone as the perfect tool for every Shopify task. From working on Shopify store setups, I have found that mobile works well for launching and everyday management.
Desktop is more comfortable for custom code, large catalogs, complex apps, and detailed testing.
This guide explains how to create your store from your phone and where you may want a larger screen.
Does Shopify have a mobile app?
Yes. Shopify has an official mobile app for iOS and Android.
The merchant app is designed for store owners and staff. It lets you manage products, orders, inventory, customers, analytics, payments, fulfillment, and parts of your online store. Shopify also provides a mobile theme editor for changing theme settings.
How to make a Shopify store on your phone?
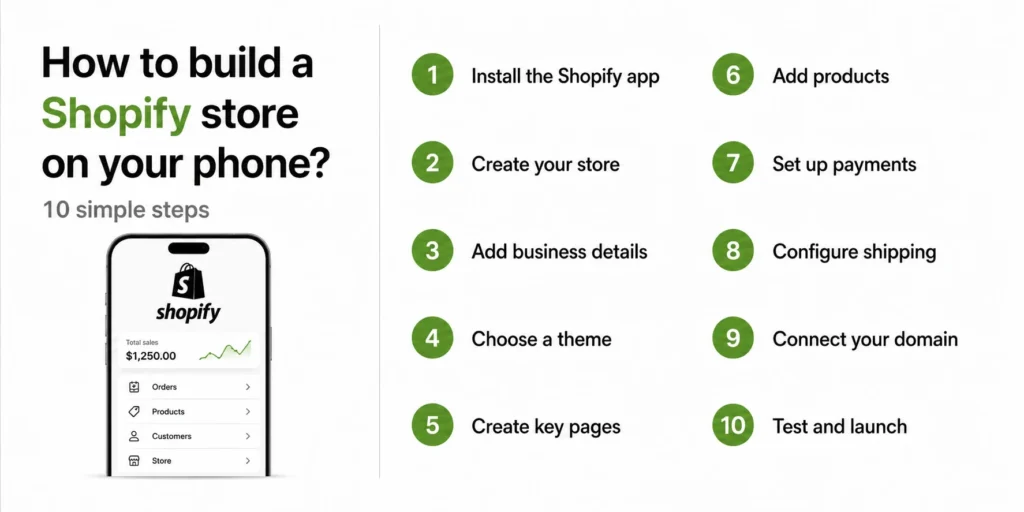
Step 1: Download the Shopify mobile app
Open the Apple App Store or Google Play Store and search Shopify.
Open the app after installation. Sign in if you already have an account, or follow the registration process to create one.
The app itself is free to download. Running an active Shopify store requires a Shopify subscription after the applicable trial or promotional period.
Step 2: Create the store and add business details
Follow the onboarding questions about your business, what you plan to sell, and where you want to sell.
After the store is created, open:
Menu > Settings
Review the following details:
- Store name
- Legal business name
- Business address
- Store currency
- Time zone
- Contact information
- Order ID format
- Measurement units
I recommend checking the currency and business location twice. They are easy to overlook during a fast mobile setup and can create extra work later.
Step 3: Choose and customize a theme
From the Shopify app, go to:
Menu > Online Store > Edit
Shopify’s mobile theme editor lets you change theme settings. You can add, remove, edit, and rearrange content from your phone.
Start with a free Shopify theme if you are building your first store. Keep the initial homepage simple. I would recommend Dawn.
Add your logo, fonts, colors, and images. Preview each section as you work.
A common mistake is trying to fill every available section. I prefer a shorter homepage with a clear shopping path. A focused layout is easier to review on a phone and easier for customers to use.
Step 4: Create your essential pages
In the app, go to:
Menu > Online store > pages
Create the pages your customers need. Most new stores should have:
- About Us
- Contact Us
- Shipping Policy
- Return and Refund Policy
- Privacy Policy
- Terms of Service
- Frequently Asked Questions
Keep the text readable on a small screen. Use short paragraphs, clear headings, and useful links.
Step 5: Build the navigation
Go to:
Menu > Content > Menus
Create a simple main menu and footer menu.
A basic main menu might include:
- Home
- Shop
- Collections
- About
- Contact
The footer can hold policy pages, FAQs, account links, and contact details.
From experience, navigation is the first area I check on a new Shopify store. A good homepage cannot help much if customers cannot quickly reach products.
Step 6: Add products from your phone
Tap the Products icon in the Shopify app, then create a product.
Add:
- Product title
- Description
- Photos or videos
- Price
- Inventory quantity
- SKU
- Weight
- Variants
- Product category
- Tags
- Collections
- Search engine listing
I find it convenient to upload product images from my phone's camera. You can take a photo, crop it, and add it to the product without transferring files to a computer.
Shopify lets merchants create, edit, preview, organize, publish, archive, and delete products through its mobile app.
Step 7: Set up payments
Go to:
Menu > Settings > Payments
The payment methods available depend on your business location and eligibility.
Complete the requested business, identity, banking, and payout details. Use information that matches your legal and banking records.
Step 8: Configure shipping, delivery, and taxes
Open:
Menu > Settings > Shipping and delivery
Review your shipping profiles, zones, rates, packages, local delivery, and pickup settings.
A basic setup may use:
- Flat-rate shipping
- Free shipping above a minimum order value
- Weight-based rates
- Price-based rates
- Local delivery
- Store pickup
- Carrier-calculated rates when supported
Step 9: Connect a domain
Shopify gives your store a myshopify.com address. You can use it during setup, but a custom domain usually looks more professional.
Go to:
Menu > Settings > Domains
From this area, you can review your Shopify domain and connect or manage a custom domain. Shopify also provides mobile controls for managing the store’s myshopify.com domain.
Choose a name that is short, easy to type, and close to your brand.
Changing a domain after launch will impact your existing URLs, marketing links, and search visibility can be affected. Read my guide on changing a Shopify store name and domain before making a major change.
Step 10: Test the store before launch
Do not skip testing because you built the store on the same phone customers may use.
Check the store as a shopper, not as the owner.
Test:
- Homepage loading
- Menu links
- Collection pages
- Product variants
- Product images
- Add-to-cart button
- Cart totals
- Discount codes
- Shipping rates
- Payment flow
- Confirmation emails
- Contact forms
- Policy links
- Account login
- Store search
Step 11: Remove the password and start selling
When the store is ready, go to:
Menu > Online Store
Open the password protection settings and remove the storefront password. Your Shopify store is now open to customers.
What can you manage from the Shopify mobile app?
The mobile app is useful after launch. Shopify currently supports many daily store tasks from mobile.
| Task | Good on a phone? | My recommendation |
| Add or edit a product | Yes | Good for small catalogs and quick updates |
| Upload product photos | Yes | One of the best mobile workflows |
| Check orders and sales | Yes | Ideal for daily monitoring |
| Capture payments and fulfill orders | Yes | Useful while away from a desk |
| Adjust inventory | Yes | Good for quick stock corrections |
| Edit theme sections and blocks | Yes | Fine for basic layout changes |
| Create pages and menus | Yes | Good for short content and simple navigation |
| Review analytics | Yes | Good for quick checks |
| Configure a complex app | Sometimes | Desktop is usually easier |
| Edit theme code | Not ideal | Use a desktop for accuracy and testing |
| Import or edit hundreds of products | Not ideal | Use desktop tools and bulk workflows |
| Perform detailed quality assurance | Limited | Test on several devices and browsers |
Shopify has also made Sidekick available on mobile through text and voice. It can help answer questions and complete supported admin tasks.
What I won’t recommend doing on a phone?
Custom theme code
Liquid, CSS, JavaScript, and structured data require careful editing. A small typing mistake can affect the storefront.
Bulk product work
Adding five products from a phone is manageable. Cleaning hundreds of rows, variants, SKUs, and prices is much easier on a desktop.
Detailed app configuration
Many Shopify apps open inside the mobile admin, but their dashboards are difficult to view on a phone screen.
Long-form content
Writing detailed product descriptions, policy pages, and SEO content is slower on a phone. Formatting errors are also harder to notice.
Full store testing
Your phone shows one screen size. Customers may use different phones, tablets, laptops, and desktop monitors. Test the store across more than one device.
Final verdict
Can you make a Shopify store on your phone? Yes.
For a small and straightforward store, that is everything you need to start.
I see mobile as the fastest route to a working first version. Once the store becomes more complex, a desktop gives you better control.
Need help turning the mobile setup into a polished storefront? Identixweb can help with Shopify store setup, theme customization, app configuration, and technical improvements when the project outgrows a phone-based workflow.
FAQs
1. Can I create a Shopify store entirely from my phone?
Yes. You can use the Shopify mobile app to create and manage a basic online store, add products, customize theme content, set up payments, configure shipping, and launch. Advanced development and large catalog work are usually easier on a desktop.
2. Does Shopify have a mobile app?
Yes. Shopify offers an official merchant app for iOS and Android. It supports store management, products, orders, inventory, analytics, payments, fulfillment, and mobile theme editing.
3. Is the Shopify mobile app free?
Yes, the app is free to download. You still need an eligible Shopify plan to keep the online store active after the applicable trial or promotional period.
4. Can I edit my Shopify theme from my phone?
Yes. Shopify’s mobile theme editor lets you change theme settings and add, remove, edit, or rearrange sections and blocks. I recommend using a desktop for custom codes.
5. Can I add products to Shopify using my phone?
Yes. You can add product titles, descriptions, images, prices, inventory, variants, tags, collections, and other details through the Shopify app.




About the author
Vineet Nair
Vineet is an experienced content strategist with expertise in the ecommerce domain and a keen interest in Shopify. He aims to help Shopify merchants thrive in this competitive environment with technical solutions and thoughtfully structured content.