


Customers shopping on Shopify can improve their shopping experience in many ways. A key feature is an ability to create custom metafields and metaobjects, which allows for the addition of unique data to products, collections, blogs, etc. These important features allow store owners to go beyond standard Shopify attributes, storing and displaying information without code or theme editing.
This guide explores the details of Shopify metaobjects, and shows how to effectively use them to enhance your store functionality and improve your customer's journey.
What is Shopify Metaobjects
Metaobjects in Shopify organise and structure custom data about your customers by grouping multiple metafields together. Metaobjects are best possible for displaying multiple parameters or repeated content across your store, as they allow for simultaneous edits from one place.
Utilising metaobjects is best for blocks or sections displayed on multiple pages. It improves the capabilities of metafields by creating a single container for related data. This setup makes it simple to locate and update information, aligning data with unique business processes and workflows.
Shopify Metafields vs Metaobjects
| Features | Metafields | Metaobjects |
|---|---|---|
| Objective | Expand Shopify assets with custom key-value data | Generate advanced, structured data versions with complex relationships. |
| Structure | Simple key-value pair | Custom data types with multiple fields. |
| Scenario | Put extra information on products, collections, orders, etc. (e.g. product details, custom notes). | Manage complex content types and relationships. (e.g. Product bundles, FAQ). |
| Access | Easy to access through Shopify admin and APIs. | Easy to access through Shopify admin GraphQL API and required more setup. |
| Limit | A simple structure without complexity: 250 metafields per resource. | Shopify metaobjects limit: No specific limit |
How to Add Metaobjects in Shopify
Adding metaobjects in Shopify, creating, defining, and displaying them to enhance your store data management. Here is the step-by-step guide:
Consider a clothing store as an example, In this structure, each clothing product (e.g., t-shirt, shirt, dresses) may have different shared parameters that you want to display on your product detail page.
Creating the Shopify Metafields for your Store
- In admin dashboard > “Settings” > select “custom data”
- In the “custom data”, select “products” to define custom data particular for products.
- Go to the “metafields” section, and click on “add definition”.
- Choose a unique name for your metafield (e.g. “Information”) and select type (e.g. “Single line text”).

Define Metafields to Products
Once you have set up your metafields, Now to add them to your products.
- Access your store’s admin dashboard > click on products > choose the product for which you want to define the metafields.
- Under the product page, locate the section for adding metafields.
- Enter the relevant information specific to this product into the designated fields.

Highlighting Metafields on Product Pages
- Showcase the metafields information on the Product Detail Page.
- Access your store’s admin dashboard > Online store > Themes >Customize
- Go with the middle template menu > "Products" section > select "default product".
- Add a new block, like “text”, to the product page
- Insert the metafields content using the database ("burger") icon."

Save all the implemented changes and explore the comprehensive Shopify Metafields Guide: overview, types and Shopify 2.0 metafields.
Shopify Metafield Example:

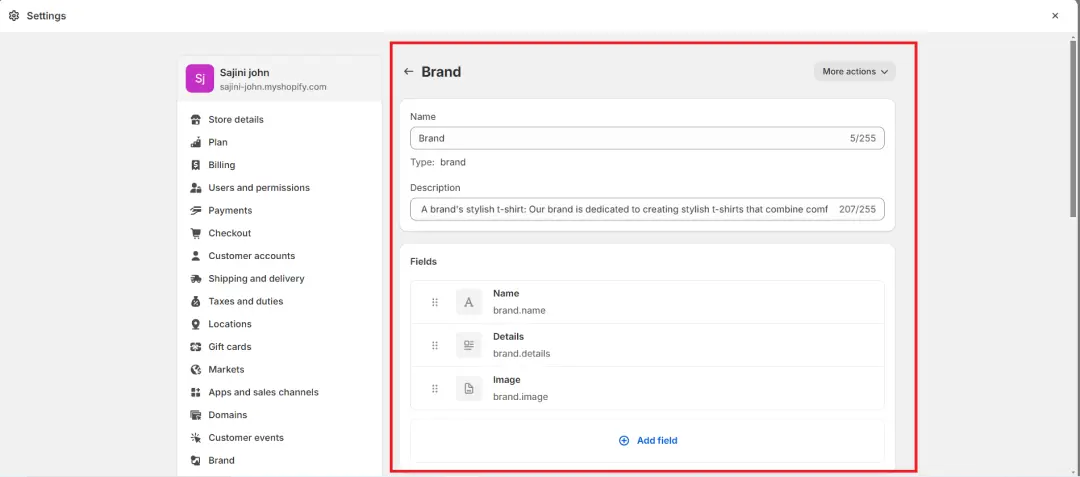
Creating the Shopify Metaobjects for your Store
With metaobjects, you can add dynamic content to your store. On each collection page, you can feature different brands with complete descriptions, images, and names. Metaobjects lets you create one object and connect it to multiple products and pages, streamlining the process.
- Access your store’s admin dashboard > click on "settings" > select "custom data".
- Under "custom data", select "products" to define custom data specifically for products.
- Under the "metaobjects" section, click on "add definition."
- Choose a unique name for your metaobjects (e.g. “Brand”) and select type (e.g. "Single Line Text").
- For our example, each “Brand” metaobjects includes:
- Name (Single-line Text)
- Details (Rich Text)
- Images (File Upload)
Insert a Metaobjects Entry
- Access your store’s admin dashboard > click on "settings" > select "custom data".
- Click on the “metaobjects” section > choose the existing metaobjects.
- Go to the “more actions” > on the right corner, select “add entry”.
- Put the required inputs and click “save”. If you have additional entries, continue adding them.

Define Collection Metafields in Shopify
- “Metafields” > “Collection” and click on “add definition”.
- Choose a descriptive name for your metafield (e.g. “Brand”) and select type (e.g. "Metaobject").

Define Metaobjects within Collections
- Access your store’s admin dashboard > click on collection > choose the product for which you want to define the metaobjects.
- Go to the collection page and scroll down to find the available metafields.
- Select an empty input box, pick from existing entries, and save your changes.

Highlighting Metaobjects on the Collection Page
Showcase the metaobject information on the collection pages.
- Access your store’s admin dashboard > Online store > Themes >Customize
- Go with the middle template menu > "Collections" section > then select "default collections".
- Add a new section, like “image with text”, to the collection page
- Insert the metaobjects content using the database ("burger") icon."
- Associate relevant items in the section/block with corresponding entries in your metaobject.
Shopify Metaobjects Example:

Best Practices for Shopify Metaobjects
Looking for best practices? Metaobjects are increasingly crucial for expanding customer reach and can assist businesses in efficiently organizing and managing their data.
Without Custom code: In the past, Shopify owners had to rely on liquid code or third-party apps to effectively set up metaobjects. Implementing metaobjects in Shopify liquid code is a bit complicated and requires technical expertise or the help of Shopify experts.
Clear Structure: Define a clear structure for your metaobjects to ensure well-organized and easy data management.
User-friendly Experience: Developing user-friendly Shopify interfaces by managing metaobjects without coding expertise.
Better Customization: Come across advanced customization options that allow you to organize and display information uniquely and improve creativity in your Shopify store.
Wrapping Up
Executing metafields and metaobjects in Shopify might little bit tricky at first. These features help you store further product details and customize customer fields, enhance shopping experiences.
Go through the process of setting up Shopify metaobjects is worthwhile. because it enhances search ranking and contributes to building a brand that resonates with customers With Shopify metaobjects, you can go after basic fields, creating custom data structures that are relevant to your business perfectly. So go along with the steps, and you will see how they can improve your store's features and options.
For more in-depth information, you can visit our Shopify metafields blog!

")

")

About the author
Bhavesha Ghatode
Explore Content with Bhavesha, a passionate and dedicated technical content writer with a keen understanding of e-commerce trends. She is committed to sharing valuable insights, practical assets, and the latest trends that can help businesses thrive in a competitive environment.