One common question many store owners encounter is, "How to change address on Shopify? Whether it's updating a customer's billing details, modifying a shipping origin, or switching to a PO Box. Accurate address information plays a crucial role in smooth order fulfillment, tax calculations, and customer communication.
In this guide, we will walk you through everything you need to know about changing your address on Shopify, step by step.
Here’s what you will learn:
- How to add or edit a customer’s address.
- How to change your business address to a PO Box.
- How to update your store’s shipping origin address.
- And other address-related tips for better store management.
By the end, you will be able to confidently manage every aspect of your Shopify address settings, helping you avoid errors, save money, and improve customer satisfaction.
Let’s dive in!
Why It’s Important to Update Your Address on Shopify
Keeping your address updated on Shopify is more than just a small task – it’s essential for ensuring your online store runs smoothly. Here's why it's important:
1. To Get Accurate Shipping Rates
Shopify uses your store's "Shipping From" address to calculate shipping fees. If this address is outdated or incorrect, the shipping costs shown at checkout may be inaccurate. That means you could end up charging your customer too much, which may turn them away, or too little, which cuts into your profits.
By updating your shipping address, you ensure that shipping rates are accurate, fair, and based on your actual location.
2. To Collect the Right Taxes
Your business address helps Shopify determine the correct sales tax to charge your customers, based on local tax rules. If your address is outdated or incorrectly set to a different region, Shopify may calculate taxes inaccurately.
This could lead to underpayment or overpayment of taxes, which may cause problems with tax filings or even legal issues. A correct address means stress-free accounting and compliance.
3. To Avoid Delivery Issues and Delays
If your shipping origin or return address is incorrect, your packages may be delayed, lost, or returned to the wrong location. This can lead to unhappy customers and extra shipping costs for you. Updating your address ensures smoother deliveries, fewer errors, and a better overall experience for your buyers.
4. To Look More Professional to Customers
Your business address appears in important places, like invoices, order confirmation emails, packing slips, and sometimes even on your storefront. If a customer sees an outdated or incorrect address, it can create confusion and reduce trust. Keeping this information up to date demonstrates professionalism and helps build customer confidence.
5. To Prevent Customer Confusion About Returns or Pickups
If you offer returns or local pickups and your address is incorrect, customers may arrive at the wrong location or send items to an outdated address.
This causes delays, miscommunication, and frustration. With the correct address in place, customers know exactly where to go or send returned products, making the whole process easier for everyone.
Let’s walk through the process of changing your Shopify business address in a few simple steps, ensuring your store remains accurate, compliant, and professional.
Step-by-Step Guide to Changing Your Shopify Business Address
Changing your address on Shopify is a quick and easy process. Just follow these simple steps:
How to Change Address on Shopify?
Changing the address on Shopify ensures accurate shipping calculations, tax rates, and professional communication with customers.
Step 1: Log In to Your Shopify Admin
- Go to shopify.com and log in with your store credentials.
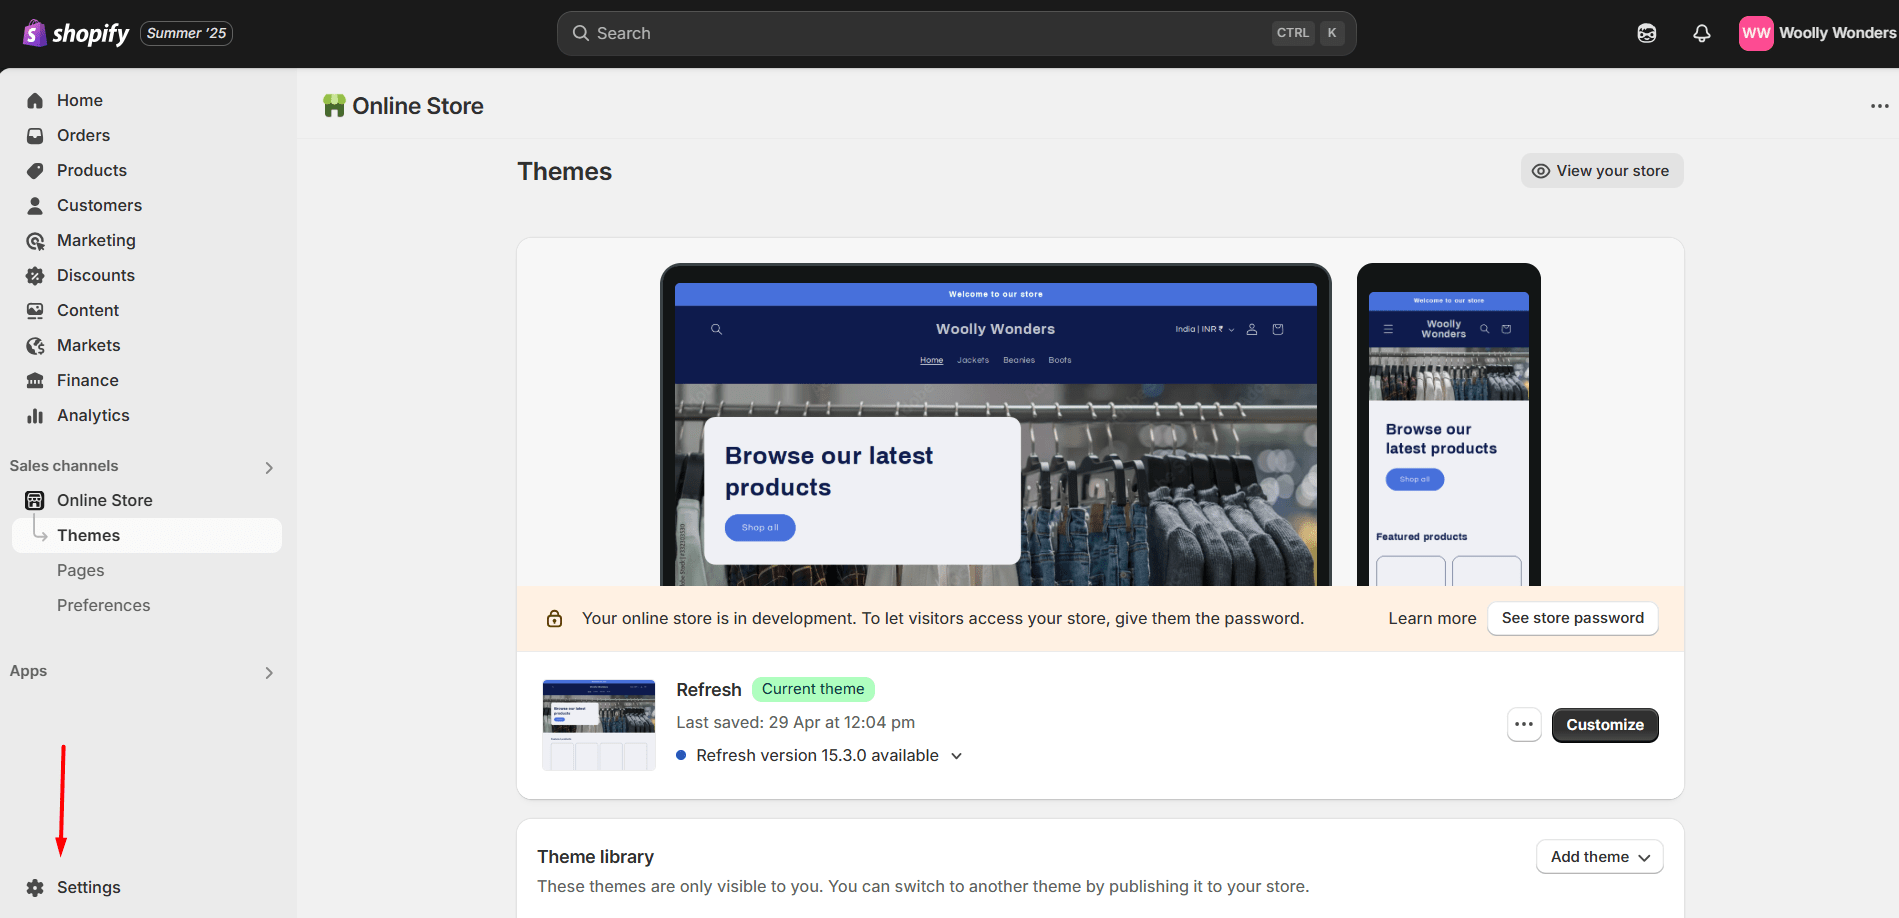
Step 2: Go to Settings
- In the bottom-left corner of your dashboard, click on “Settings.”
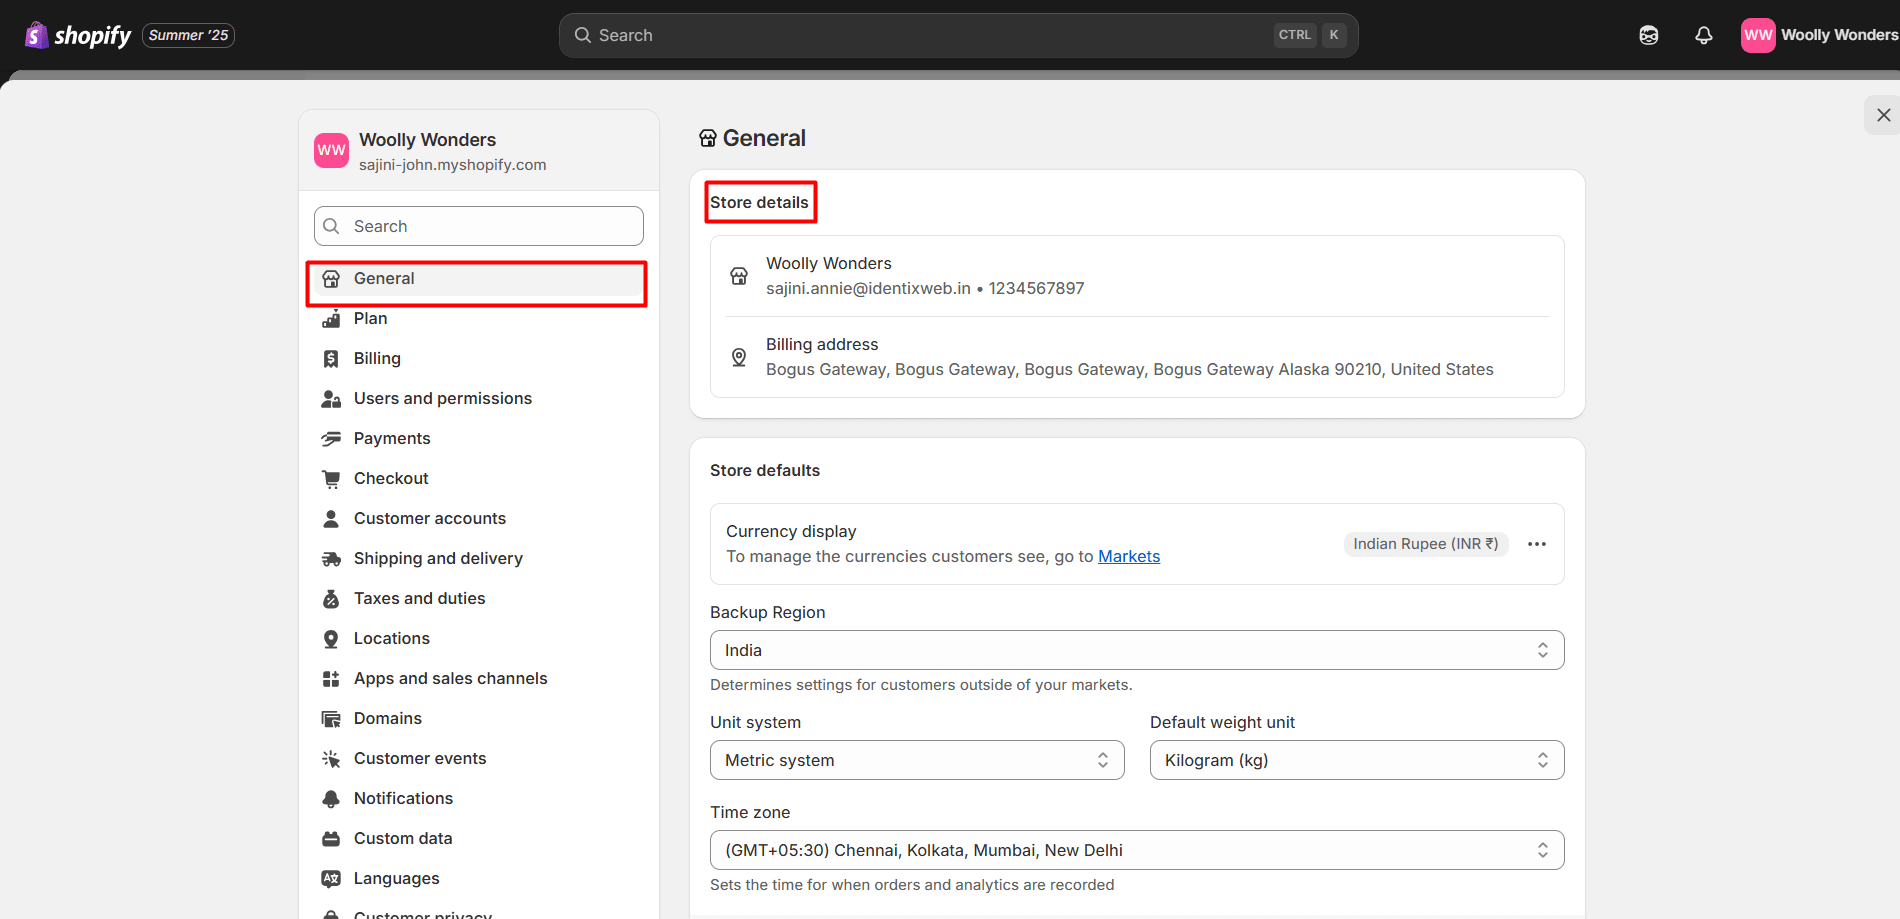
Step 3: Go to on ‘Generals’ or 'Store Details'
- In the settings menu, look “Store details” (in older versions, it might be called “General”).
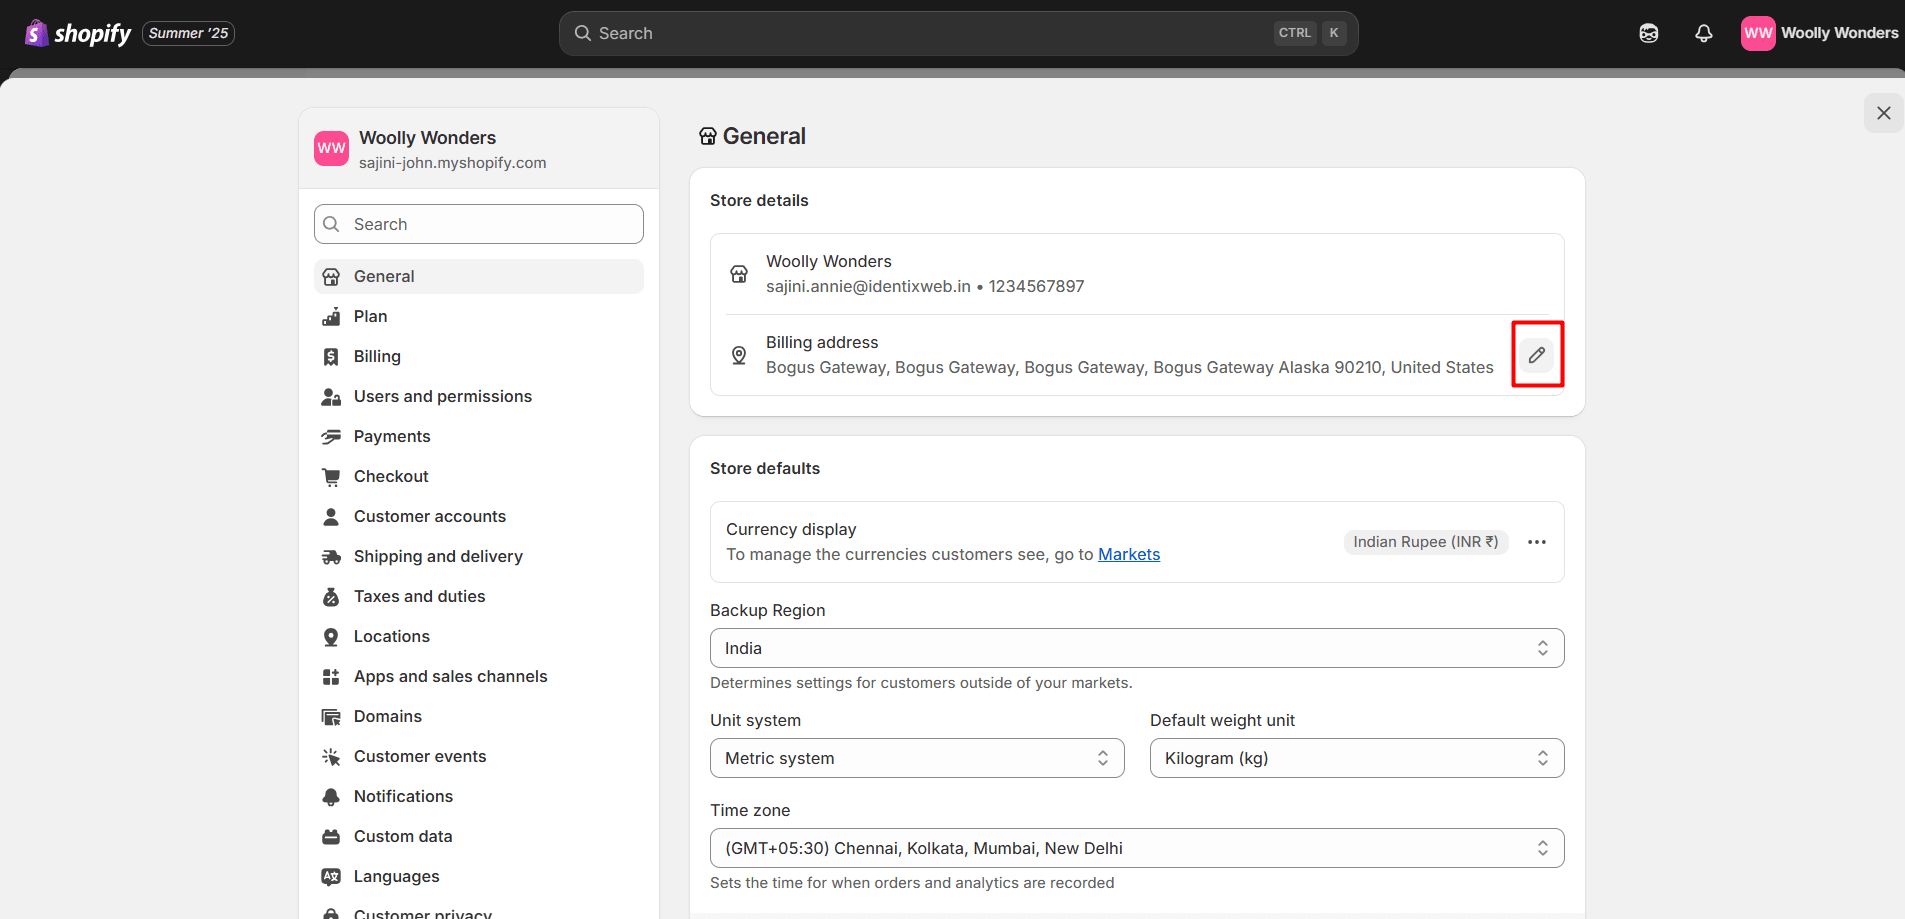
Step 4: Find the Address Section
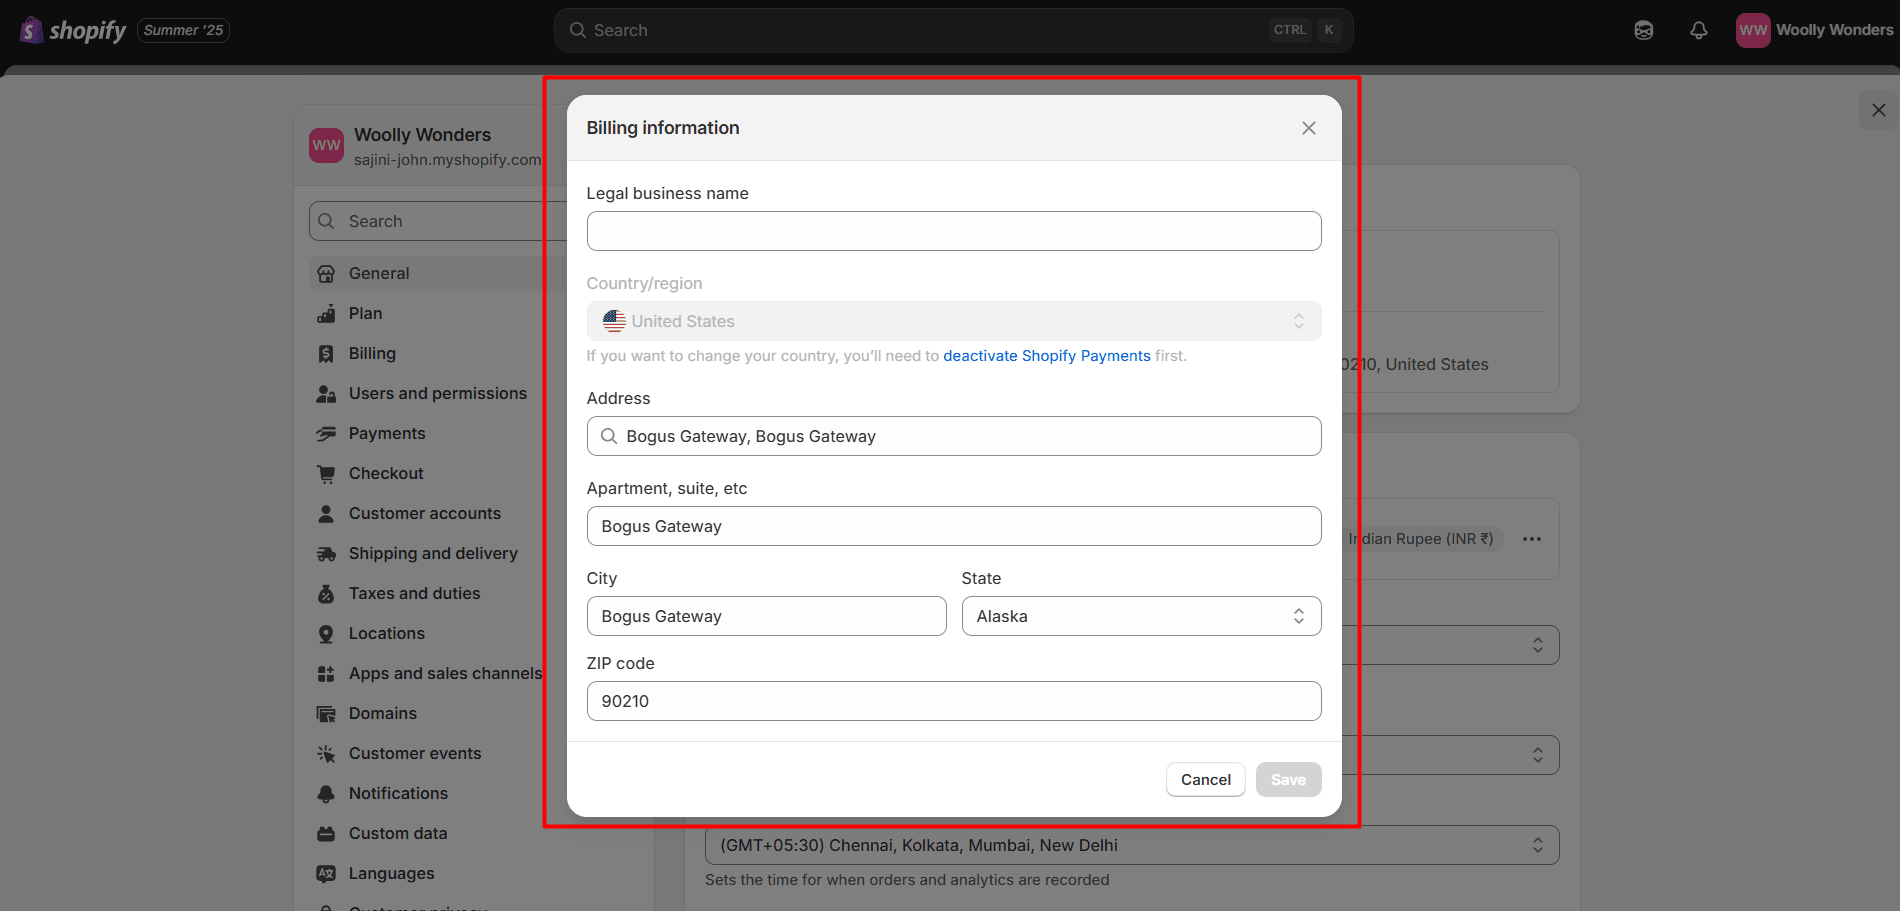
- Scroll down to the “Edit Billing Information” section. This is where you’ll see your current business address.
- Click the “Edit” button (or icon).
Step 5: Edit Your Address
- Update your street address, city, postal/ZIP code, country, and phone number as needed.
Step 6: Save Your Changes
- After making updates, click “Save” to apply the changes.
What Happens After Updating Your Business Address?
- Shopify will use the new address to calculate taxes, shipping rates, and display it on invoices and customer communication.
- If you are using Shopify Payments, you may also need to update your billing or banking information.
- For stores using Shopify Markets, changing your address may affect how you set up regional shipping zones or market-specific pricing.
Your business address in Shopify appears on invoices, order confirmations, shipping labels, and is used for billing and legal documentation. If you prefer using a PO Box for privacy or logistical reasons, you can easily update it in your store settings.
How to Change Your Shopify Address to PO Box
Using a PO Box is one of the best ways Shopify store owners can protect their privacy, especially if you’re running your store from home. It helps keep personal addresses off public-facing documents and also builds trust with customers who expect a secure and established business location.
Shopify allows you to add your PO Box either as your main business address or as a location (especially useful for returns or shipping purposes).
Here’s how to set up a PO Box as your Shopify business address:
Step 1: Log in to your Shopify Admin dashboard.
Step 2: Click Settings (bottom-left corner).
Step 3: Go to Locations.
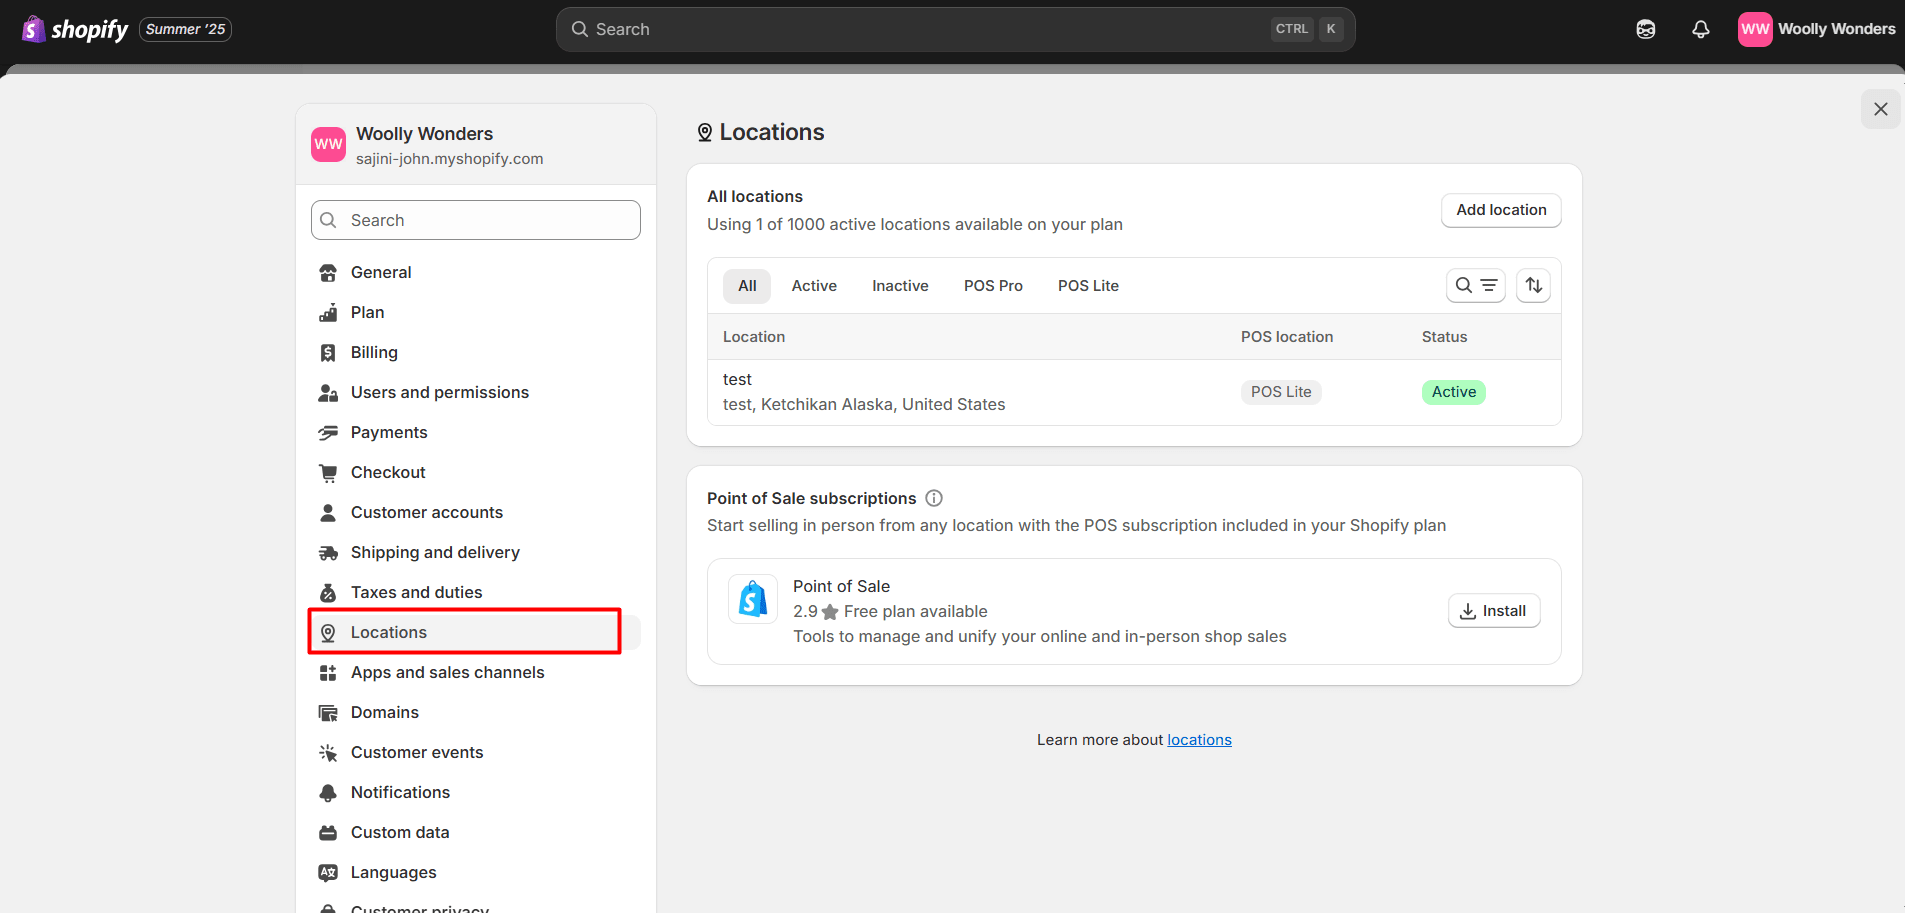
Step 4: In the top-right corner, click the existing location called “test”.
Step 5: Enter your PO Box address and give it a name (e.g., “text-PO Box”).
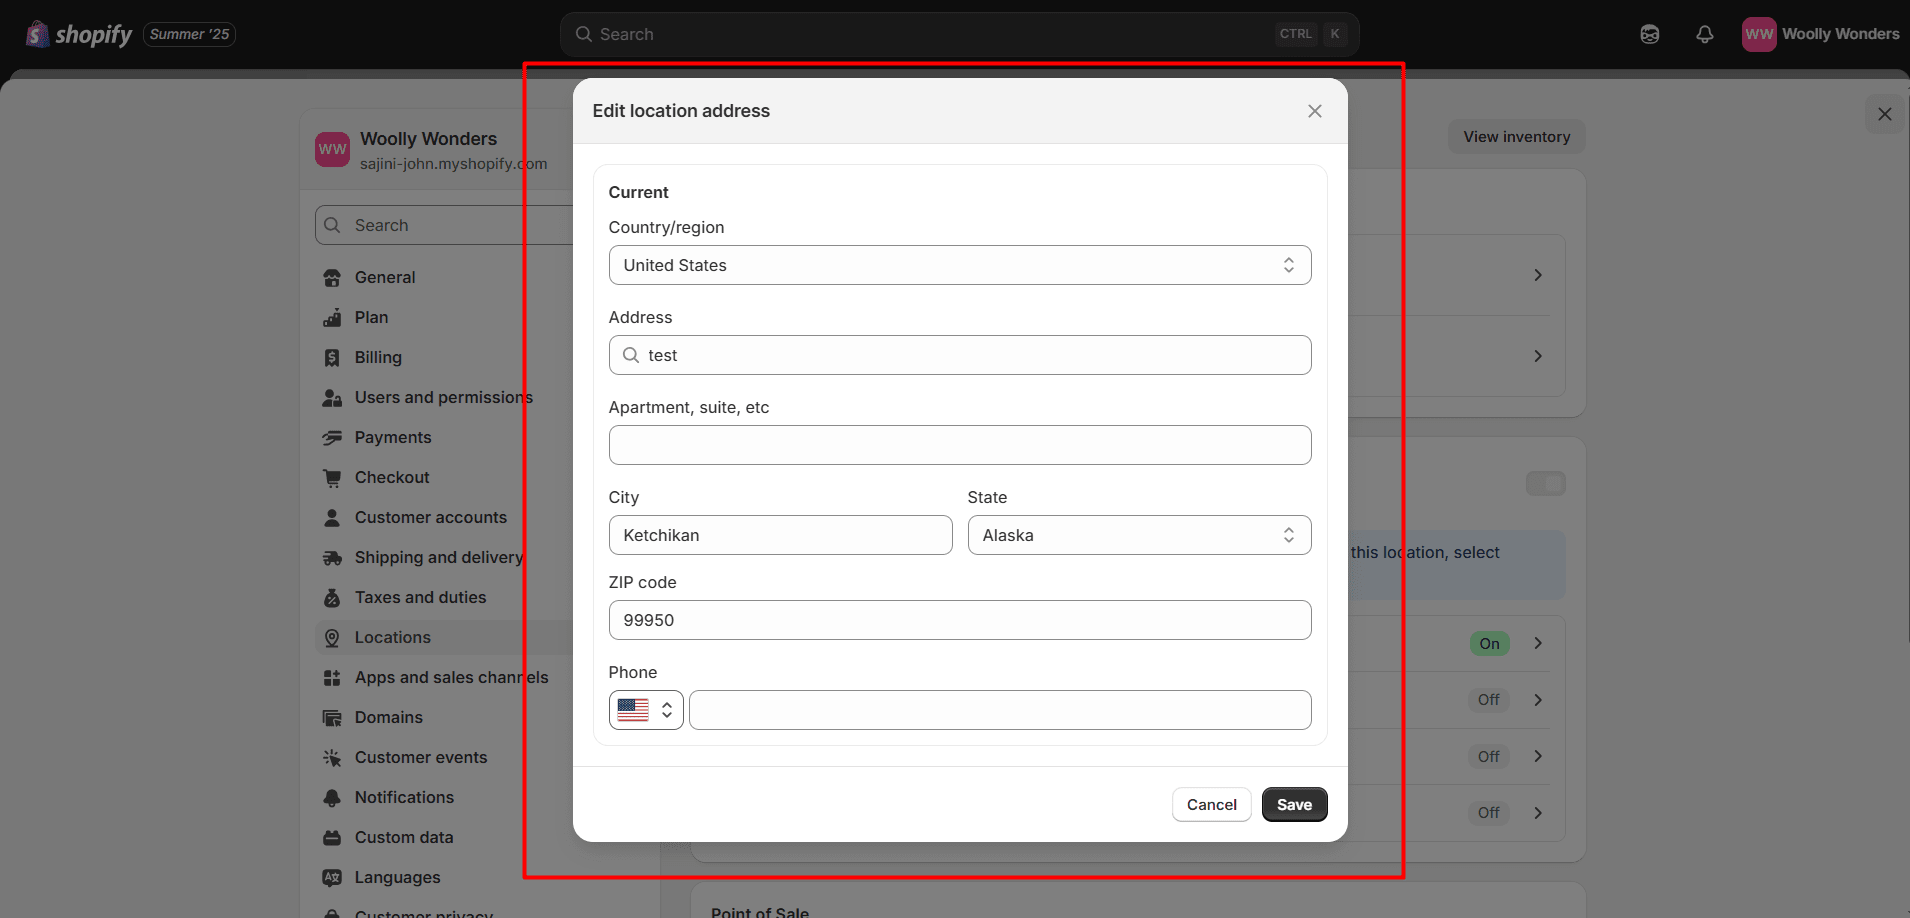
Step 6: Click Save.
Important Note
- Shipping carriers like UPS, FedEx, and DHL may not deliver to PO Boxes. They often require a physical address for returns.
- Use a physical return address if your carrier does not accept PO Boxes.
What Happens After You Change to a PO Box?
- Shopify will begin displaying the updated PO Box on invoices, packing slips, order emails, and other official documents.
- Your billing address for Shopify payments or apps will be updated to reflect the change.
- You may need to update your return address in the shipping settings if you want it to differ from your store address.
How to Change Billing Address for Customer in Shopify
The billing address is often required for fraud checks or when issuing invoices.
Step 1. Go to your Shopify Admin > Customers.
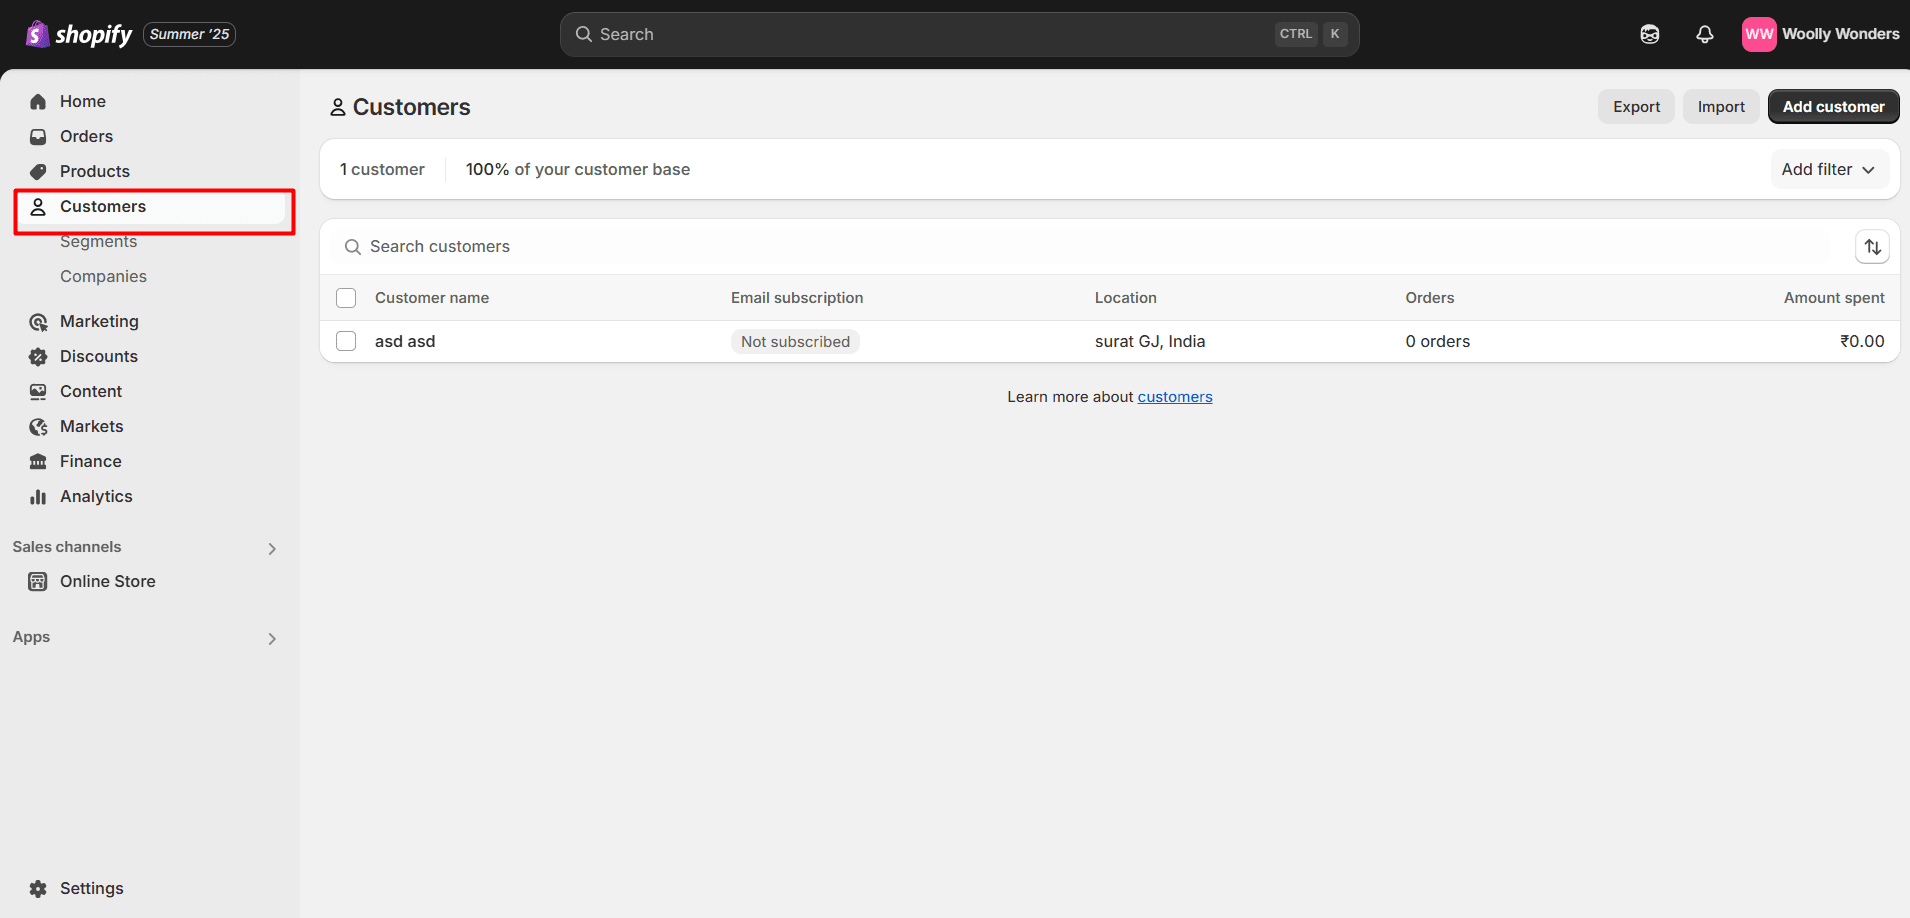
Step 2. Click on the customer's name.
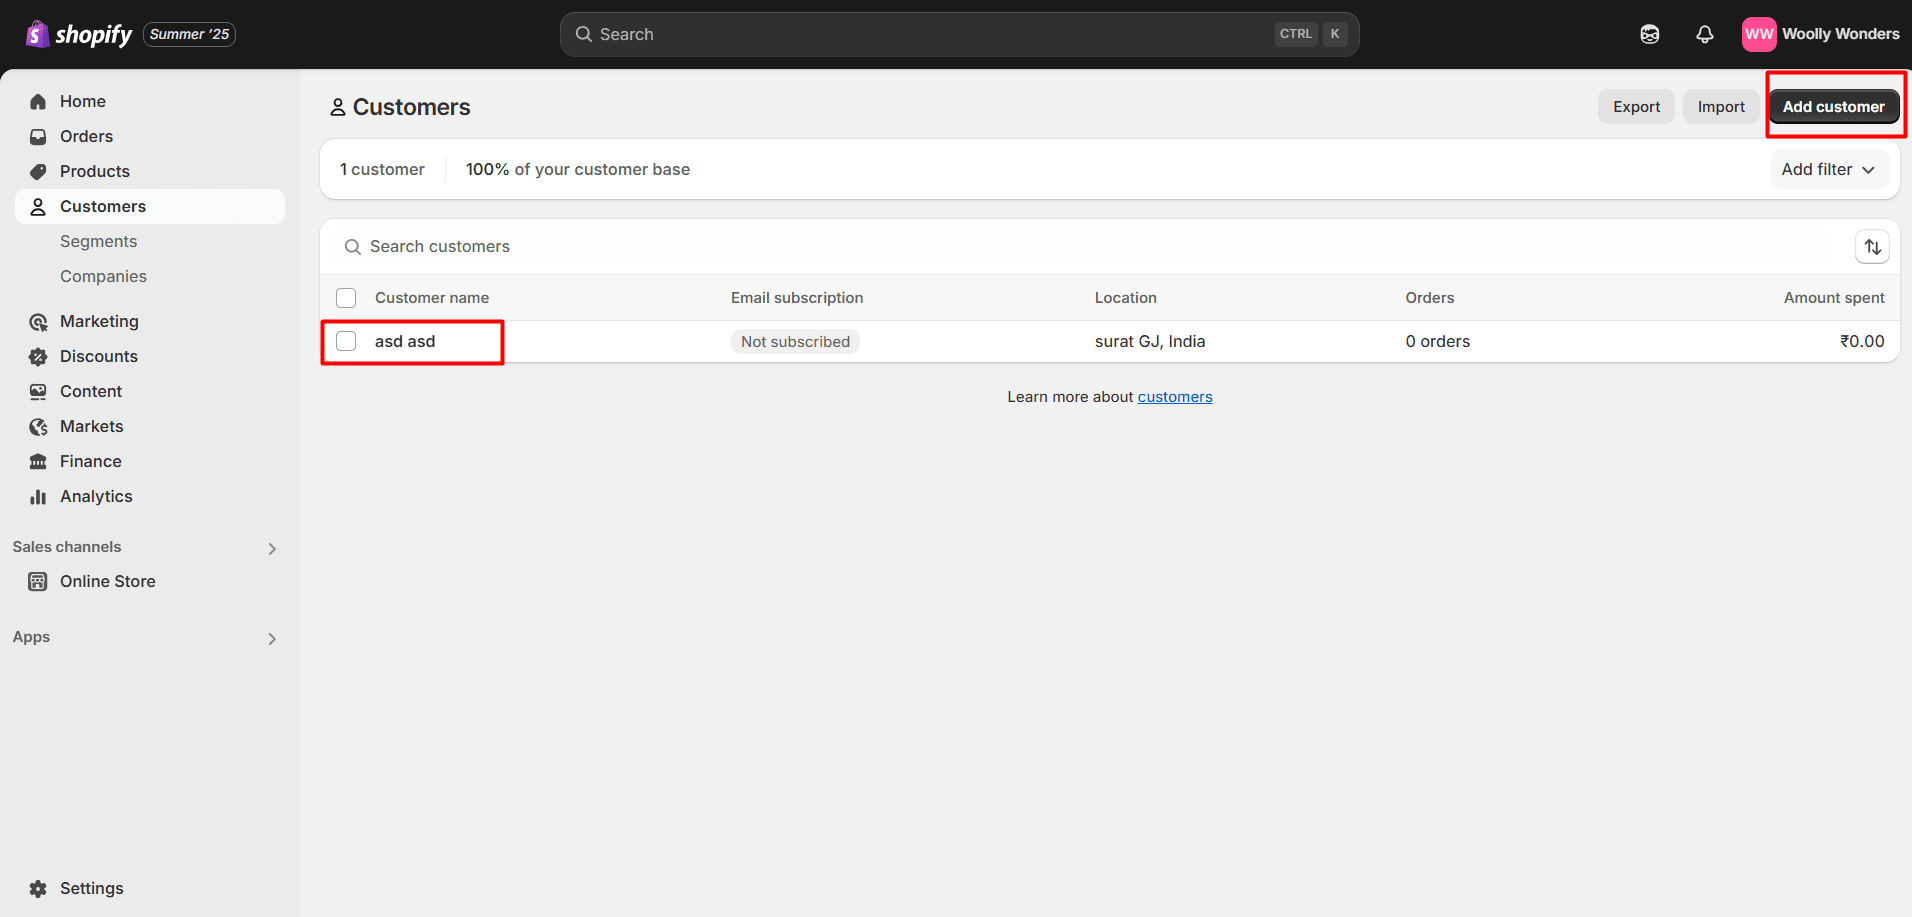
Step 3. Under Addresses, click Edit next to the current address or Add Address.
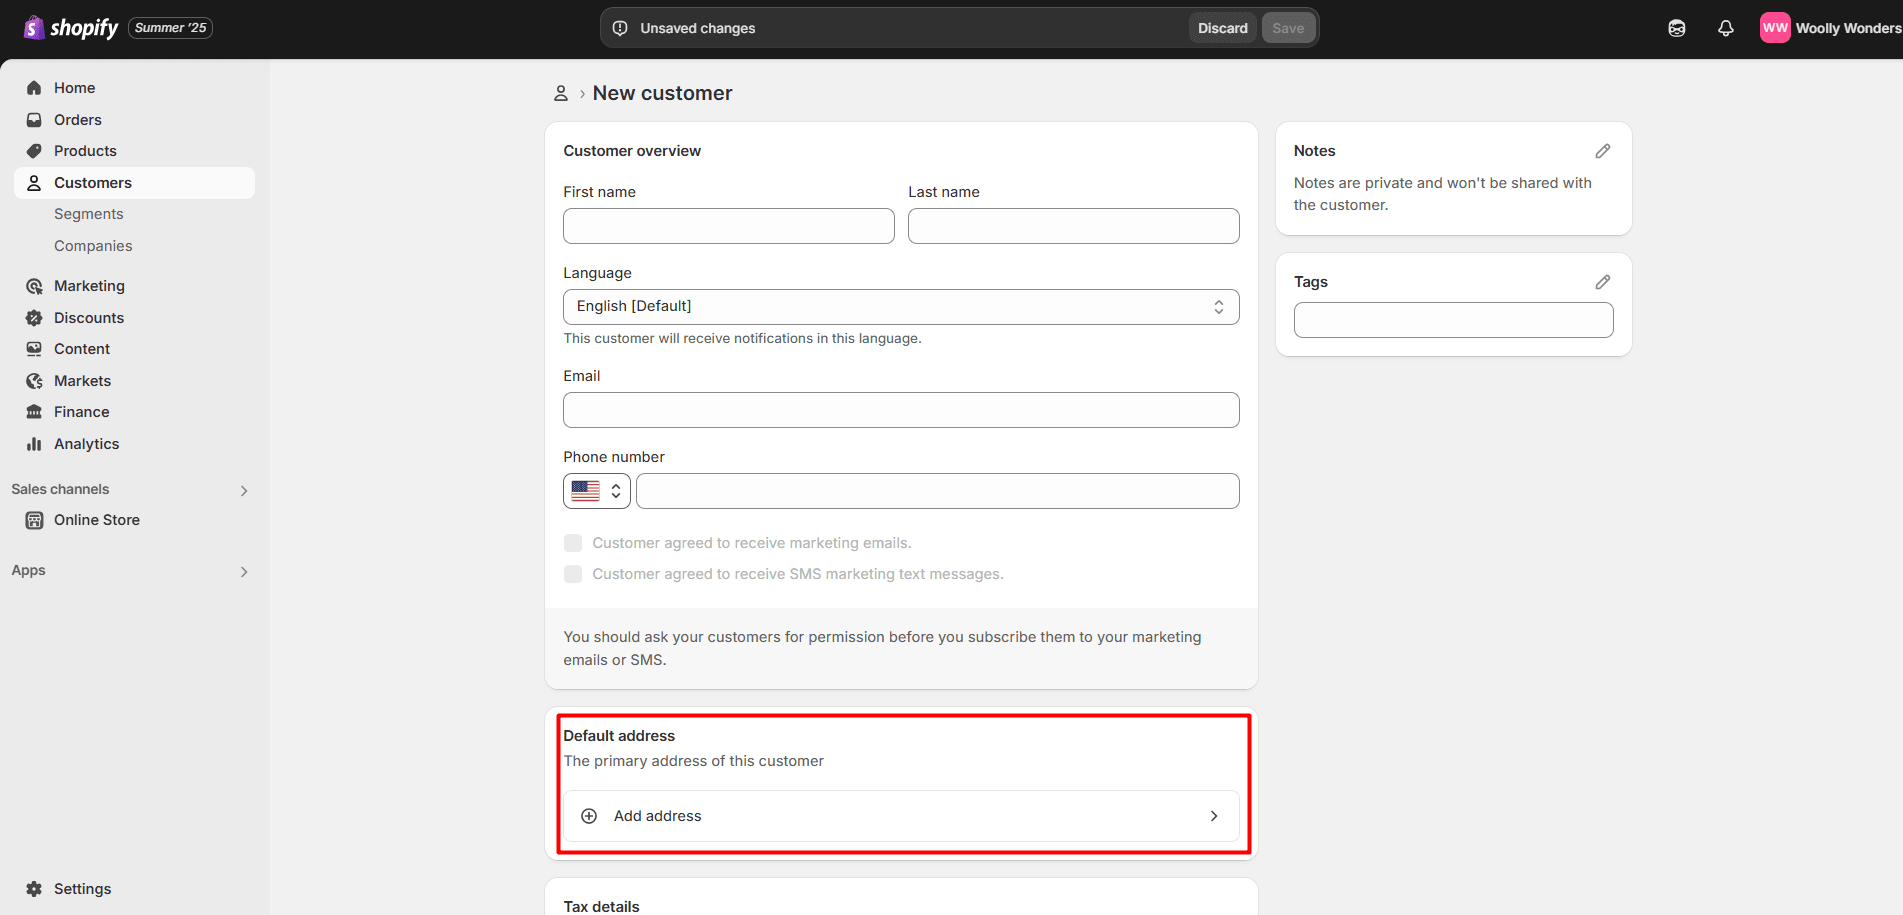
Step 4. Update the address details.
Step 5. Click Save.
Important Note
- Some shipping carriers (like UPS or FedEx) may not accept PO Boxes as a return address. If this applies to your business, consider adding a physical address just for returns.
- Always check your shipping settings to ensure that this new PO Box location doesn't affect carrier rates or delivery options.
What Happens After You Change a Customer’s Billing Address in Shopify
- The new address is used for future orders by default.
- Past orders remain unchanged.
- Helps reduce payment failures and fraud alerts.
- Used in draft orders and invoices.
- The customer can still override it at checkout.
How to Change Your Shipping Origin Address on Shopify
If you fulfill orders from a warehouse, office, or a different location than your business address, updating your shipping origin is crucial for accurate shipping rates and taxes.
Step 1: Go to your Shopify Admin > Settings.
Step 2: Click Shipping and delivery.
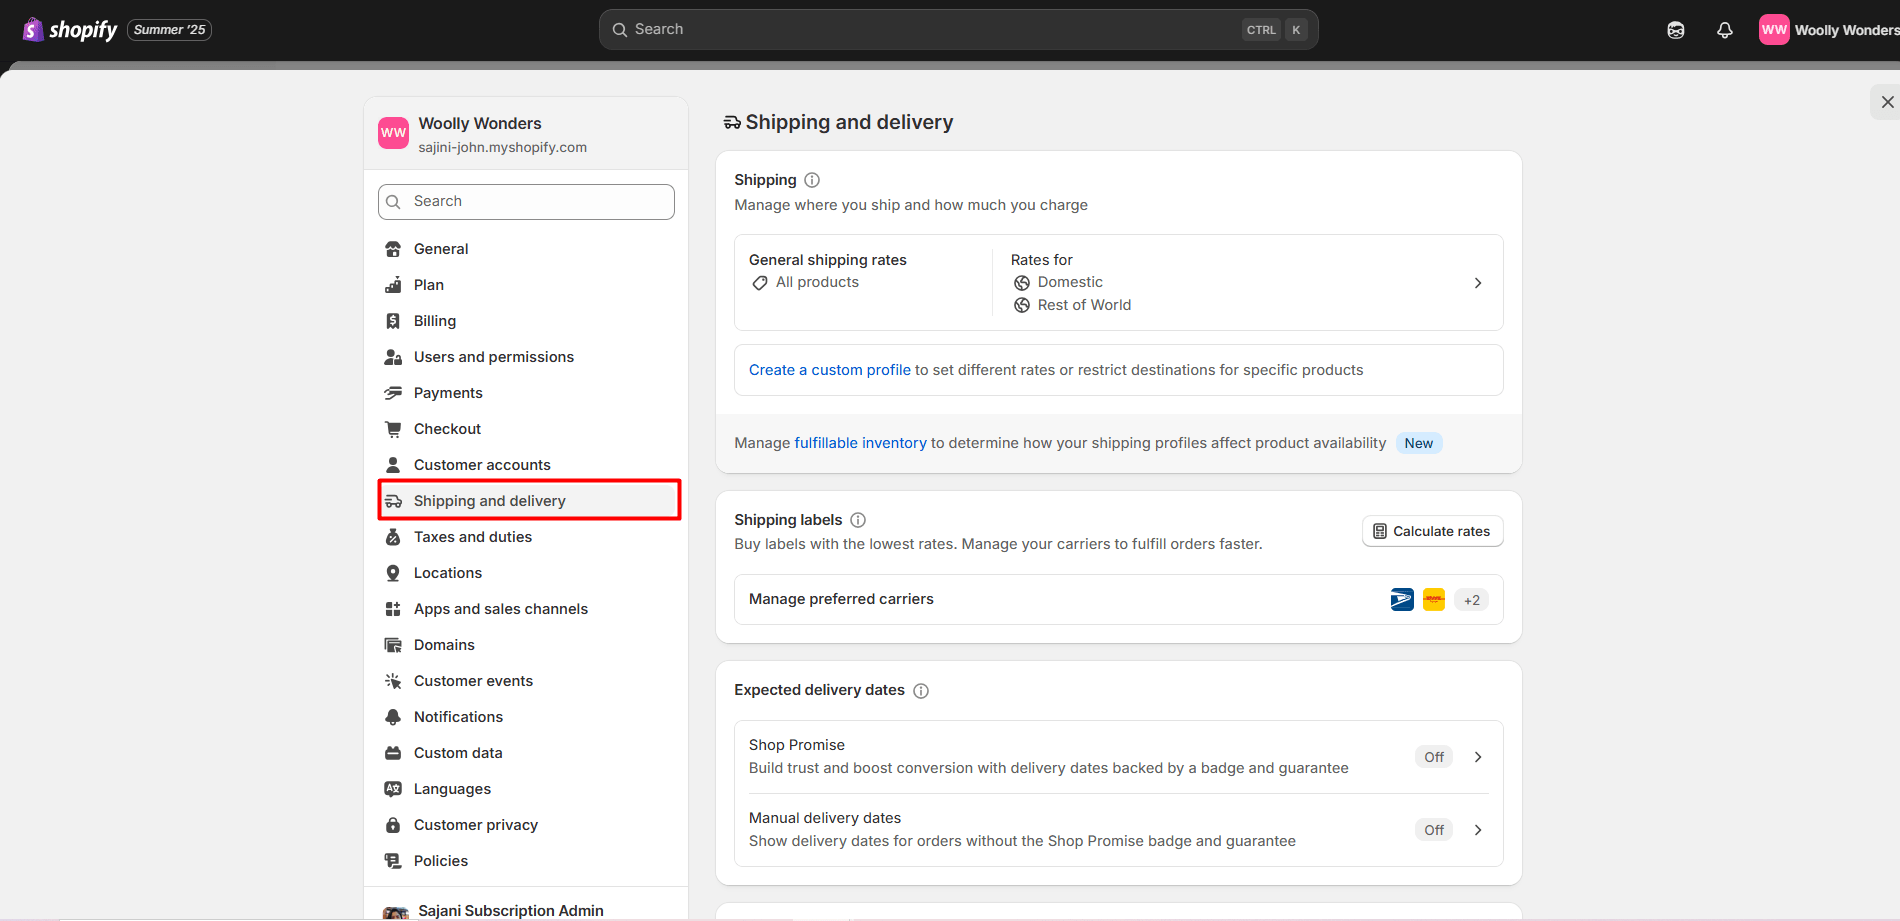
Step 3: Find the “Shipping Origin” section.
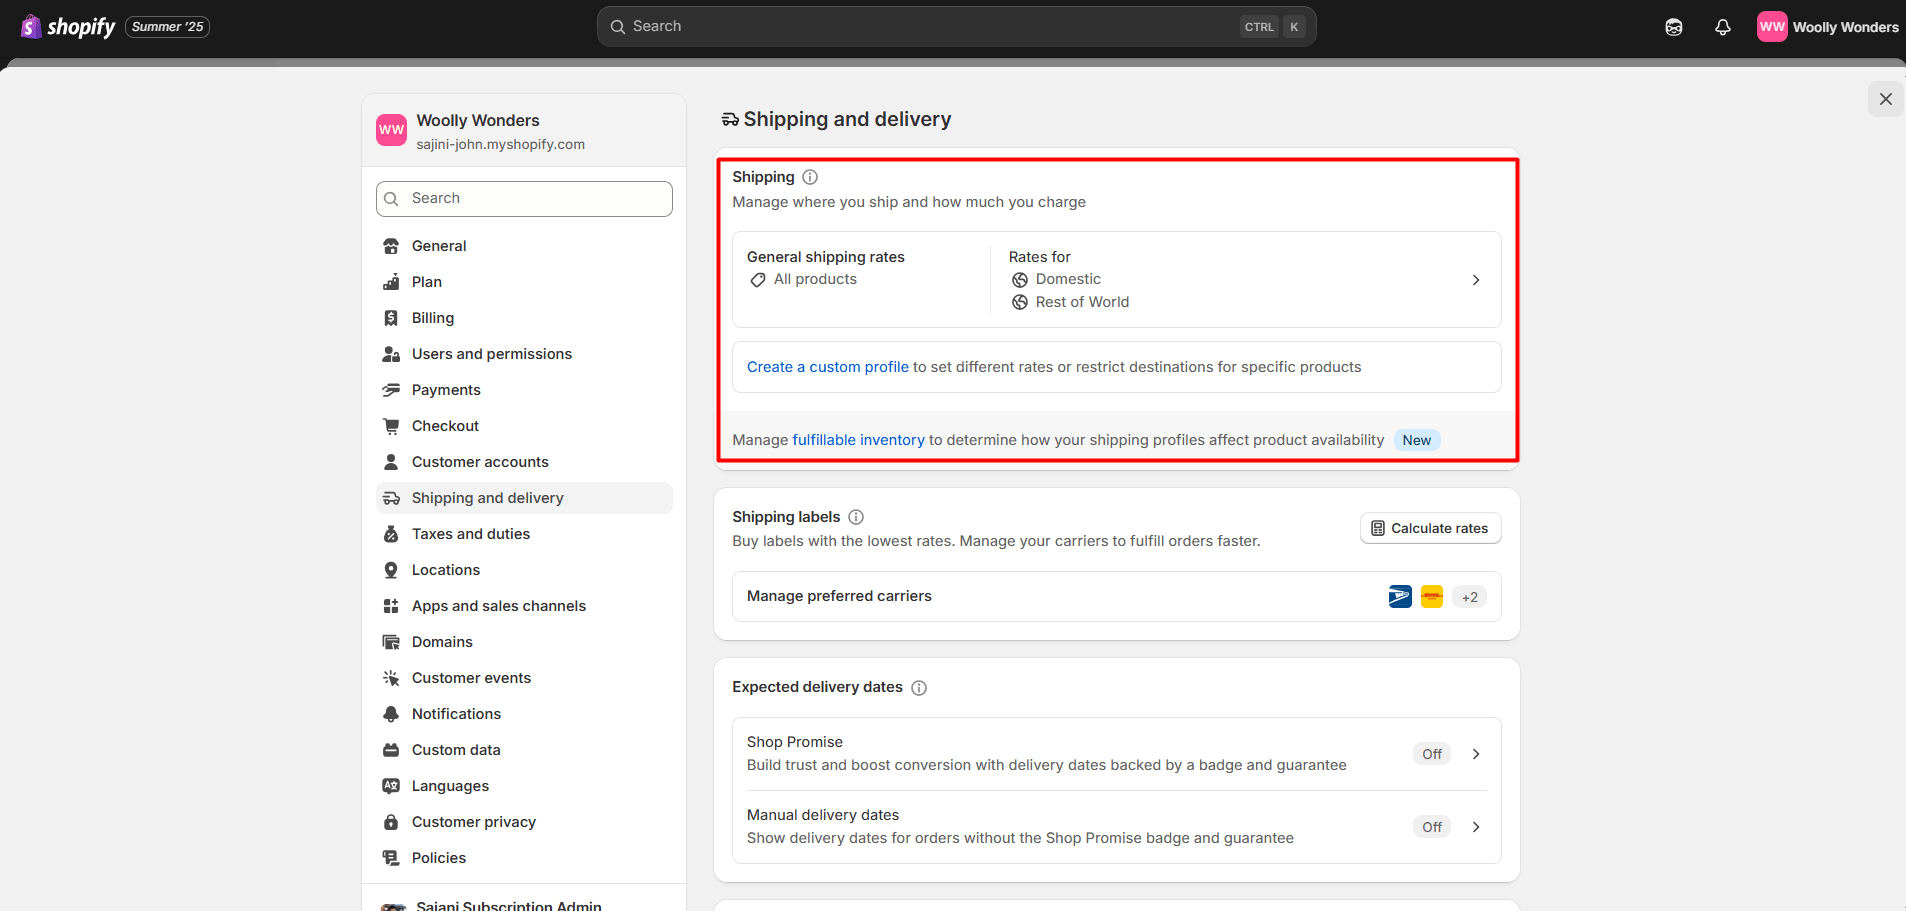
Step 4: Update the address to your desired fulfillment location.
- Replace the existing address with the correct warehouse, fulfillment center, or office location where your orders are packed and shipped from.
- Ensure the address is complete, including street name, city, postal code, and country.
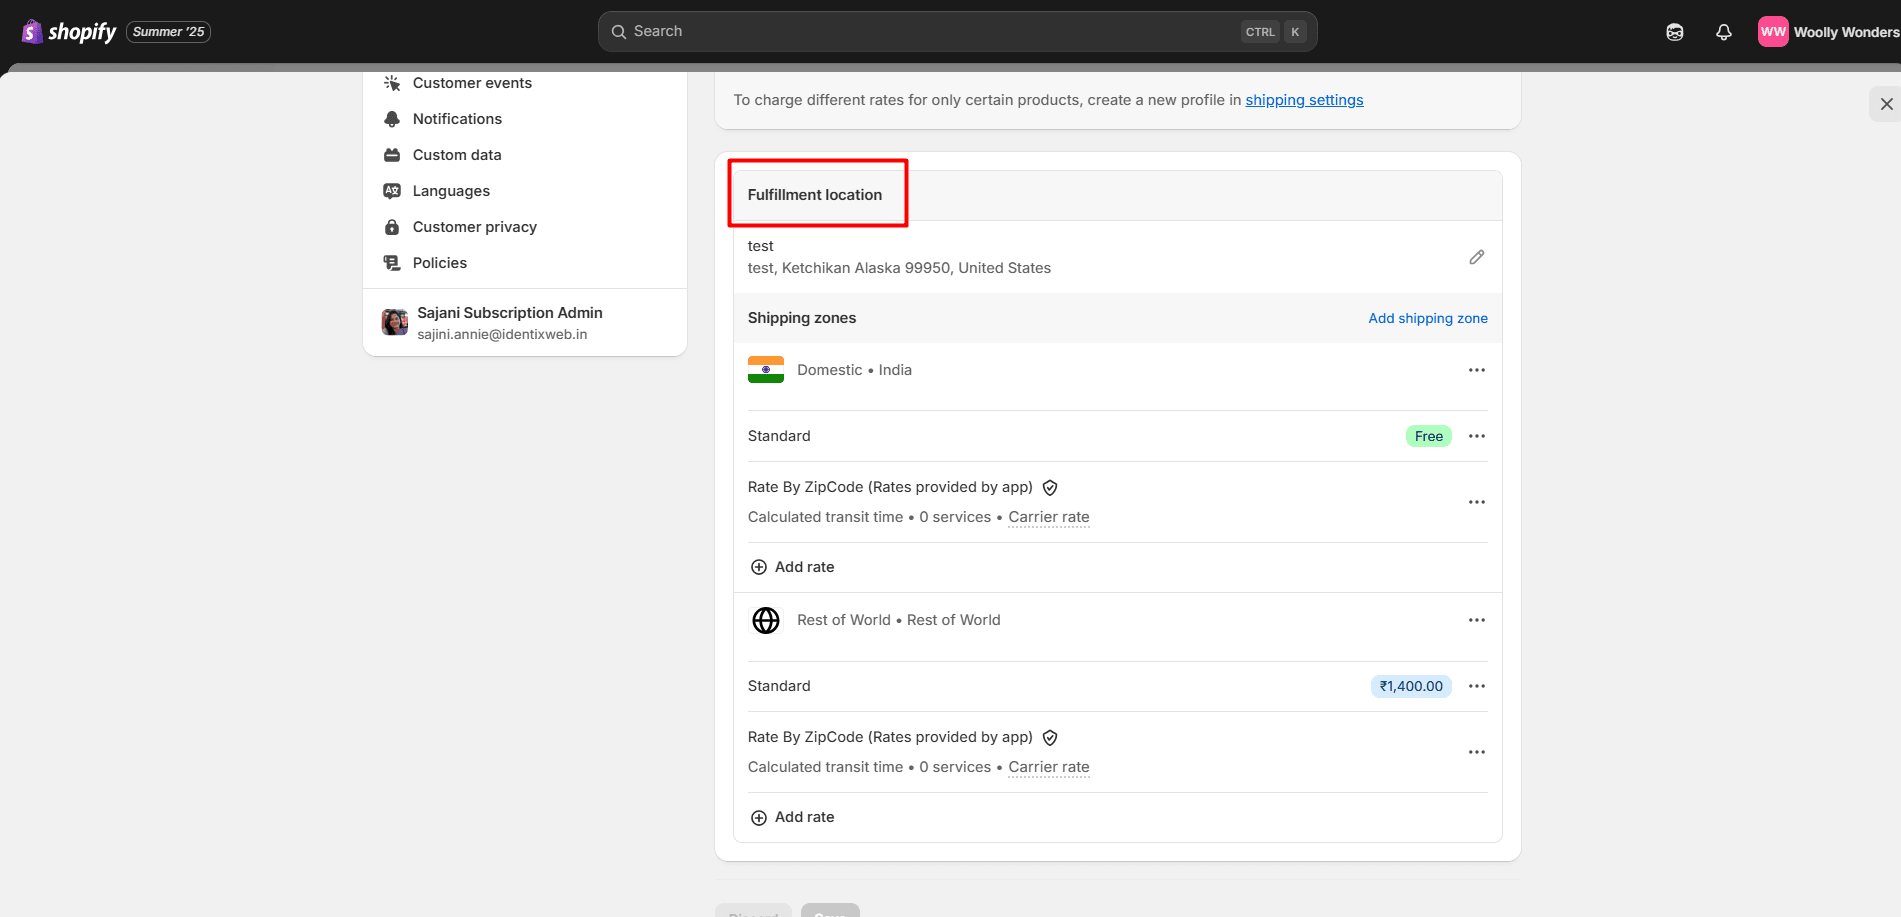
Step 5: Click Save.
Important Note
- Do not use a PO Box as your shipping origin if you're relying on real-time carrier-calculated rates (FedEx, UPS, DHL, etc.), as they may not accept it.
- Ensure the new address accurately reflects the location from which your products ship, to avoid overcharging customers or receiving incorrect rate estimates.
What Happens After Changing the Shipping Origin Address:
- Shopify recalculates shipping rates based on the new origin.
- Your tax calculations may also change depending on regional laws.
- The updated address appears on shipping labels if you're using Shopify Shipping.
- It helps reduce order delivery delays caused by mismatched location data.
Let’s take a closer look at real-world examples where updating address details made a measurable difference.
Case Studies: Successful Examples of Businesses That Change Addresses on Shopify
The Urban Apparel Brand — Moving Fulfillment to a Warehouse
Challenge
A booming streetwear label was originally running fulfillment from the founder’s home. While this approach was practical during the early growth phase, increased order volumes resulted in shipping delays, inconsistent packaging, and frequent returns. It also led to personal burnout due to the manual workload.
Solution
The brand decided to partner with a third-party logistics (3PL) provider. To ensure Shopify aligned with this new setup, they updated their Shipping Origin Address in the Shopify admin to reflect the warehouse location.
Results
- Shipping time reduced by 25%, thanks to faster processing and closer proximity to the shipping hub.
- Return-related issues dropped by 40%, as 3PL handled returns more efficientl.
- Real-time carrier rates became accurate, avoiding undercharging or overcharging on shipping fees.
- The improved workflow allowed the founder to regain personal time.
Artisan Soap Seller — Switching to a PO Box for Privacy
Challenge
A solo entrepreneur crafting handmade soaps from home was growing increasingly uncomfortable sharing their residential address. Invoices and return labels exposed personal details, which felt unprofessional and risky from a privacy standpoint.
Solution
They rented a PO Box and updated the Business Address in their Shopify settings. This ensured all business communication, invoices, and return shipments were routed to the PO Box instead of their home.
Results
- Enhanced personal privacy and security.
- Boosted brand credibility, with a dedicated mailing address on invoices.
- Seamless return handling, as customers had a consistent and professional address to send items back to.
- Built greater trust with customers, especially new ones purchasing from a small business.
Subscription Box Startup — Consolidating Locations for Clarity
Challenge
This startup operated from two separate addresses, one for billing and one for shipping. This created headaches during tax season, made syncing systems like inventory and invoicing complex, and confused new team members.
Solution
They consolidated both the business address and shipping origin to a single fulfillment center. All necessary details were updated in Shopify to ensure consistency across settings.
Results
- Streamlined accounting and legal paperwork
- Better inventory accuracy, with one central shipping point
- Simplified internal operations, especially during team onboarding and vendor communication
- Reduced chances of logistical errors or shipping to the wrong address
Correct Address in Your Shopify Store: Final Thoughts
In the fast-moving world of e-commerce, small details make a big difference, and your store’s address is one of them.
Now that you have learned how to change address on Shopify the right way, don’t wait. Head over to your Shopify dashboard and apply these updates. A few clicks today can prevent hours of support tickets tomorrow.
Need help configuring multiple addresses or syncing them with your shipping providers? Contact our Shopify support for personalized guidance.
FAQs
1. Can I use a PO Box as my shipping origin?
Not recommended. Most real-time carriers require a physical address for accurate rate calculation and pickup.
2. Will customers see my PO Box address?
Yes, if it’s your store address on invoices or packing slips. You can use a PO Box for privacy, but keep shipping carrier requirements in mind.
3. Can customers edit their own addresses?
Only before checkout. After placing the order, changes must be made by the store admin.
4. Is it possible to set different addresses for billing and shipping?
Yes, Shopify allows you to use different billing and shipping addresses during the checkout process.
5. How many addresses can I save for a customer?
You can save multiple addresses per customer in their profile, but only one is set as the default.


About the author
Bhavesha Ghatode
Explore Content with Bhavesha, a passionate and dedicated technical content writer with a keen understanding of e-commerce trends. She is committed to sharing valuable insights, practical assets, and the latest trends that can help businesses thrive in a competitive environment.