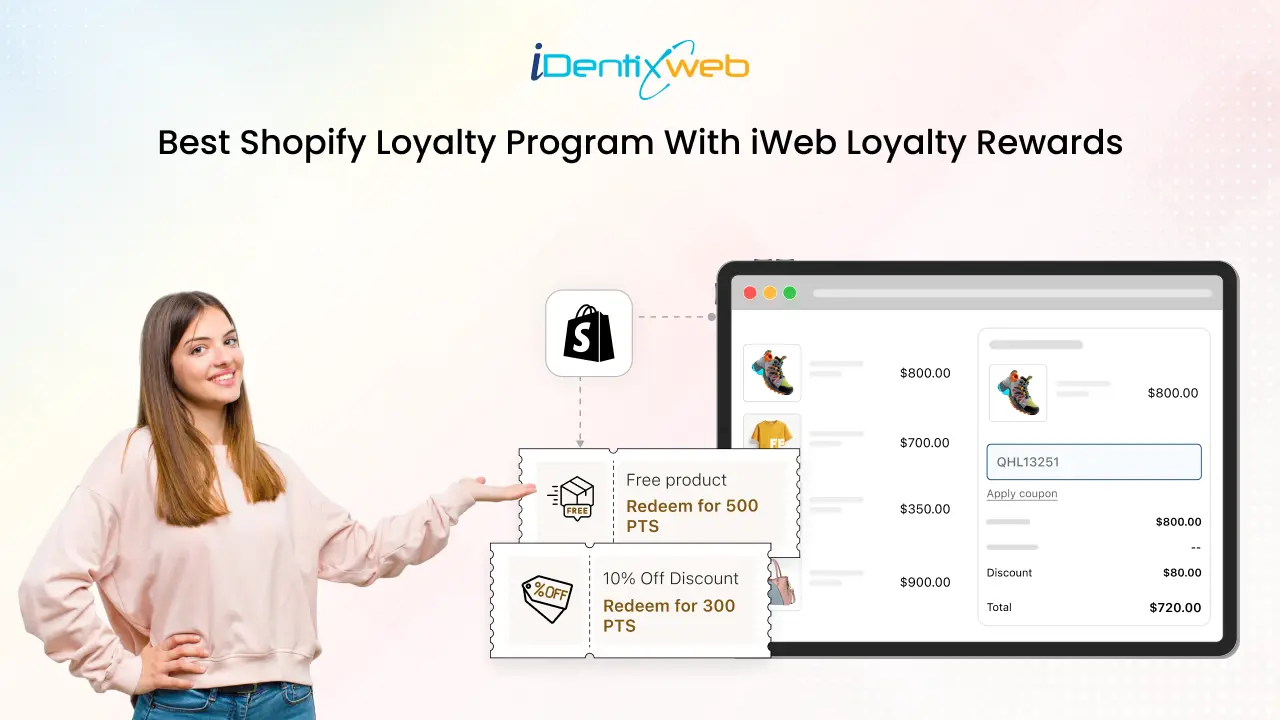
Loyal customers are key to long-term growth. To build a thriving Shopify store, setting up the best Shopify loyalty program is crucial.
The iWeb Loyalty Rewards app is a favorite among Shopify merchants for its flexibility and ease of use. In this guide, we’ll cover everything from installing to customizing and launching your first best loyalty program for Shopify.
What is a Shopify Loyalty Program?
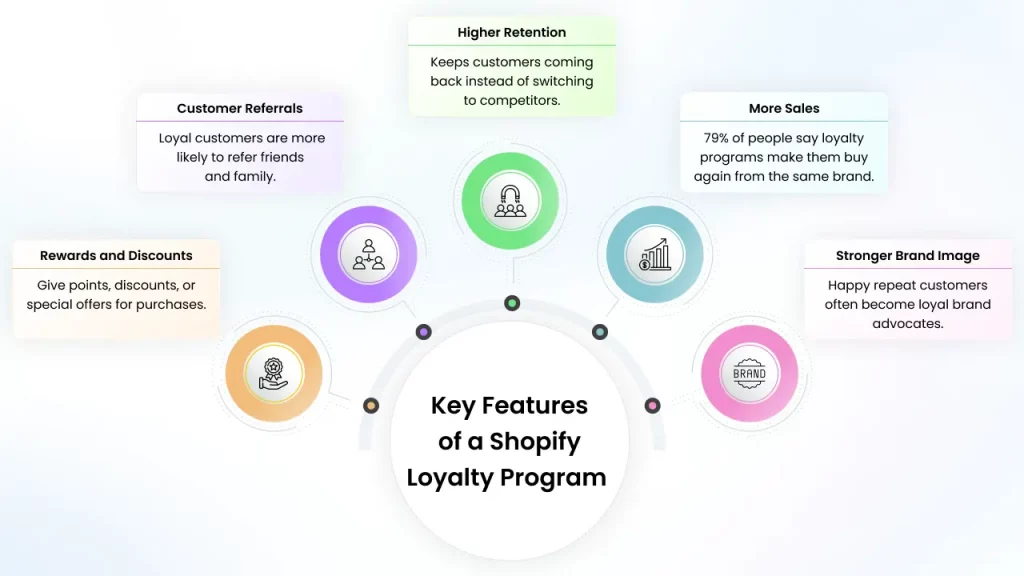
A Shopify loyalty program rewards customers for shopping with you. It offers points, discounts, free gifts, or other perks to encourage them to return and make purchases.
Before we delve into the features, it's essential to understand how Shopify loyalty programs work effectively. Simply put, they are designed to reward customers for their continued support, creating incentives that support repeat purchases and stronger relationships.
How to Set Up Your Best Shopify Loyalty Program With iWeb
iWeb Loyalty Rewards is a user-friendly app that enables you to create and manage a customized best Shopify loyalty program for your store.
Here is a step-by-step process to guide you:
Step 1: Install iWeb Loyalty Rewards App
Before building your customer loyalty program, you must install the iWeb Loyalty Rewards app from the Shopify App Store. Follow these steps:
1. Go to the Shopify App Store and search for iWeb Loyalty Rewards.
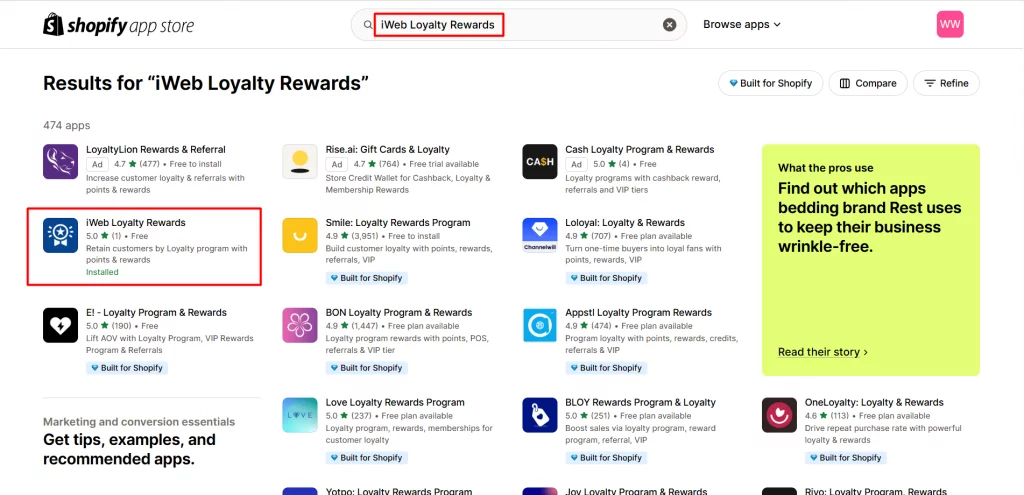
2. Click on the app, then click install.
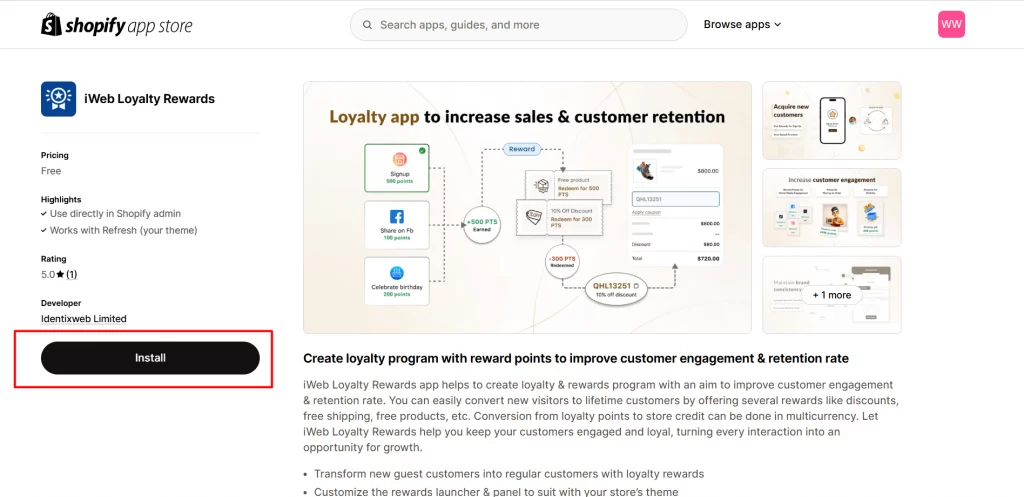
3. You will be redirected to your Shopify store’s admin panel to complete the installation process.
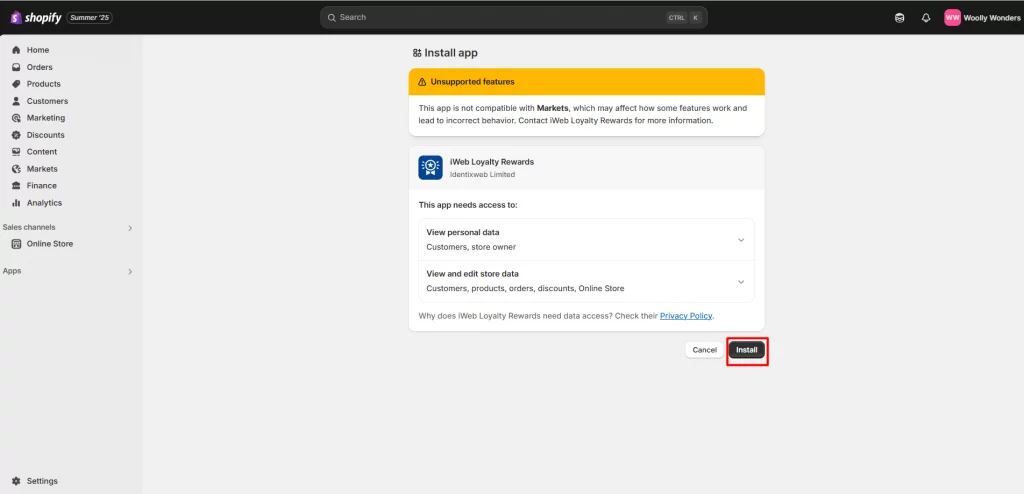
Note: The basic Onboarding Setup is already in place.
Step 2: Complete Onboarding Setup
To start the onboarding setup, follow the steps:
1. After installing the app, you’ll be automatically guided to the onboarding setup.
2. You will be guided through a quick 3-step setup.
3. Choose the percentage of points your customers earn per order, typically 3%, 5%, or 10%.
For example, with a 5% setting, customers earn 5 points for every $100 spent. This percentage defines your program's value and engagement, and can be updated anytime.
4. Choose who can join your loyalty program. You can allow guests to earn points even without creating an account, just toggle the option on or off based on what works best for your store.
5. After setup, enable the iWeb Loyalty Rewards app in your store theme to display the loyalty widget, allowing customers to view and redeem points easily
Note: If you are using the app for the first time, completing this setup is mandatory to activate the main features of the loyalty program.
Once set up, your best Shopify loyalty program is live. Monitor activity, adjust rewards, and build stronger relationships with your customers.
Step 3: Configure Loyalty Points System
Let’s take a look at the ways your customers can earn points and how you can easily set them up.
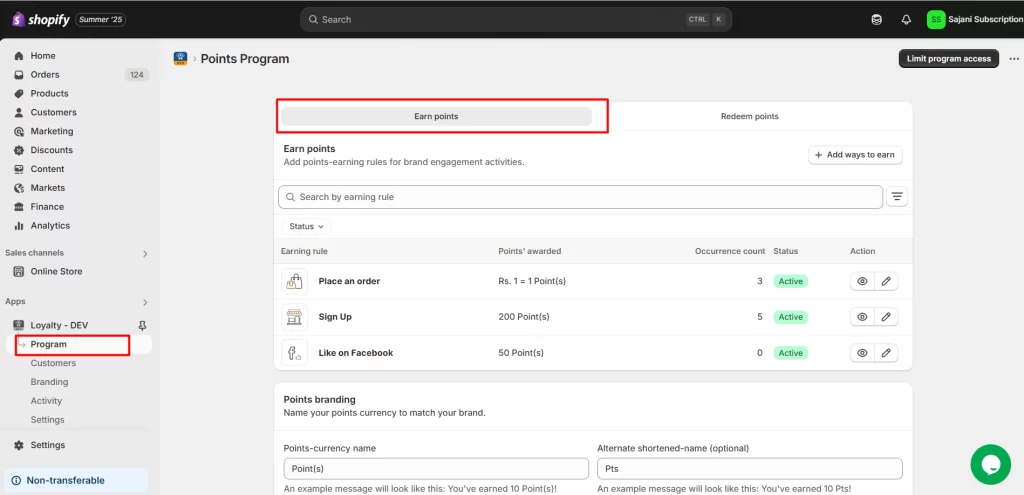
1. Earn Points Setup
To access the Earn Point settings in the app, open the app, go to Point Program, and then navigate to Earn Points.
Place an Order Rule
One of the simplest and most effective ways to reward your customers is by letting them earn points for every order they place.
You can set the number of points customers will earn per order. Choose whether the points are based on the order total or a fixed value.
With iWeb Loyalty Rewards, you can easily configure how many points are awarded per purchase:
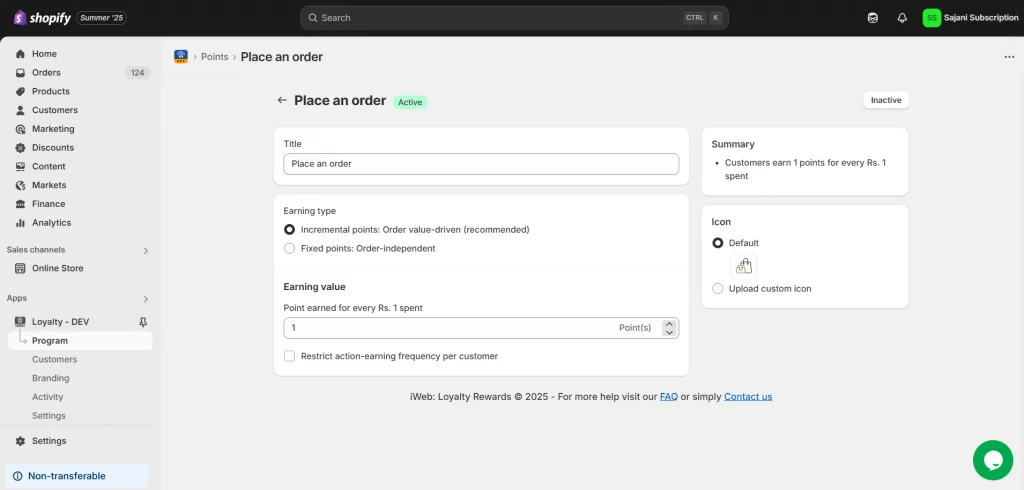
- Title – Set a clear name, such as “Shop & Earn,” to display in the rewards list.
- Earning Type –
- Increments of Points (e.g., 1 point per $1 spent – encourages higher spending).
- Fixed Points (e.g., 100 points per order – consistent reward).
- Earning Value – Define the number of points based on the chosen earning type.
- Frequency Restriction – Limit how often customers earn points (e.g., once per day) to prevent misuse.
Celebrate a Birthday
Celebrating birthdays with bonus points makes customers feel valued, fostering a personal connection and boosting engagement, loyalty, and sales.
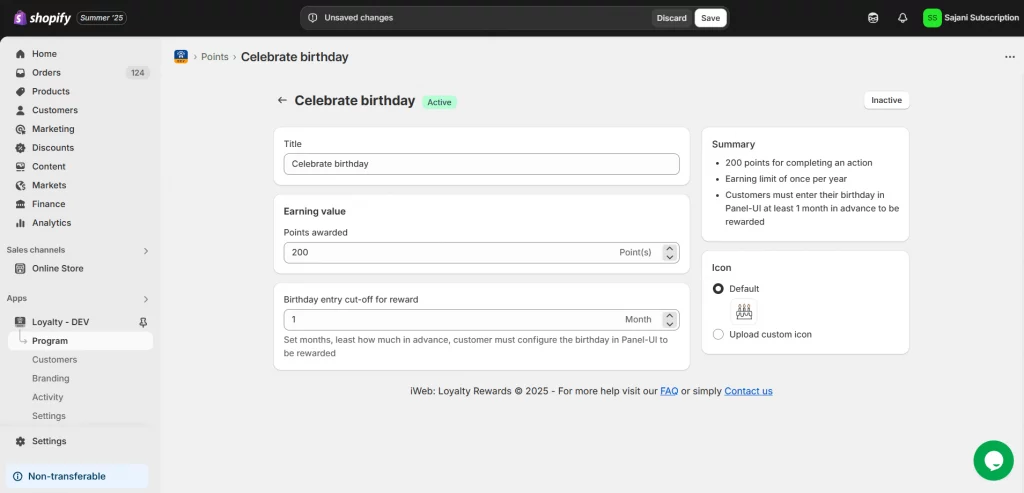
- Title: Personalize the reward name (e.g., “Birthday Points” or “Celebrate Your Day with Rewards”) to make it feel special.
- Earning Value: Set the exact number of points customers will earn on their birthday (e.g., 100 points).
- Cut-Off Time: Define how far in advance customers must submit their birthdate to qualify for the reward (e.g., at least 1 month prior).
Sign Up
Offer points when new customers create an account. This encourages engagement from the start, boosts sign-ups, and builds long-term loyalty by opening the door to future offers and promotions.
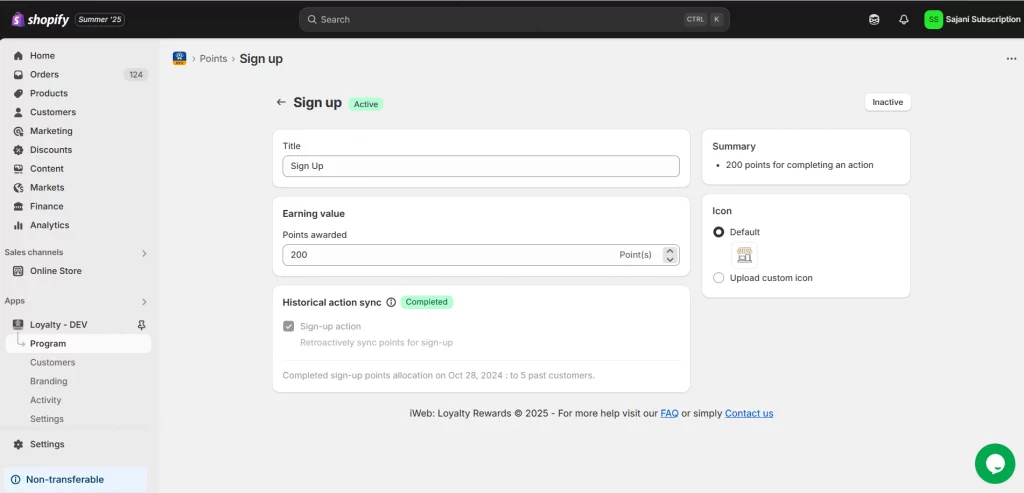
- Title: Customize the name (e.g., “Welcome Points”) to show the reward clearly.
- Earning Value: Set how many points new users earn for signing up (e.g., 50 points).
- Historical Sync: Award points to past signups by enabling this option.
Note: Shopify’s new passwordless signup (via email) doesn't trigger standard signup events. As a result, customers won’t automatically receive signup rewards if you're using this method.
Set Earning Points through Social Media Engagement
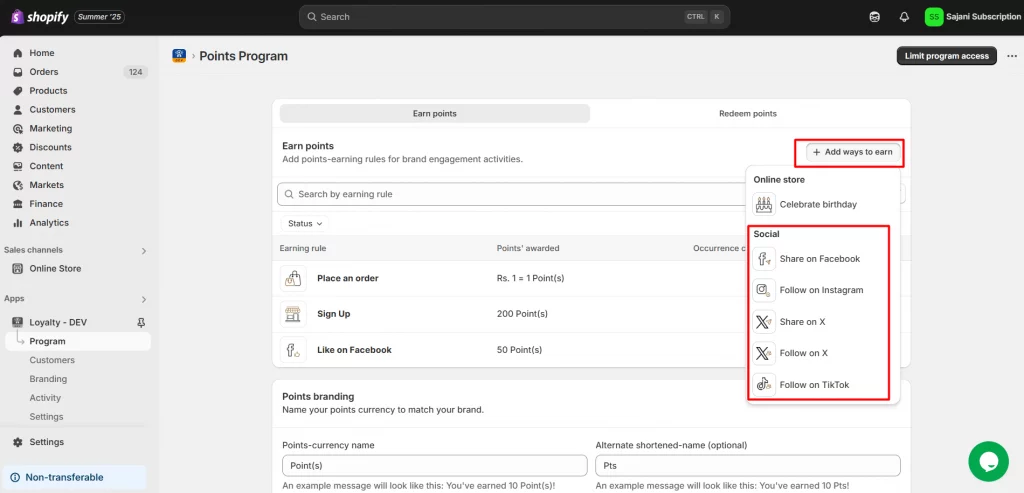
Enhance your brand visibility by rewarding customers for engaging with your social media channels. With this app, you can offer points for simple actions that encourage followers to become promoters.
Ways to Earn Points Through Social Media:
- Share your content on Facebook
- Follow on Instagram
- Join you on X (formerly Twitter)
- Tweet or share content on X
- Follow your TikTok account
2. Redeem Point Setup
Set who can redeem points, how, and when they earn them based on order status. With the app, you can offer discounts, free products, and more.
Here’s how to set it up:
To access the redeem point settings in the loyalty app, select Program, and then navigate to Redeem Points.
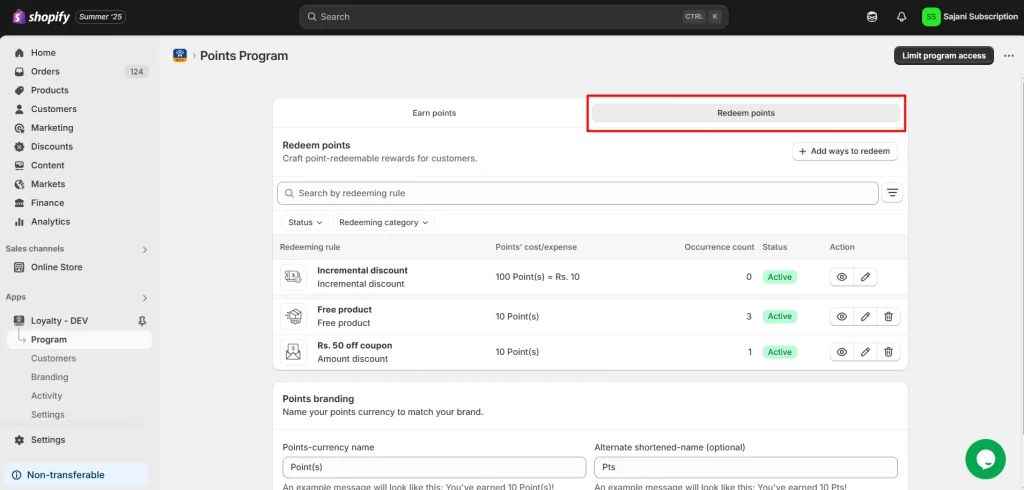
You can easily search for specific redemption rules using filters such as Rule Name and Status (Active or Inactive).
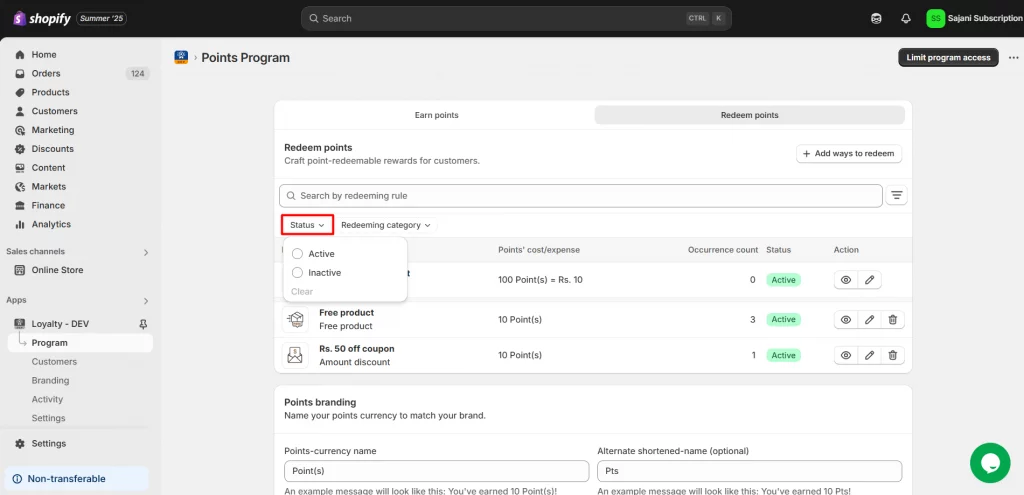
Redeeming Category: The available categories include Incremental Discount, Amount Discount, Percentage Discount, Free Shipping, Free Product, and Points to Store Credit, helping you easily manage rules for your loyalty program.
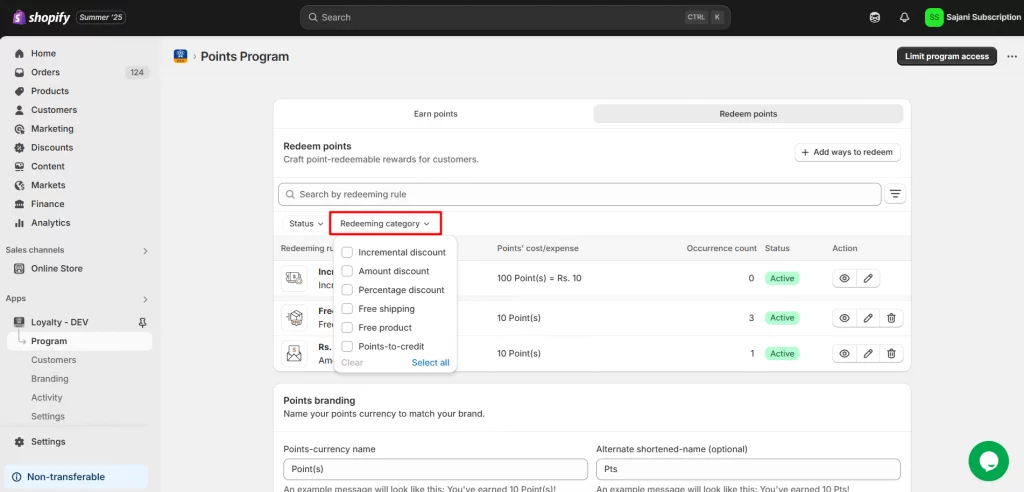
Incremental Discount
This option allows customers to receive a discount based on the number of points they use, for example, $1 off for every 100 points. The more points they redeem, the bigger the discount, encouraging them to spend more.
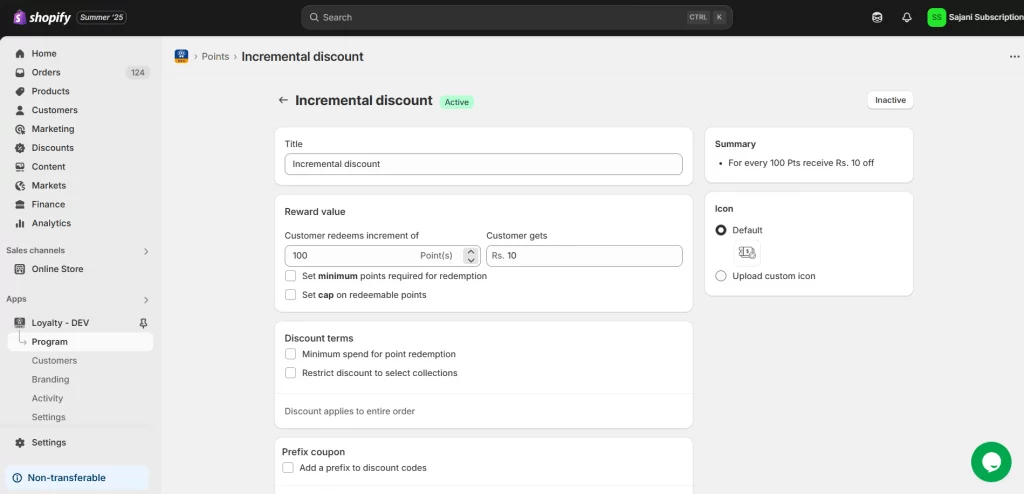
You can customize how it works and appears:
- Title: Set a clear name for the reward, like “Points for Savings,” to match your brand tone.
- Set the reward value to determine the number of points customers must redeem for discounts. For example, you can configure it so that for every 100 points spent, the customer receives a $1 discount. Additionally, you can establish limits for redemption eligibility:
- Minimum Amount for Redemption: Specify the minimum number of points required to redeem them. This ensures users can only utilize the redemption option once they have accumulated enough points.
- Maximum Redemption Cap: Specify the maximum number of points that can be redeemed at once. This ensures there is a limit to the points a user can redeem in a single transaction.
- Discount Terms:
- Minimum Spend: Set a minimum order amount to redeem points.
(For example, customers must spend at least $50 before they can apply their points toward a discount.) - Limit by Collection: Apply the discount only to specific product collections.
- Minimum Spend: Set a minimum order amount to redeem points.
- Prefix Coupon: Add a custom prefix to discount codes for easy tracking (e.g., TEST91DY84Q)
- Combine Discounts: Choose if this discount can be stacked with:
- Order Discounts
- Shipping Discounts
- Product Discounts
Amount Discount
Amount Discount gives a fixed discount for a set number of points, e.g., 500 points = $10 off. It offers clear value and is great for encouraging bigger purchases.
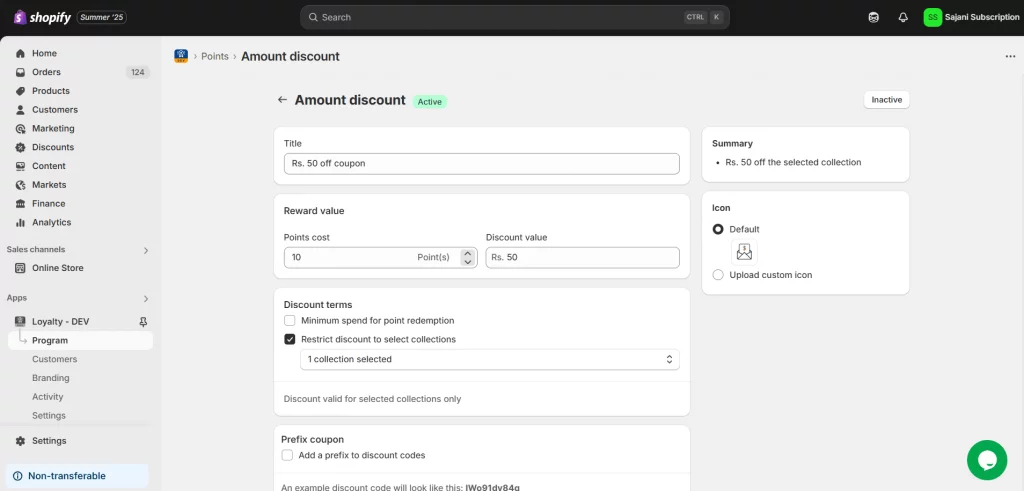
You can customize how it works and appears:
- Title: Name the discount clearly (e.g., “Flat Discount” or “Fixed Savings”).
- Reward Value: Set a fixed discount for a specific point value (e.g., 500 points = $5 off).
- Discount Terms:
- Minimum Spend: Set a required order amount to redeem (e.g., spend $ 50 or more).
- Product Scope: Limit to specific collections, such as “Seasonal Items.”
- Prefix Coupon: Add a custom code prefix (e.g., "SAVE") for tracking purposes.
- Combine Discounts: Select whether it applies to other discounts (order, shipping, or product-based).
Percentage Discount
Customers can redeem points for a percentage off their order (e.g., 500 points = 10% off). Ideal for larger purchases, as the savings increase with order value.
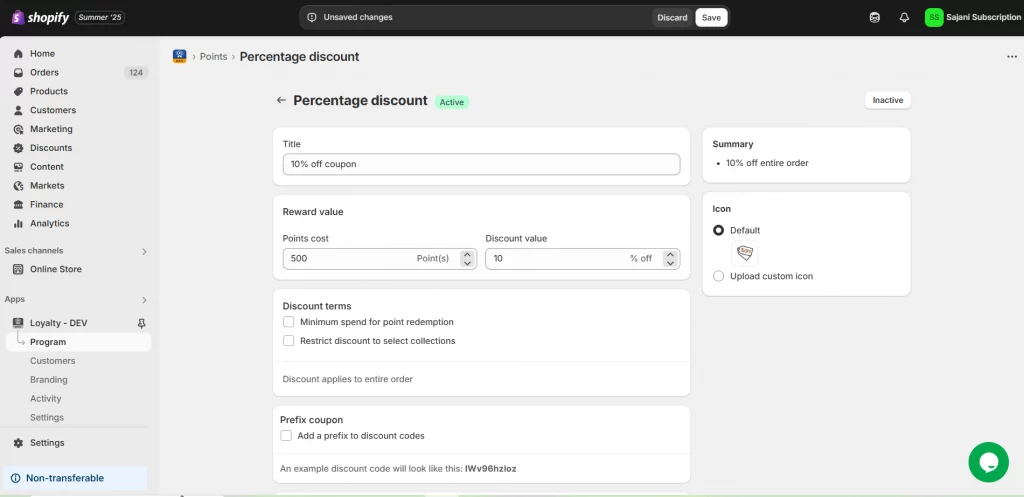
- Title: Name the reward (e.g., “Save with Points”) to match your brand.
- Reward Value: Set points required for a % discount (e.g., 500 points = 10% off).
- Discount Terms:
- Minimum spend required (e.g., $ 50 or more).
- Limit to specific collections (e.g., “New Arrivals”).
- Prefix Coupon: Add a custom prefix to codes (e.g., PERCENT123XYZ).
- Combine Discounts: Allow stacking with order, shipping, or product discounts.
Free Shipping
Customers can redeem points to get free shipping, helping them save on delivery costs. It’s a popular reward that boosts satisfaction, reduces cart abandonment, and encourages more completed purchases.
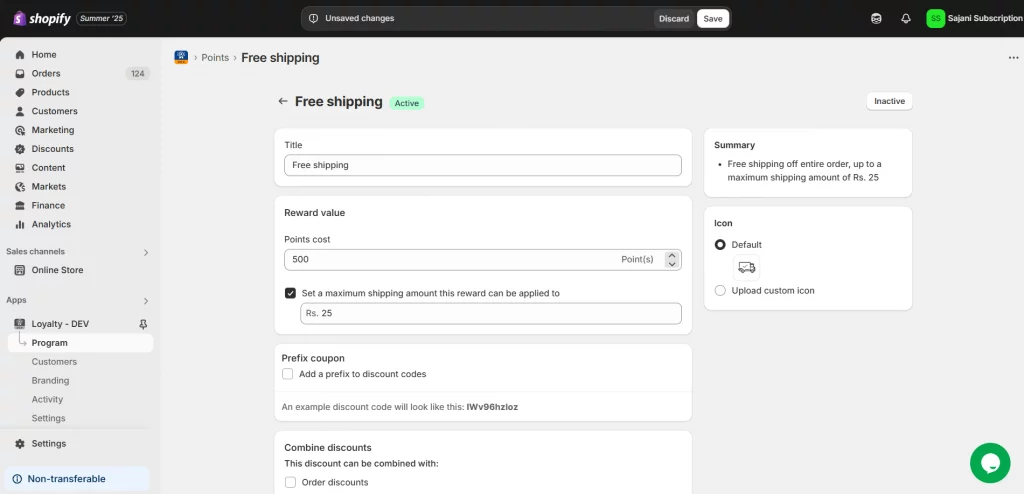
- Title: Name the reward, such as “Free Shipping with Points,” to match your brand style.
- Reward Value: Set the number of points required (e.g., 300 points for free shipping) and optionally cap the maximum shipping cost covered.
- Prefix Coupon: Add a custom prefix (e.g., SHIPFREE) to generated codes for easy tracking and brand alignment.
- Combine Discounts: Choose if it can be used with:
- Order Discounts
- Product Discount
Free Product
Allow customers to redeem points for specific products like samples or promotions. This boosts loyalty, promotes popular items, and encourages cross-selling and engagement.
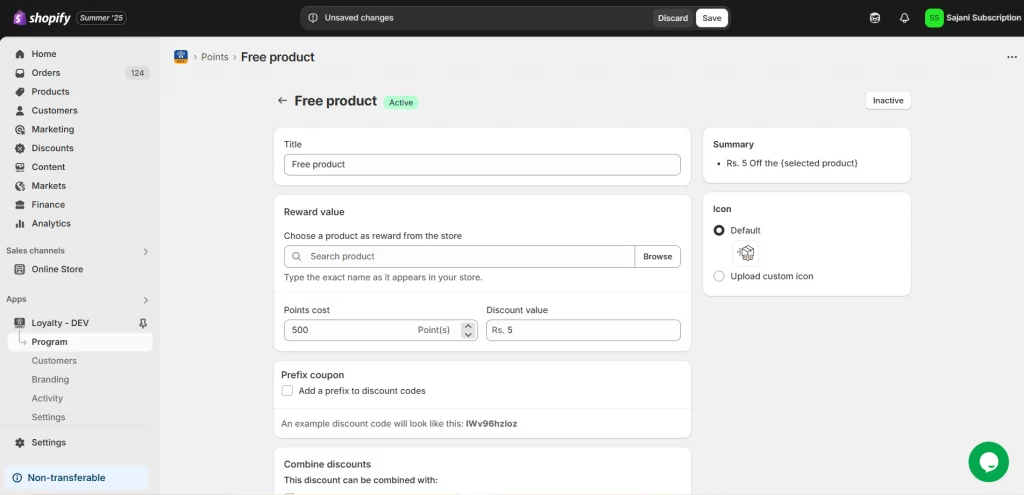
- Title: Name the reward (e.g., “Free Gift with Points”) to align with your branding.
- Reward Value: Select a product from your store to offer as a reward and set the required points for redemption. For example, you can configure it so that 1,000 points unlock a complimentary branded mug. This flexibility allows you to offer rewards that are both attractive and aligned with your loyalty strategy.
- Prefix Coupon: Add a custom prefix (e.g., FREEITEM) for easier tracking and brand consistency.
- Combine Discounts: Select whether the discount can be applied to orders, products, or shipping.
Step 4: Settings for Best Shopify Loyalty Program
Manage key loyalty program settings here: control the app’s status, set participation rules, and configure how customers earn and redeem points.
Please note that only registered members are eligible to earn points. To start enjoying the benefits, customers must create an account.
You can also handle the conversion of points to and from store credit for a smooth experience.
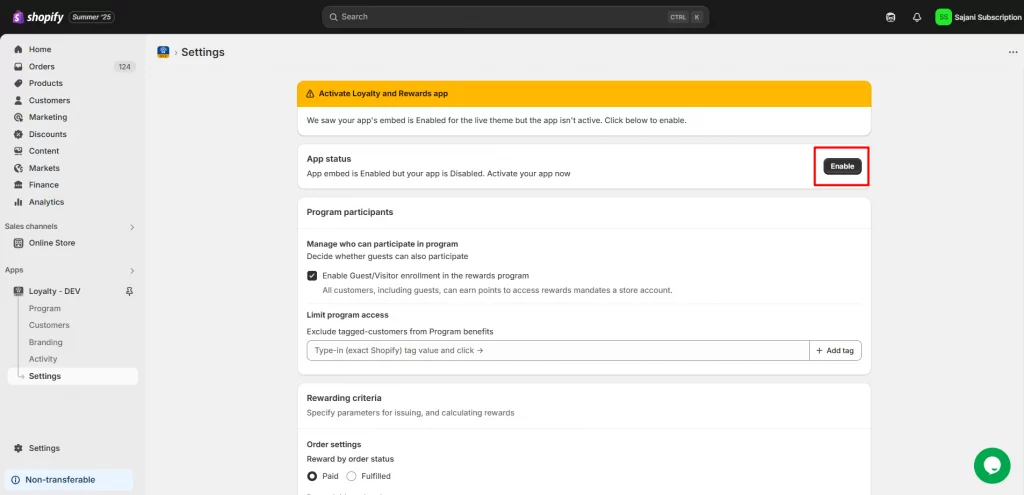
1. Program participants
Since the basic setup is already provided in the onboarding step, which allows you to manage front-end settings, such as participation rules.
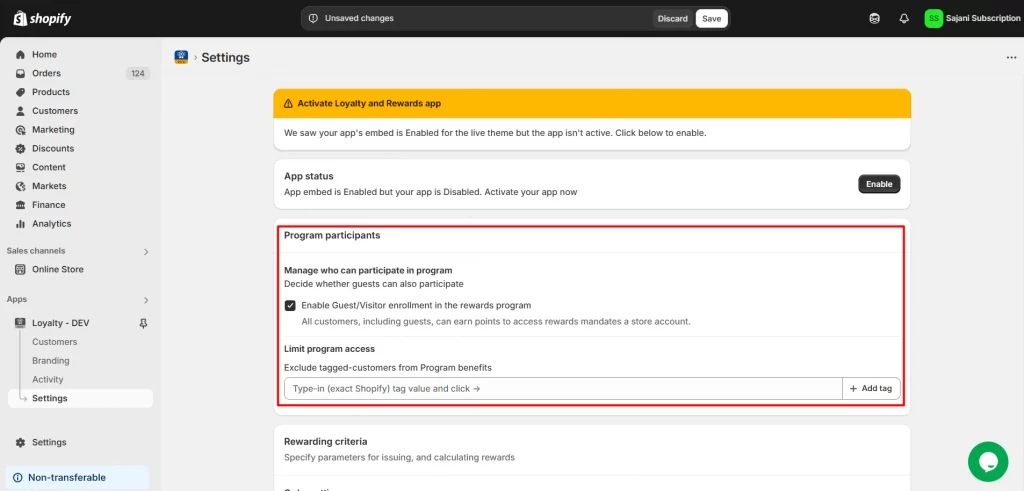
Even after setting up the basic program, it’s essential to control who can join your loyalty program. Managing participation ensures your rewards are given only to the right customer groups.
You can allow or restrict guest access by simply enabling or disabling the guest participation option. Additionally, use the limit program access feature to exclude specific customers by applying tags.
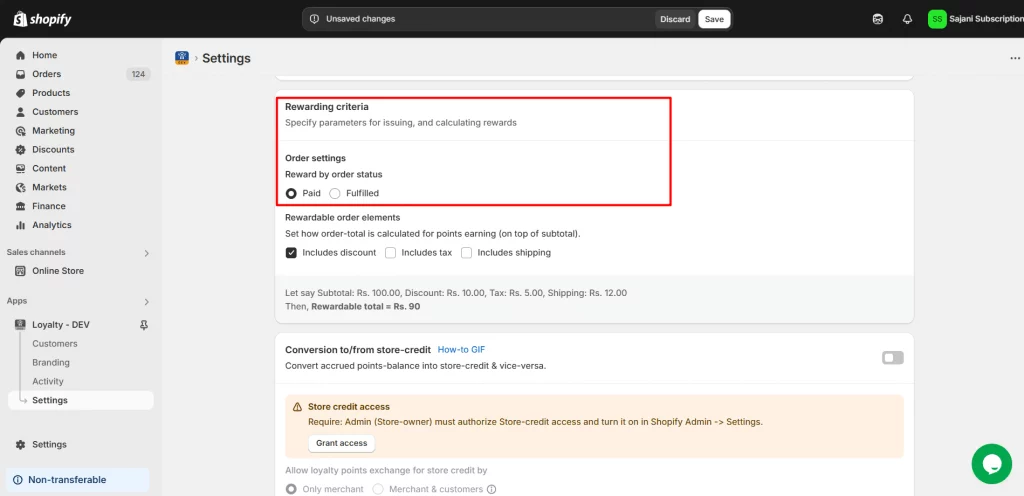
2. Rewarding Criteria
Reward by Status lets you assign loyalty points based on order status, giving you control over reward distribution and influencing customer behavior.
- After the order is paid: Choose this option if you want to reward customers immediately.
- After the order is fulfilled (delivered): Select this option if you want to issue points only after delivery confirmation has been received.
3. Rewardable Order Elements
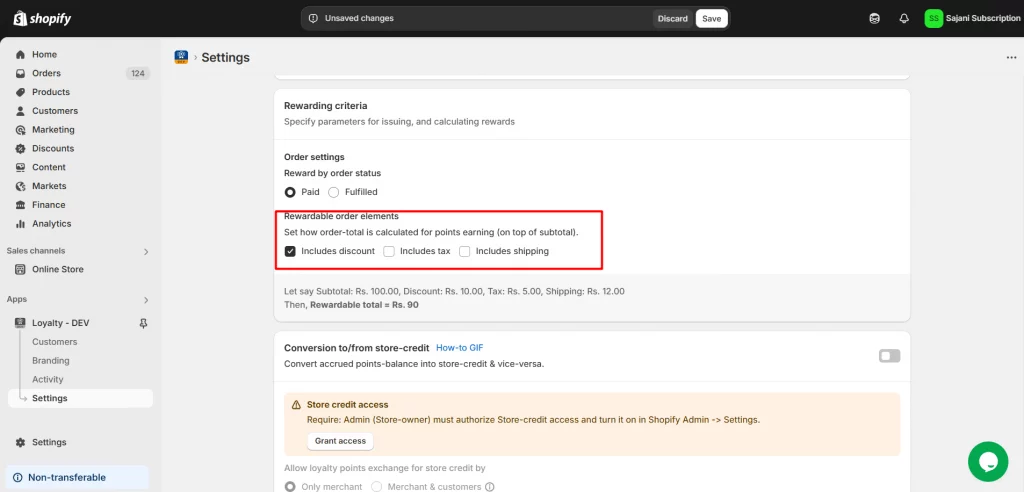
Decide what to include when calculating points:
- Include Discount
- Include Taxes
- Include Shipping Fees
You can include or exclude these to control how points are given.
Example: Let’s say a customer places an order with the following:
- Subtotal: Rs. 100.00
- Discount: Rs. 10.00 (include)
Then:
Rewardable Total = Rs. 100 - Rs. 10 = Rs. 90
Customers will earn points based on Rs. 90.
- Tax: Rs. 5.00 (include)
- Shipping: Rs. 12.00 (include)
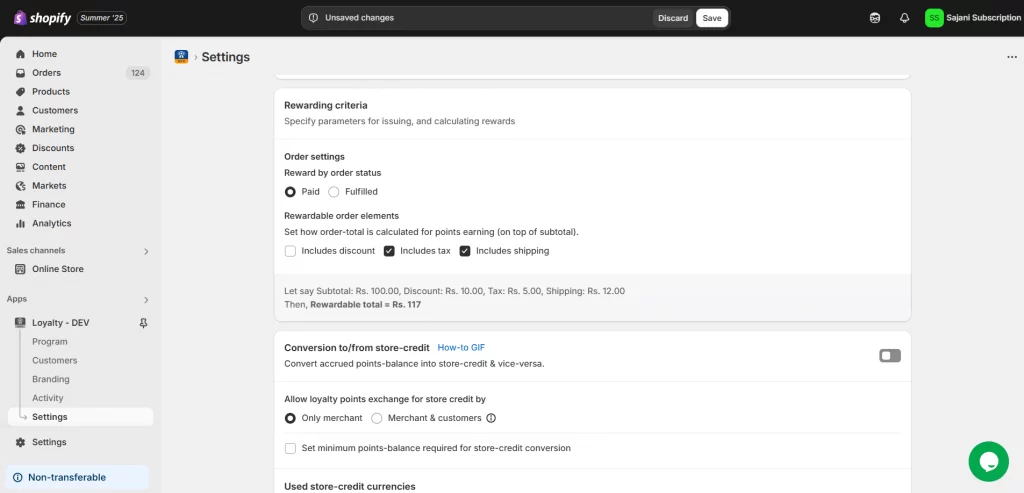
Then:
Rewardable Total = Rs. 100 + Rs. 5 + Rs. 12 = Rs. 117
Customers will earn points based on Rs. 117.
When an order is placed, loyalty points are calculated based on the subtotal amount, excluding discounts, including taxes, and shipping charges. It will be helpful to earn more points.
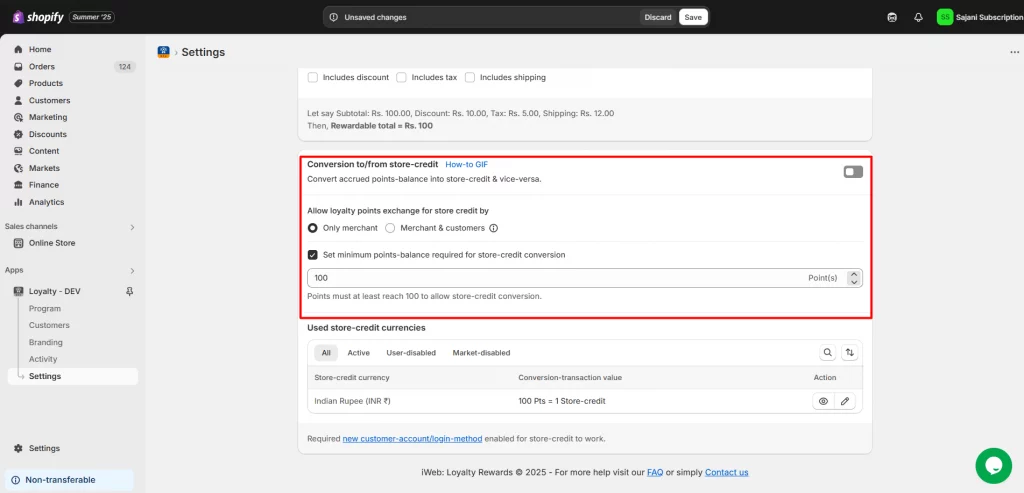
4. To Set Store-Credit Configuration
This feature lets you convert loyalty points into store credit, with control over redemption rules, point thresholds, conversion rates, and currency settings to suit your rewards strategy.
How to Set Store Credit Configuration
- Go to the “Conversion to/from store credit” section.
- This option lets you enable or disable store credit conversion. When enabled, loyalty points convert to store credit based on your settings. (Only admins with full rights or users with the required permissions can approve the scope request.)
- Use the toggle to control whether store credit is available in your loyalty program.
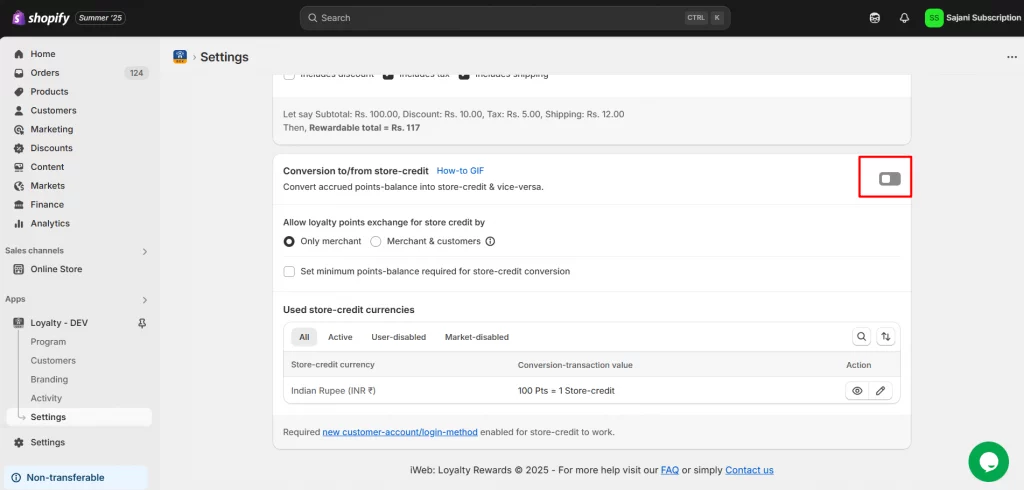
- Allow Loyalty Points Exchange for Store Credit: Choose who can convert points into store credit, only you (the admin), both you and your customers, or neither. Decide based on how much control or flexibility you want to offer.
- Set the minimum points balance required for store credit conversion: Specify the minimum number of points needed to convert into store credit.
- If the minimum is set to 100 and your current balance is exactly 100, you can redeem. But if your balance is below 100, you won’t be able to redeem until you reach the required threshold.
5. To Set Store Credit Currencies
Your store’s default currency will appear automatically, and you can set the reward points needed for 1 unit of store credit, giving you full control over the conversion rate.
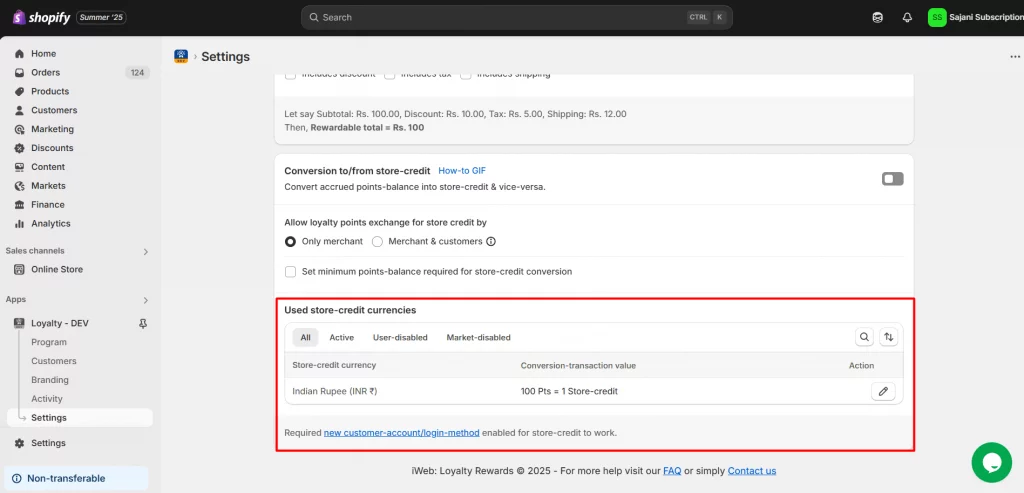
Store credit in your loyalty program uses your Shopify store’s default currency. To offer credit in multiple currencies for international customers, enable them through Shopify Markets.
How to Enable Currencies via Shopify Markets:
1. Log in to your Shopify Admin.
2. Go to Settings > Markets.
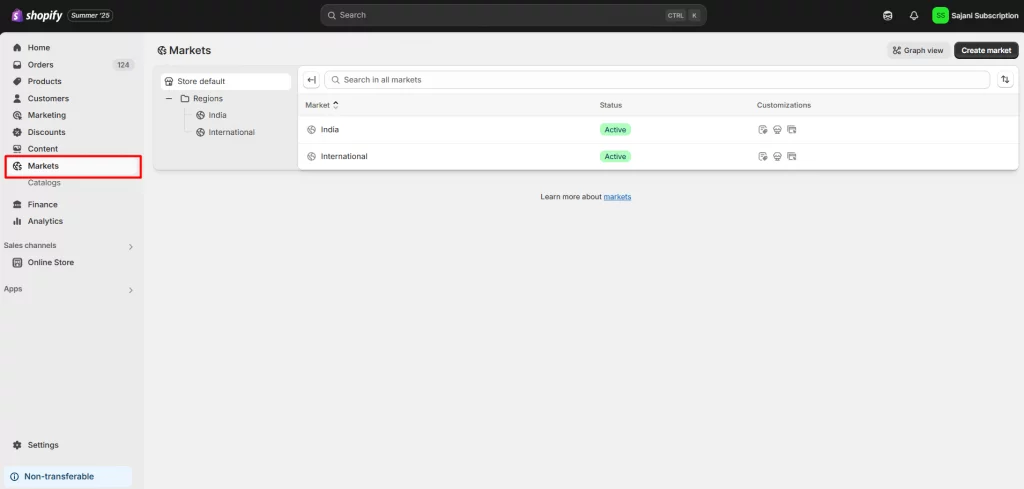
3. Select the market (e.g., United States, Europe, etc.) where you want to offer additional currencies.
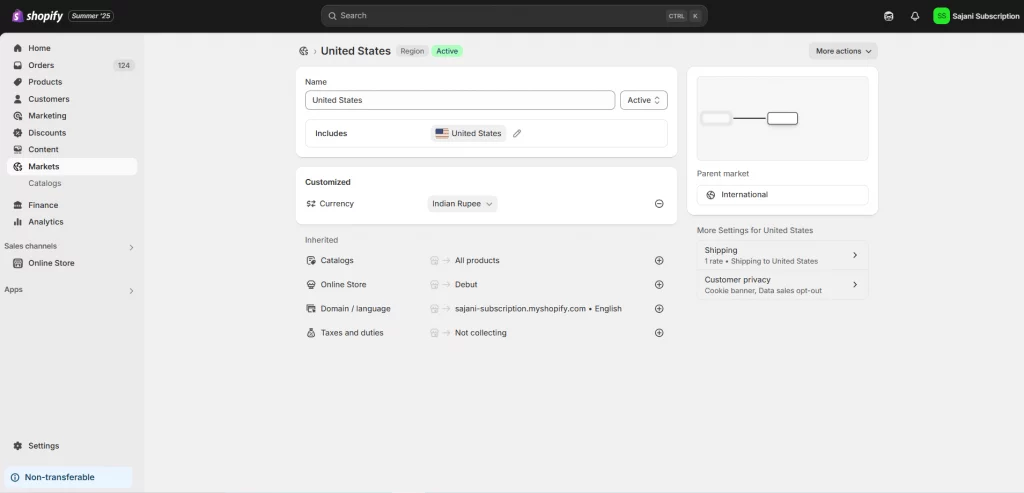
4. In the market settings, find the Currency section.
5. Enable the desired currency for that market.
6. Click Save to apply changes.
Once enabled, these currencies will be available for use in your store credit system, ensuring a smooth experience for international customers.
Note: To keep data safe, you can’t delete a currency once it has been added. However, you can still edit or turn it off at any time.
To use store credit smoothly, ensure your Shopify store has the new customer accounts or OTP login feature enabled. Legacy (old) login methods won’t support this feature.
Step 5: Customize Your Loyalty Points Branding
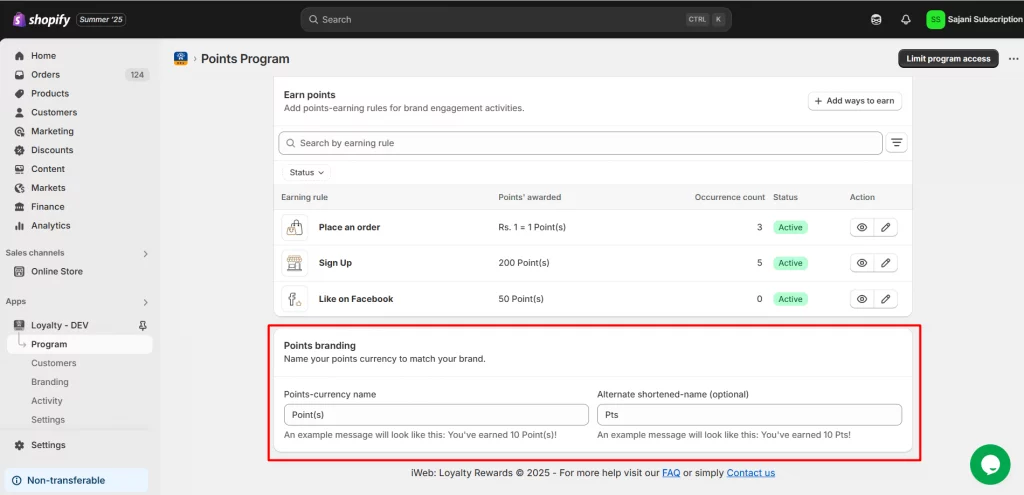
Add a personal touch by renaming your loyalty points to match your brand. Instead of “Points,” use names like “Stars,” “Coins,” or “Perks.” You can also set a short version for compact displays.
Track Your Loyalty Activity with iWeb Loyalty
Here are two ways that you will track the activities:
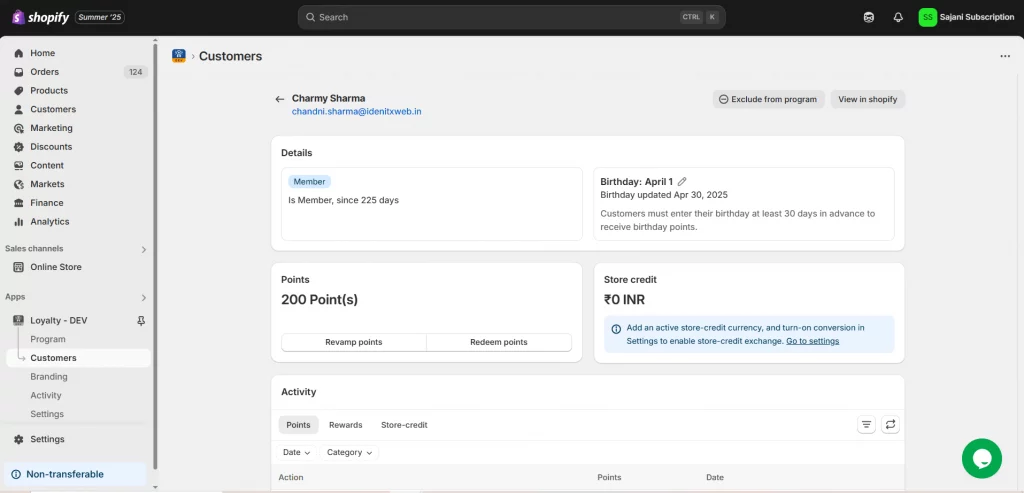
1. Customer-Based Profile: Activity Section
The Customers page shows an overview of each customer's activity, including their accumulated points, helping merchants manage and engage with their customer base efficiently.
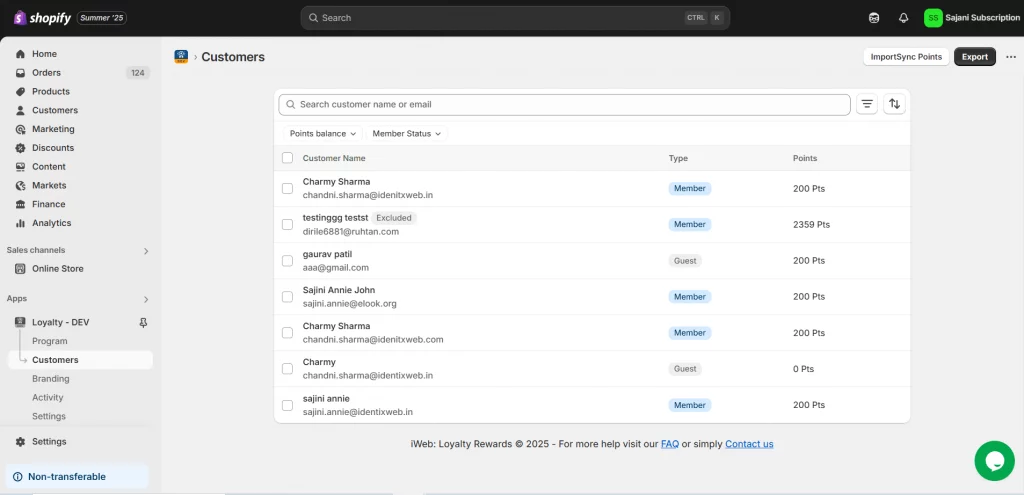
Merchants can manage points redemption on behalf of their customers for smoother operations, using options such as Import Sync, Bulk Edit, or directly at the Profile Level.
Import Sync Points:
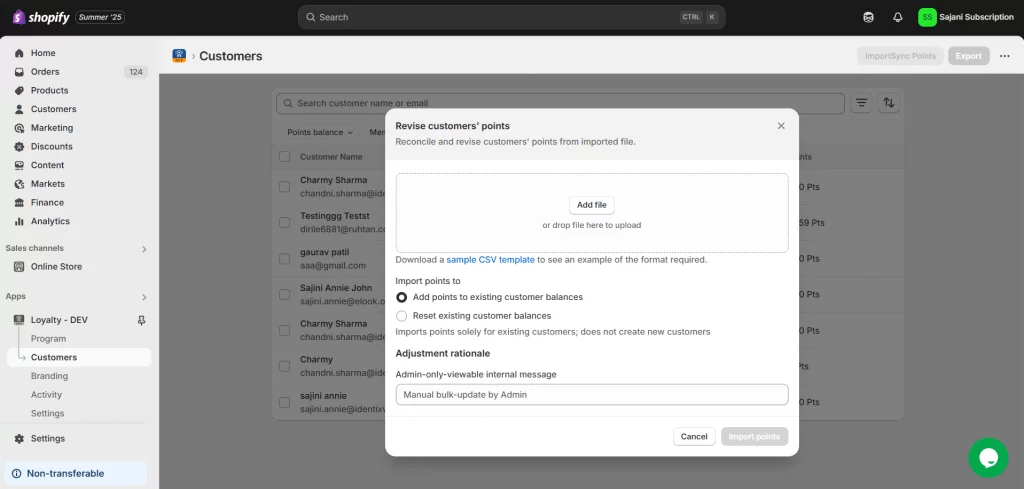
- Revise Customers' Points: Merchants can upload a CSV file to adjust customers' loyalty points by reconciling and revising their balances.
Import Options:
- Add Points to Existing Balance: This option updates points balance for existing customers, adding the imported values to their current balance.
- Reset Existing Customer Balance: This option replaces the current points balance with the new amount in the file, effectively resetting the customer points.
Bulk Option:
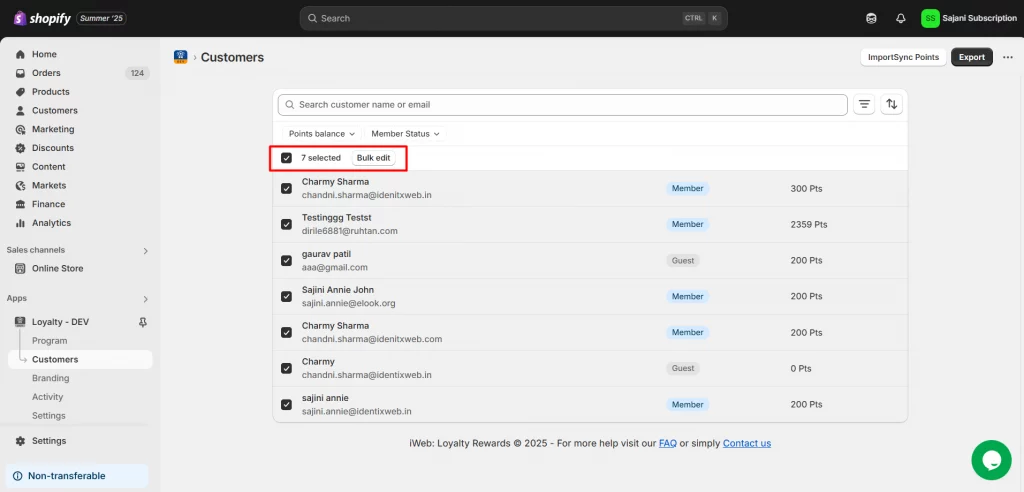
The Bulk Edit option enables merchants to update loyalty points for multiple customers simultaneously, streamlining the process of managing points in bulk.
The activity section logs specific customer interactions within the loyalty program, including:
- Earned points
- Redeemed rewards
- Store credit transactions
2. Activity Dashboard
This dashboard gives you easy access to track points and rewards in one place. The Activity section records all their interactions, including:
- Points earned from purchases and other activities
- Rewards they have redeemed
- Any store credit transactions
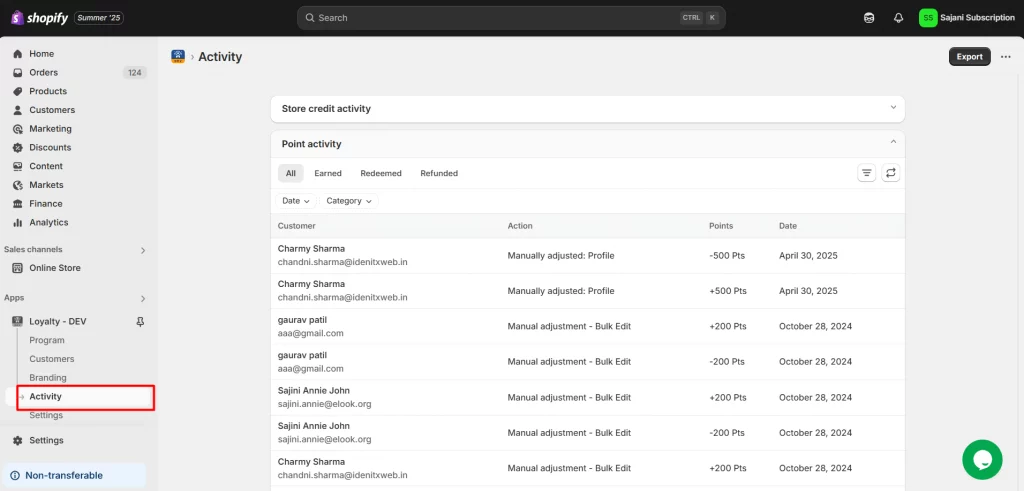
By providing a clear and transparent history of their loyalty activity, this feature helps keep merchants informed and engaged.
Results You Can Expect from Your Loyalty Program
Once your best Shopify loyalty program is live, both you and your customers can track progress and rewards in real-time. Here’s what you can expect:
How Customers Earn Points
Customers automatically accumulate points by engaging in key actions such as making purchases, creating an account, sharing their store on social media, or celebrating special occasions like birthdays.
Easy Access to the Loyalty Dashboard
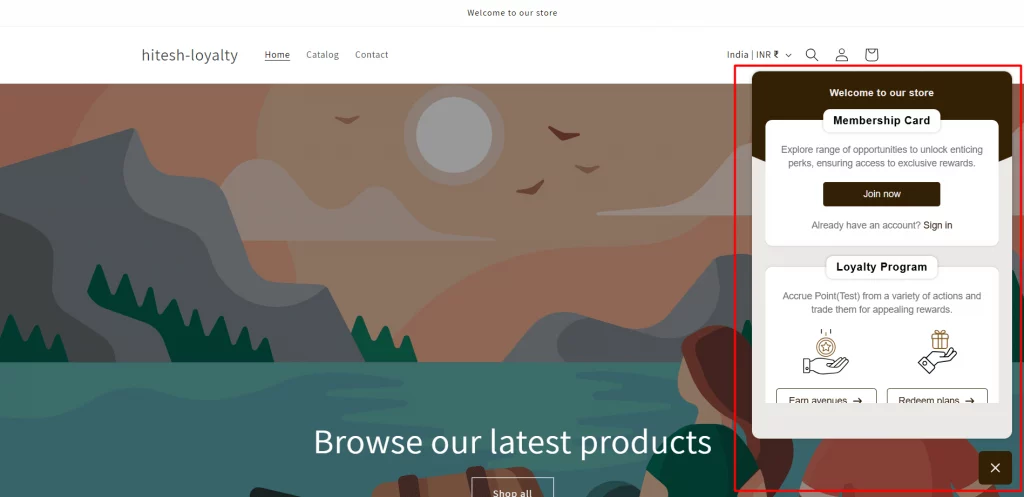
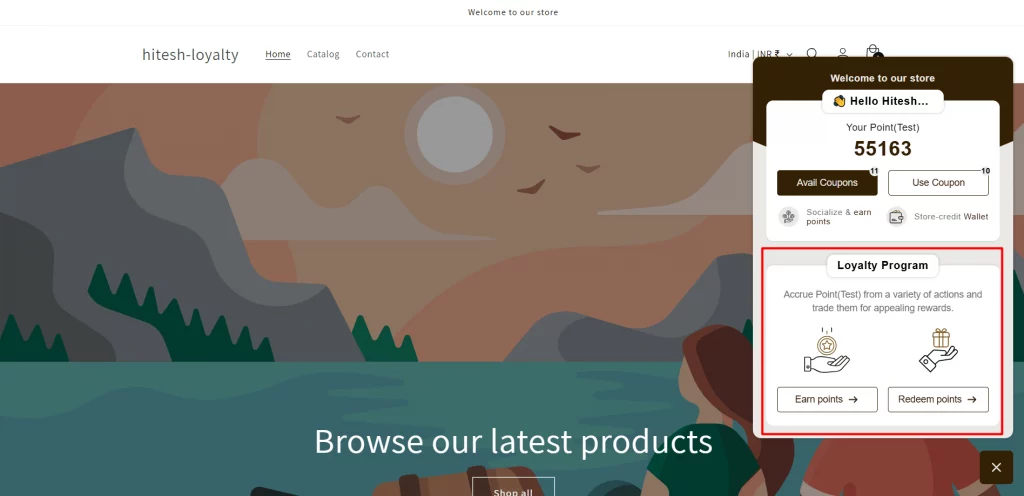
Customers can log in to their accounts on your store at any time to view a personalized loyalty dashboard. This dashboard provides a clear snapshot of their points balance, available rewards, and recent activity.
Detailed Reward History
Within the dashboard, customers can access details of their points history. They can see precisely when and how points were earned or redeemed.
Below are the screenshot from our store showing a real example of a customer’s points dashboard in action:
Need Help? If you have any questions or need assistance setting up your best Shopify loyalty program, our Shopify experts are here to help. From configuring earning rules to customizing rewards, we’re happy to assist you anytime!
Each Purchase Brings Your Customers Closer To Staying Loyal
The best Shopify loyalty program requires regular updates based on customer interactions and feedback. By tracking key metrics like engagement and repeat purchases, you can optimize your program to benefit both your business and customers.
A strong loyalty program not only brings customers back but also turns them into long-term brand advocates.
FAQs
1. How do customers earn loyalty points?
Customers can earn points by making purchases, signing up, and following your brand on social media.
2. How do I measure the success of my Shopify loyalty program?
Track key metrics like repeat purchase rate, average order value (AOV), customer lifetime value (CLV), and points redemption rates.
3. Do Shopify loyalty programs work for all types of products or stores?
Yes. Whether you sell fashion, electronics, beauty products, or digital goods, a loyalty program can boost repeat business.
4. How customers can track their points and redeem rewards?
Customers can track points and redeem rewards through a dashboard on your store, where they can view their balance, history, and offers.
5. Can customers transfer their points to others?
Typically, loyalty points are non-transferable. However, you can customize your program to allow points sharing or gifting if desired.



About the author
Bhavesha Ghatode
Explore Content with Bhavesha, a passionate and dedicated technical content writer with a keen understanding of e-commerce trends. She is committed to sharing valuable insights, practical assets, and the latest trends that can help businesses thrive in a competitive environment.