Shopify is a leader in ecommerce, offering powerful features for scaling your online store. However, its default font options are limited. While some merchants are fine with basic fonts, others may want to personalize their store with custom typography that aligns with their brand.
In this guide, we’ll show you how to easily add custom fonts, integrate Google Fonts, and customize your Shopify store’s typography to make it stand out and improve the user experience.
Why is Typography Important for Your Shopify Store?
Typography plays a huge role in shaping your store’s design. It contributes to the overall brand identity, making your website more engaging, professional, and easy to read. Choosing the right fonts for your Shopify store can improve the user experience, create a cohesive design, and even enhance your conversions.
- Readability: Ensures customers can easily navigate your website and read the content.
- Brand Identity: Custom fonts can help differentiate your store and create a memorable experience.
- Mobile-Friendly: With many shoppers using mobile devices, it’s essential to choose fonts that are legible on small screens.
Now that we understand the importance of typography, let's explore how to add custom and google fonts to your Shopify store.
How to Add Custom Fonts to Shopify
Step 1: Upload Your Font Files
1. Choose a web-friendly font (e.g., .woff, .woff2) from sites like Google Fonts or Font Squirrel.
2. In your Shopify admin, go to Settings > Files and upload your font files.
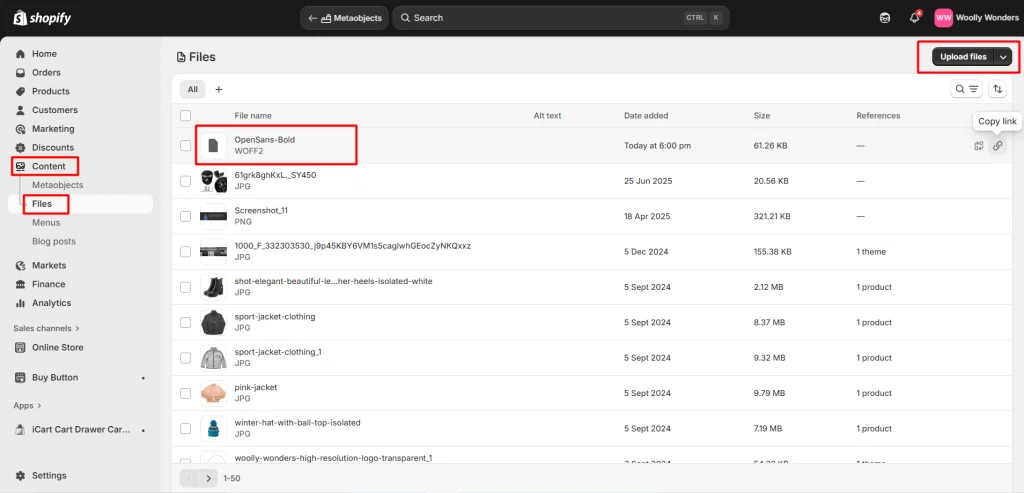
3. Copy the URL of each uploaded file for later use.
Step 2: Add Font-Face CSS
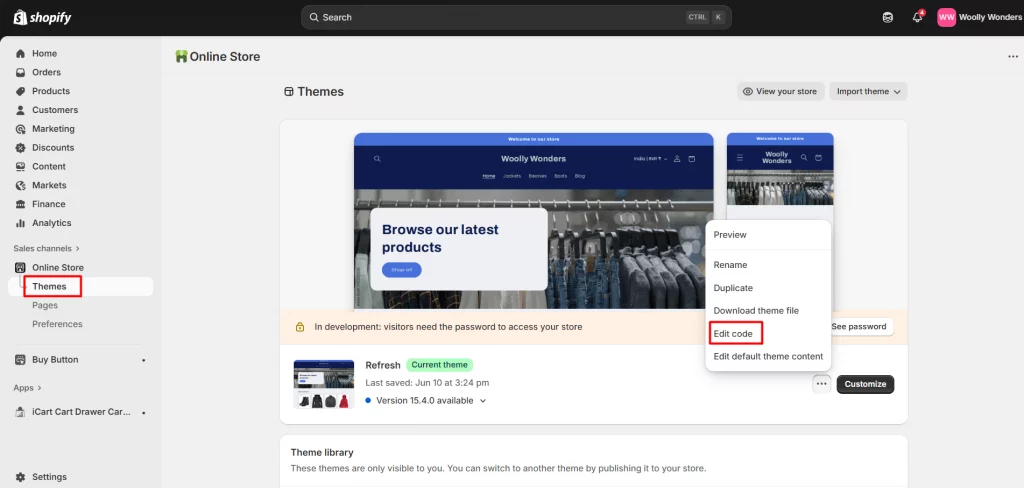
1. Go to Online Store > Themes and click on the three dots next to your theme, then select Edit code.
2. In the Assets folder, find or create a CSS file (e.g., theme.css, or base.css).
3. Add the following CSS code, replacing FONT_URL with your file’s URL:
@font-face {
  font-family: 'YourCustomFont';
  src: url('FONT_URL') format('woff2');
  font-weight: normal;
  font-style: normal;
}

body {
  font-family: 'YourCustomFont', sans-serif;
}
Step 3: Save and Preview
1. Save your changes.
2. Preview your store to make sure the font is applied correctly. Test it on different devices and browsers for compatibility.
Google Fonts is an easy and effective way to enhance your Shopify store with web-safe fonts. Here's how to seamlessly integrate Google Fonts into your Shopify theme.
How to Add Google Fonts to Shopify
Step 1. Choose Your Google Font
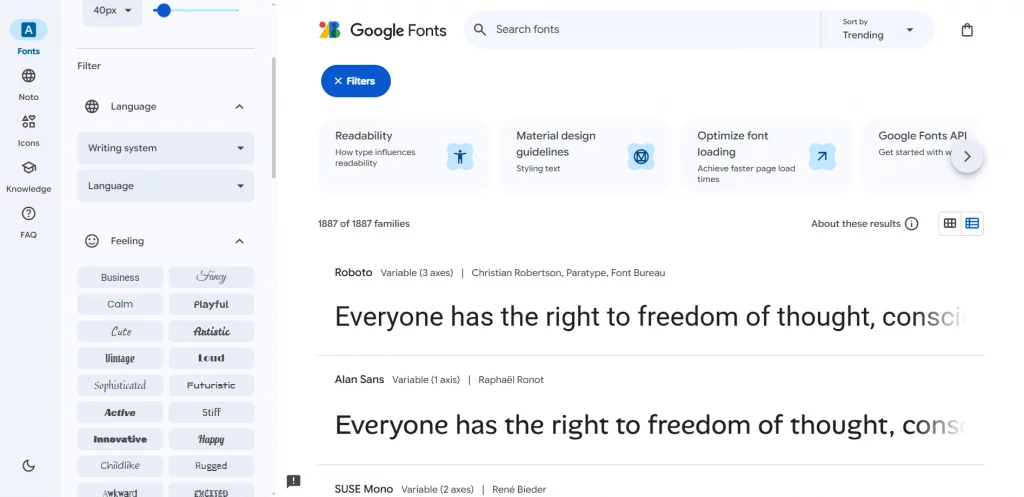
1. Go to the Google Fonts website.
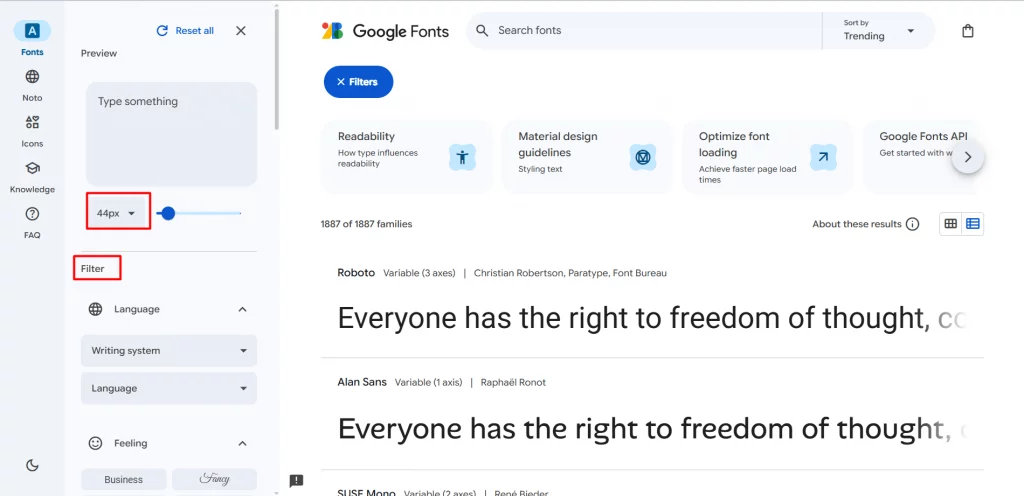
2. Browse through the fonts and select the one that suits your store’s style.(You can filter fonts based on various criteria, such as category, language, font style, popularity, new arrivals, or trending options).
Step 2: Choose Your Font and Copy the Code
1. After selecting your preferred font, you can adjust its size, view the available characters, check the license, and see which fonts pair well with it.
2. Spend some time experimenting to find the best font for your Shopify store.
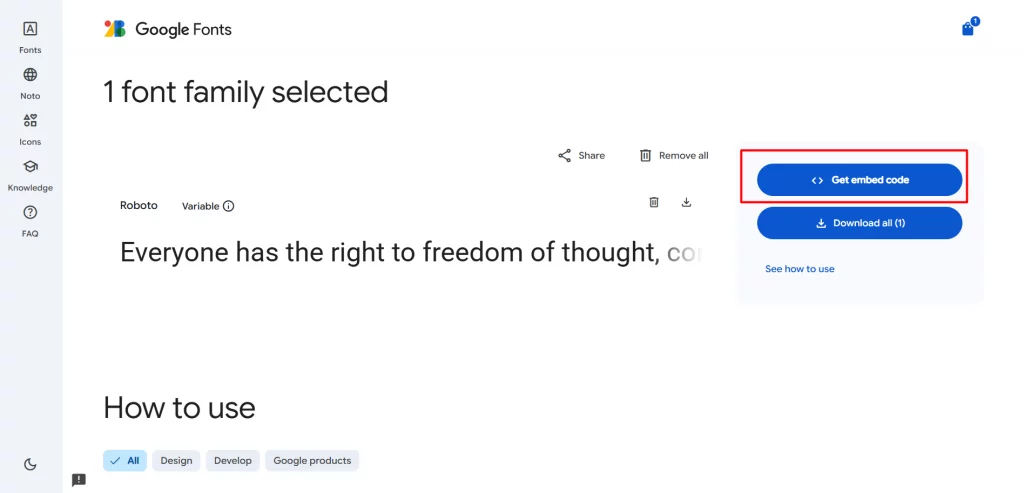
3. Once you click the one font like "Roboto", and select "get one" then choose "get embed code" next you’ll be able to copy the code from the window.
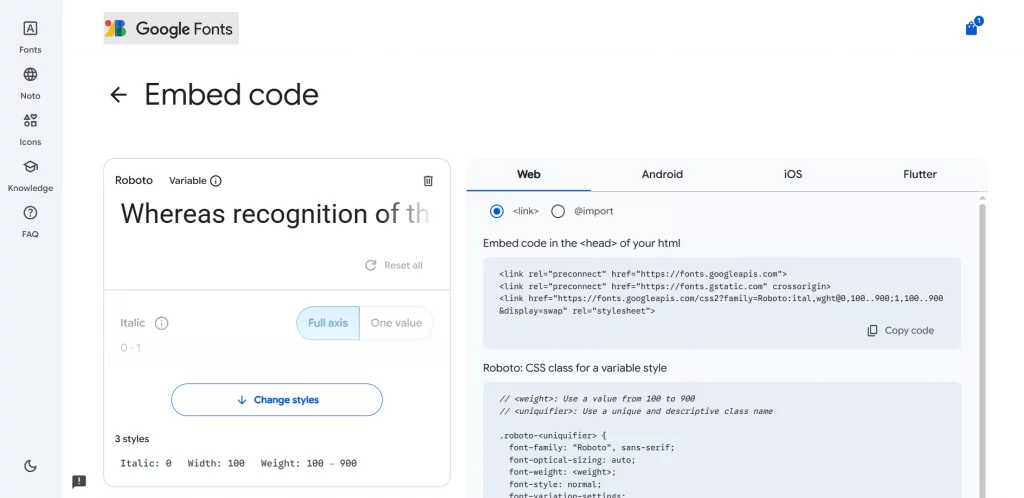
Step 3: Add the Font Code to Your Theme Files
1. After copying the code from your Shopify dashboard, go to Online Store > Themes > Actions > Edit Code.
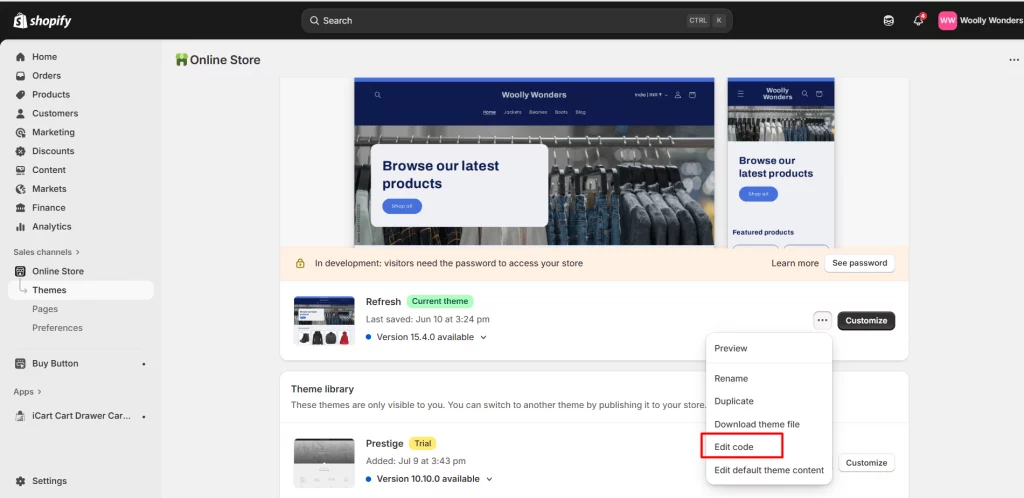
2. Click on Layout > theme.liquid.
3. Scroll down to find the </head> tag and paste your code just before it.
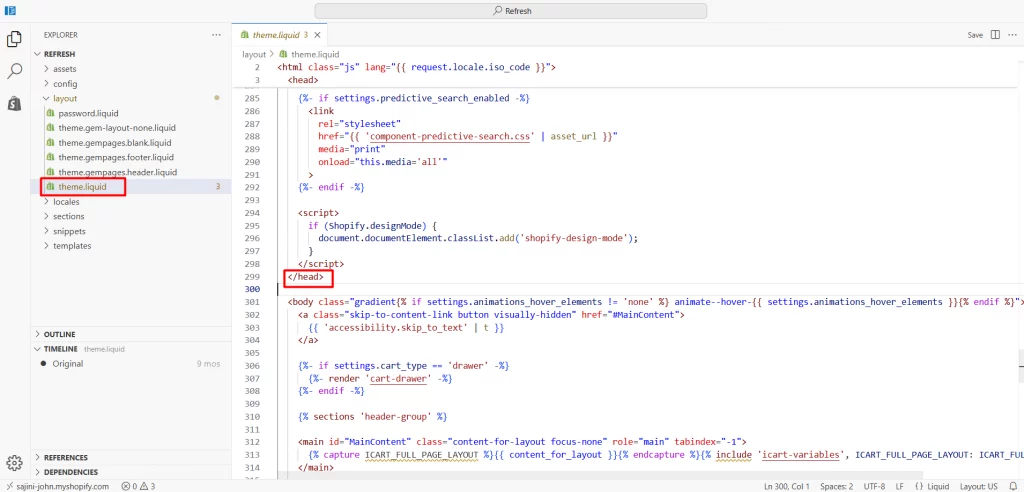
3. Save the changes when you're done.
Step 4: Open Your Theme’s Style Files
1. Go to the Assets folder.
2. Open the theme.scss.liquid or timber.scss.liquid files(depends on your theme).
Step 5: Copy Font CSS from Google
1. Return to the Google Fonts page you’re using.
2. Copy the font name (e.g., 'Lato', sans-serif).
Step 6: Add the Font Details to Style Files
1. Go back to the style files you opened earlier in the Assets folder and Scroll to the “Typography” section.
2. Save the file once you’re done.
You can also use Shopify’s theme settings or an app that simplifies font integration without needing to edit the code.
How to Change Font on Shopify Using Theme Settings
Many Shopify themes come with built-in options to change the font without needing to touch any code. This is the easiest and quickest method to modify your store’s typography.
Step 1. Go to Theme Settings
1. From your Shopify admin, go to Online Store > Themes.
2. Click on Customize to open the theme editor.
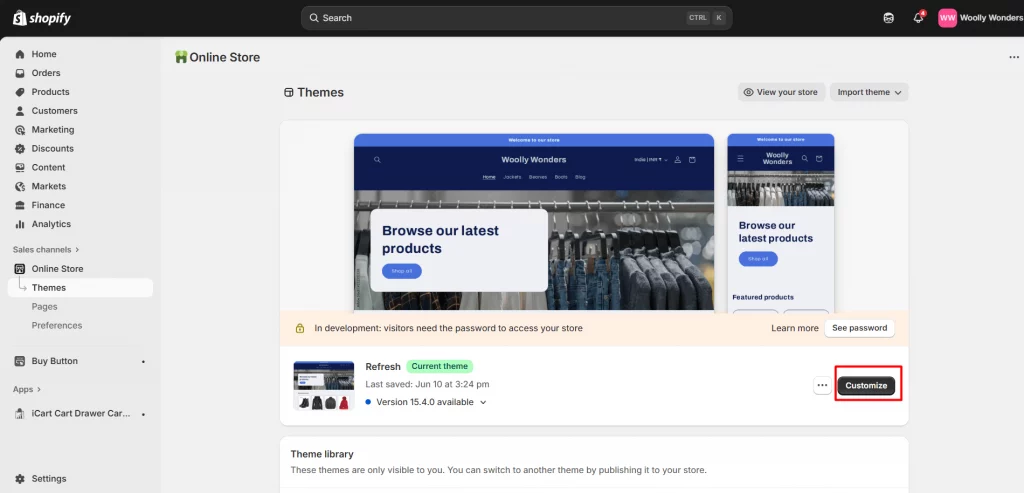
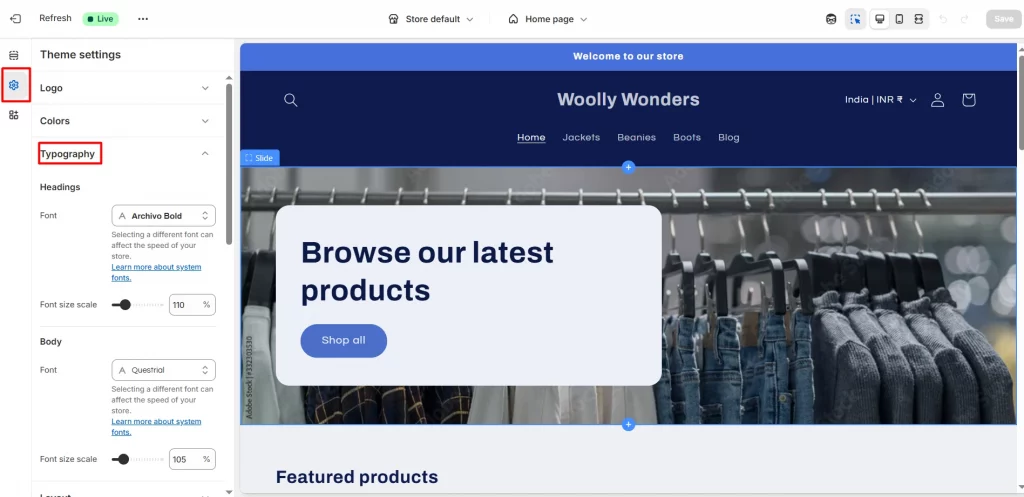
Step 2. Access Typography Settings
1. In the theme editor, look for Typography or Theme Settings.
2. Depending on your theme, you might find font options for various text elements such as headings, body text, buttons, and more.
Step 2. Select Your Font
1. You’ll likely see a list of Google Fonts or custom fonts available within your theme’s settings.
2. Select the font you want for different elements (e.g., headings, body text, buttons).
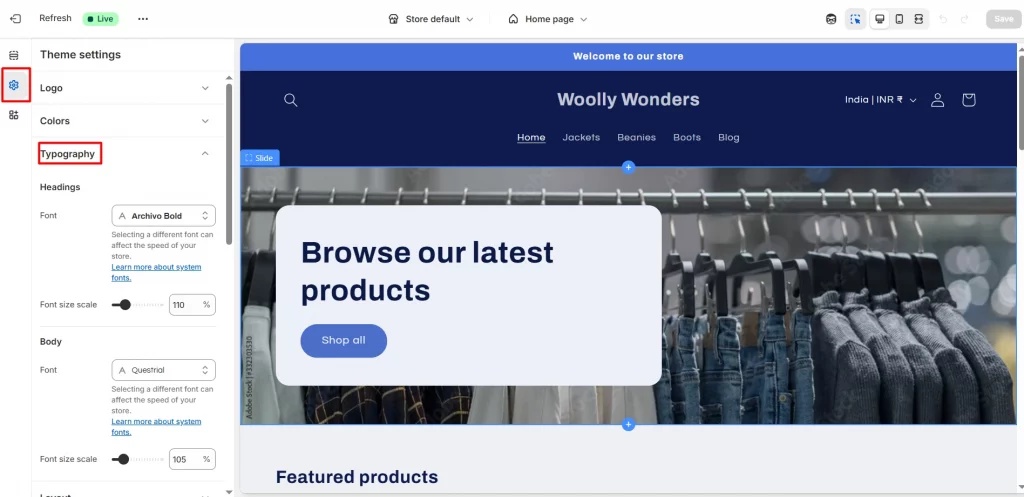
3. After selecting the font, click Save to apply the changes.
This method is great for store owners who want to change fonts quickly without dealing with code.
Best Shopify Fonts for Your Store
Choosing the best fonts for your Shopify store is crucial to creating a professional, user-friendly design. Here are a few popular and highly recommended fonts for Shopify:
- Roboto: Clean and modern, ideal for both headers and body text.
- Lora: A serif font that gives a more elegant, traditional feel to your store.
- Montserrat: A bold, sans-serif font perfect for headers and emphasis.
- Open Sans: A versatile font that’s easy to read and works well on mobile devices.
- Poppins: A rounded, modern font that’s perfect for fashion and lifestyle stores.
Closing Tips for Adding Fonts to Shopify
Adding custom and Google fonts to your Shopify store is a simple yet powerful way to personalize your online store and enhance the user experience. Whether you’re using Google Fonts or uploading custom fonts, the process can be done easily through the Shopify admin. Remember to choose fonts that align with your brand and are easy to read on all devices.
By following the steps outlined in this guide, you can ensure that your Shopify store stands out with users attractive, well-chosen typography that creates a professional and engaging experience for your visitors.
FAQs How to Add Fonts to Shopify
1. What are the best fonts to use on Shopify?
Popular choices include Roboto, Open Sans, Montserrat, Lora, and Poppins. Choose fonts that are easy to read and align with your brand style.
2. Can I use Google Fonts on Shopify?
Yes! Shopify allows you to integrate Google Fonts either through your theme settings or by adding the font via CSS code.
3. How do I add a custom font to Shopify?
Upload your font files (.woff, .woff2, .ttf, or .otf) to your theme assets and add them using the @font-face CSS rule. Then apply the font to your store elements.
4. Do I need coding knowledge to change fonts on Shopify?
Not necessarily. Many Shopify themes allow you to change fonts through Theme Settings > Typography, but adding custom fonts may require minimal CSS edits.
5. Will changing fonts affect mobile responsiveness?
If you choose web-safe or Google Fonts, your typography will remain responsive. Always test your store on mobile devices after making font changes.


About the author
Bhavesha Ghatode
Explore Content with Bhavesha, a passionate and dedicated technical content writer with a keen understanding of e-commerce trends. She is committed to sharing valuable insights, practical assets, and the latest trends that can help businesses thrive in a competitive environment.