


How Shopify Works? (A Step-by-Step Guide for Beginners)
Planning to start an online store? Then you have come to the right page. This blog gives you a clear cut to launch your own online store. When you are planning to start a business for the first time it seems very complicated. You can have many questions like how do I start an online store? From where should I start? Will I earn a profit or not?
One of my favorite quotes is “When starting out, forget about big investments in stock or website. Test by getting a Shopify store and start doing some marketing to validate your product.”
Don’t worry I will help you out. This blog contains exactly what you need to get started from scratch. I suggest you follow the instructions and try implementing additional features to launch your Shopify store. Before getting started let’s have look at Shopify.
Shopify is a complete E-commerce platform that allows you to start and manage your business. Shopify offers the services to create your own beautiful websites and use their shopping cart to sell and manage your products. Shopify provides access to use admin panel from where you can add products, process orders, and many more.
Why choose Shopify?

For E-commerce businesses, the online store should be accessible, flexible, and easy to use. Shopify comes with satisfying all these features. You can easily sell your products with no worries.
No need to worry about Coding
By using Shopify a user will feel like he is not using a tech site. If you are a the non-technical user then Shopify is the right platform to start your business. It comes with a wide range of themes that allow you to create a beautiful and attractive storefront without coding or design experience.
Customer Support
Shopify offers 24*7 support which means your business will never stop due to any malfunction. Shopify offers support through phone, email, and chat.
Mobile Responsive
As half of the E-commerce businesses are done on mobile so Shopify provides mobile responsive themes. Now you can gain more profit through your mobile shoppers. It also includes a free built-in mobile commerce shopping cart.
Customization Apps
If you want to sell products, add product reviews, or offer additional shipping options then there’s going to be an app for that.
Step by Step Guide to Launch a Shopify store
Step 1: Sign Up with Shopify
Shopify makes it simple to start your own store right away. Shopify offers a 14-day free trial to get you started. To sign up, visit Shopify.com. Now you can see a signup form, enter your email address, and click “Start a free trial” to continue. After you click the button a pop-up box will appear as shown in the image below.
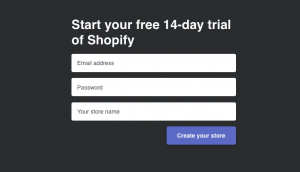
Enter your Email address, password, and your store name. Once you have finished click the “Create your store” button.
Remember your store name should be unique otherwise, Shopify will notify you to pick a new one. Selecting a name is an essential part, but don’t spend too much time on it. Select simple and attractive names.
For example, I have selected the Order Delivery Date for my Shopify app. List out a few names and find if it isn’t trademarked and has an available .com domain which will help in SEO results. You just need to simply add keywords related to your business. It will recommend a list of names related to your keywords. You can easily select your desired business name. When you select your domain name make sure it is relevant and simple.
Step 2: Pick your Theme
Shopify has its own theme store which provides a wide range of beautiful themes. You don’t have to do coding now. With Shopify’s theme store, you can choose any of their pre-made templates. You will be provided with a list of modifications without doing any coding but premium themes offer more modifications than the free ones.
Browse the Theme Store
Login to Shopify and visit Shopify’s theme store. Here you will find 180+ varieties of themes with an option of selecting from both paid and free. You can sort them by price, popularity, and most recent. Keep in mind that your theme should be relevant to the products you are selling.
Check the Theme’s functionality and reviews
After finding a theme click on the sample image of the theme. From there you can get various information like whether the theme is responsive or mobile-ready. Also, you can scroll down to get more reviews to know other E-commerce store owners’ experiences with this theme after trying.
Preview the Theme
To see a preview of the theme click on “View Demo” to see the action of the theme live. If the theme contains varieties of styles then you can also view those demos by clicking on them.
Get the Theme
To select your theme click on “Start with this theme” button. After that Shopify will make confirmation whether you want to install the theme or not. To start to install, click on “Publish as my store’s theme” button. After your theme has been successfully installed Shopify notifies you that the theme has been installed.
After this process, you will find an option to go back to your theme manager. Click “Go to your Theme Manager”. Now your Theme Manager will show you both published and unpublished themes.
Step 3: Edit Shopify Settings
Most of the Shopify themes allow you to make unique changes just by making a few settings that are very simple to do. This will help you gain attraction among other stores.
General
Coming to this option you can change or update your
- Store Details, Store Address, Standards, and Formats, Store Currency
Payment Providers
This option lets you configure how to accept payments also you can do the following from this page
- Set up Shopify Payments
- Activate a third-party payment provider
- Activate an alternative payment method
- Activate a manual payment method
- Change your payment authorization settings
Checkout
From this page, you can make changes in following
- Customer Accounts
- Customer Contact
- Form Options
- Order Processing
- Email Marketing
- Checkout Language
- Fill out policies
Shipping
From this page, you can perform the following
- Shipping Origin
- Shipping rates at checkout
- Size and weight of packages used to calculate shipping costs
- Enable third-party calculated rates from carriers, or choose an external service for fulfillment.
Taxes
From this page, you can configure your tax setting such as
- Change the way taxes are calculated on your store
- Apply tax rates country wise on your store
Notifications
From this page, you can configure your tax settings such as
- Change the way taxes are calculated, Order Refund, Draft Order Invoice and Abandoned Checkout.
- For Shipping Notifications such as Fulfillment Request, Shipping confirmation, Shipping Update, Shipment out
Files
This option provides the option for merchants to upload images, videos, and documents and also to manage the files.
Sales Channels
This option lets you manage sales channels that you use to sell your products and services.
Account
This option lets you manage your accounts and permission
- It gives you an overview of the account along with the status and the selected plan.
- Store status empowers you to perform activities on your store such as Hire a Shopify Expert, pause your store, and close your store.
Billing
This option allows you to manage your billing information and view your invoices.
Step 4: Add products to your store
To add products navigate to the admin bar and click “Products”. Now you will be able to see a blue button called “Add a product.” Click it. After everything is been filling don’t forget to click the “Save Product” button.
Set up collections
A collection is a group of similar products. Usually, when customers come to your store they might be shopping for:
- Clothing for men, women or kids.
- Home decors
- Electronics
Products may appear in any number of collections. So this may help customers to find out their desired products and purchase them easily.
Manual vs. Automatic Collections
When you add a new collection, you can choose about adding products to your collections. You can have two choices
Manually
From here you can add and remove products to a collection individually.
Automatically
You can set up conditions based on certain criteria for including products automatically.
Step 5: Set up payment
Now it’s time to add a payment gateway. Payment gateway enables you to accept payment from your customers through your website. To set up payment click on “Settings” and then a section will appear named “Payments”. Click on it, and now you will be directed to the payment page where you can see various payment gateways.
I would suggest PayPal. If you don’t have a PayPal account then register at Paypal Website. While selecting the payment gateway for your online store note down some of the important things.
Transaction Fees
Some of the payment gateways charge flat fees for using their services. Compared to the payment gateway you will be able to know about the profit earned from the sales. Shopify solutions, such as TrueProfit, can help you accurately track your transaction fees without errors.
Card Types
While doing the transaction you need to be aware of the types of cards such as VISA and Mastercard used for transactions. As different gateways accept different card types, so make sure about that before moving to the payment gateway. All accept VISA and Mastercard and some accept American Express.
Offsite Checkout
Some gateways use Offsite Checkout which means the customers are taken away from your website and directed to a separate form for secure payment. After the payment is completed by the customer they will be redirected to the confirmation page.
Step 6: Set up Taxes and Shipping
Yeah, you are now somewhat nearer to the ending point. Come let’s finish this up.
Add General Details
Before launching your store make sure that you have filled in the entire details. Go to “Settings” then click on “General” and fill out the information. This can be proved to track the visitors visiting your store.
Taxes
Some stores like if they are selling digital products then they won’t charge any taxes but some stores charge taxes for the store selling physical items.
To set up product taxes in Shopify follow the below steps
- Move to “Products” page
- Click the name of a given product
- See down to the Pricing box and check the checkbox titled “Charge taxes on this product”.
Shipping
The Shipping charges will be charged based on the rules that you have already set on the Shipping page. To set up the shipping rate go to Settings > Shipping page.
Step 7: Test your order system
Basically, there are 2 ways to test your order system. One is by using Shopify’s Bogus Gateway to simulate a transaction. And the other one is by using a real payment provider from which you can cancel and refund the order.
To test your order system using the Bogus system follow the below steps:
- Go to Settings > Payments
- Before moving on check whether the credit card payment provider which is already activated is deactivated or not. If not then click on Edit then Deactivate and confirm your deactivation.
To test your order system using a real payment provider
- Make sure you have set up the payment gateway you want to test.
- Now order anything from your shop like a customer would and complete checkout using the real credit details.
- Now cancel the order immediately to refund and avoid paying transaction fees.
Is this free?
Yes, it is free just be sure to cancel and refund the order soon after you place it. If the billing cycle starts after you have placed a test order but before you cancel it, then the transaction fees will appear on the bill. You can still cancel after paying the bill but you will receive the refund in the form of transaction credit on your account which you can use it later for the transaction fees.
Step 8: Purchase & Setup your Domain Name
To make your website live you need a domain name.
There are 2 ways to buy a domain name. You can buy directly from Shopify which will add automatically to your E-commerce store. I think this would be a better solution for one who doesn’t have any idea about how to purchase and register a domain. Or you can buy a domain from a third party register like GoDaddy or Bluehost. To purchase your domain name from Shopify follow the below steps:
1. Connect your selected domain name with Shopify
In the dashboard go to Online Store > Domains. Here you will see “Connect existing domain”. After that click the “Next” button.
2. Update your DNS records
- Under the domain management section click on DNS Zone Editor.
- Go to the Select a Domain section then click on the drop-down menu and select the domain name that you want to update.
- Now add or replace the www CNAME to shops.myshopify.com and click save.
- Go back to Shopify’s admin area and click Verify connection from the Domains
3. Remove your Shopify storefront passwords
To remove the password go to Online Store > Themes and search for a yellow box that will be prompting you to remove your store password.
4. Set store’s domain as primary
From Settings > Domains make sure that Shopify has listed the correct domain name as per your site’s primary domain.
5. Add other domains (if needed)
You can always add additional domains if needed. To do this repeat steps 1 and 2 this will redirect your other domain names to your primary domain.
Yeah, your online store is ready!
Congratulations! Finally, here you have created your fully functional E-commerce store.


About the author
Sajini Annie John
Meet Sajini, a seasoned technical content writer with a passion for e-commerce and expertise in Shopify. She is committed to helping online businesses to thrive through the power of well-crafted content.