How to create a Shopify preorder product page template

If your store is having out of stock products, then you can sell them as pre-orders. Shopify preorder is carried out by creating a separate product template by editing your store’s payment settings in it. If you want to create Shopify product page template for preorder then follow the below steps.

Two types of themes will be there {1} Sectioned themes and {2} non-sectioned themes
A sectioned theme is a newer theme that allows you to arrange the layout of your store’s pages by dragging and dropping. Non-sectioned themes were released before October 2016, and do not have files in the Sections directory. So the following steps will be based on the type of theme you are using.

Steps for sectioned themes

When selling products as preorder on shopify you should not capture payment directly until your customers is not aware that they are buying a product that is out of stock or currently not available in your store. Alternatively, you can authorize the payment without capturing the fund immediately.

Step 1: Open your Shopify admin and go to Settings > Payment providers.
Step 2: Then, move to the bottom of the page and find the Payment authorization section.
Step 3: Select Manually captured payment for orders as shown in the below image.

manually-captured-payment-for-orders

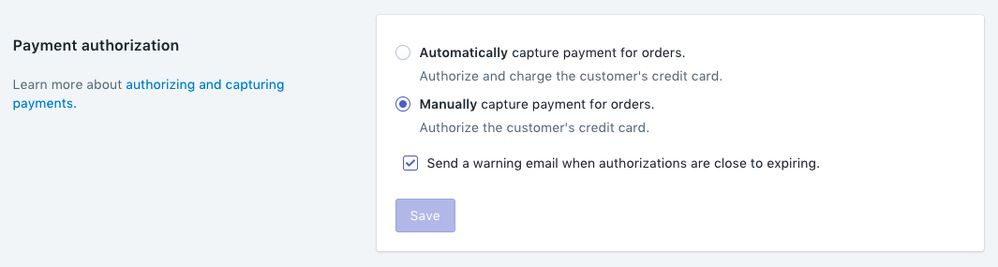
Step 4: Click on the Save button.

How to create a Shopify product page template for pre-orders

If you want to change the text of the Add to cart button for your Shopify preorder products then you need to create a new product template. Follow the below steps to create a new product template:

Step 1: Open your Shopify admin and go to your Online Store > Themes.
Step 2: Choose the theme you want to edit and then click on Actions > edit code.
Step 3: From the left side you can see the Templates directory, click on Add a new template.
Step 4: Now from the dropdown menu select product, and give name to the template as pre-order.
Step 5: Click on Create template. Your new product.pre-order.liquid template will open in the code editor.
Step 6: Fine the following code:

{% section ‘product-template’ %}

Replace with:

{% section ‘product-pre-order-template’ %}

In the same file, search tag that contains this line of code:

addToCart: {{ 'products.product.add_to_cart' | t | json }},

Replace it with:

addToCart: {{ 'Pre-order' | json }},

Step 7: Click Save.

Step 8: Now, from the Sections directory, click on the Add a new section. Give name to your name section as product-pre-order-template;

Step 9: Click on Create section. Your new product-pre-order-template.liquid will open in the code editor. Delete all of the default code, so that the file is blank.

Step 10: In the Sections directory, click product-template.liquid. Copy all the content from this file, and paste it into your new product-pre-order-template.liquid file.

Step 11: In your new product-pre-order-template.liquid file, find and replace the Add to cart button text.
Search this code:

{% unless current_variant.available %}
{{ 'products.product.sold_out' | t }}
{% else %}
{{ 'products.product.add_to_cart' | t }}
{% endunless %}

Replace it with:

{{ 'Pre-order' | json | remove: '"' }}

NOTE: As every themes are different, the code used for Add to cart button text may vary. If you replace instances of products.product.add_to_cart with pre-order then your Add to cart button text should change to read Pre-order instead. And, if you can’t find the above lines of code, then they might be found in your product-pre-order-template.liquid file instead.
Step 12: Click Save.

How to assign the template to a product

Step 1: Open your Shopify admin, go to products > all products.
Step 2: Click the name of the product you want to make available for pre-order.
Step 3: In the Theme templates sidebar section, change product to product.pre-order.
Step 4: Click Save.

Inventory settings

Follow the below steps to edit the inventory settings of a product. This option works when you want to allow customers to purchase pre-order products even if they are out of stock.
Step 1: From your Shopify admin, go to your Products > All products.
Step 2: Select the name of the product you want to make available for pre-order.
Step 3: Click on the Edit button seen on the next to the first variant.
Step 4: Check this option: Allow customers to purchase this product when it’s out of stock.
Step 5: Click Save

Steps for non-sectioned theme

Step 1: Open your Shopify admin and go to Settings > Payment providers.
Step 2: Scroll down to find the Payment authorization section.
Step 3: Select Manually capture payment for orders.
Step 4: Click Save.

Creating a pre-order product page template

create-new-product-preorder-template

Step 1: Open your Shopify admin and go to Online Store > Themes.
Step 2: Select the theme that you want to edit, and click on Actions > Edit code.
Step 3: From the Templates directory, click Add a new template.
Step 4: Select product, from the drop-down menu, and name the template pre-order:

Step 4: Click on Create template button. Your new product.pre-order.liquid template will open in a new code editor.
Step 5: Find and replace the Add to cart button text.
Step 6: Search this code.

data-add-to-cart-text
{% unless current_variant.available %}
{{ 'products.product.sold_out' | t }}
{% else %}
{{ 'products.product.add_to_cart' | t }}
{% endunless %}

Replace it with:

data-add-to-cart-text
{{ 'Pre-order' | json | remove: '"' }}

In the same file, search for tag that contains this line of code:

addToCart: {{ 'products.product.add_to_cart' | t | json }},

Replace it with:

addToCart: {{ 'Pre-order' | json }},

Step 8: Click Save.

Inventory settings

If you are tracking inventory for a product then you need to allow your customers to pre-order that product even if it is out of stock.

Step 1: Open your Shopify admin, and go to your Products > All products.
Step 2: Select the name of the product that you want to make available for pre-order.
Step 3: Click on the Edit next to the first variant.
Step 4: Check Allow customers to purchase this product when it’s out of stock.

inventory-settings

Step 5: Click Save.

Sajini Annie John

About the author

Meet Sajini, a seasoned technical content writer with a passion for e-commerce and expertise in Shopify. She is committed to helping online businesses to thrive through the power of well-crafted content.

Leave a Reply

Your email address will not be published. Required fields are marked *