


Do you think your store visitors get everything they need to know about your products and services from the product page? Product descriptions only describe the product, not show the usability or the advantages of usage in detail. To make your visitors closer to your brand, you should start blogging on Shopify stores.
Blogging is one of the most cost-effective methods of promoting your Shopify store organically. For more low-budget or free promotional methods you can refer to this guide.
Benefits of Blogging on Shopify
Are you planning to get started with Shopify blogging? Before you start, you should be aware of the impact of blogs so that you can craft your blogs accordingly.
Gain your potential customers
Anyone who is actually interested in your product would like to know more about it. For that, he/she would search for the source of information. And when you add blogs to your store and link it to the product, it will help your customers to know your product better.
Drive Traffic to your eCommerce Website
Millions of people worldwide love reading blogs. Blogs will help your website to appear on the search engine results page when people will search for the same topic. As a result, more people will visit your store to read the blogs you posted there.
Helps in Search Engine Optimization
When a visitor comes to your store and reads your blogs, the total amount of time spent on your site will increase. Consequently, the bounce rate of your website will reduce.
Raise your hand if you want these benefits too. Alright, let’s move further and see how to activate and set up the Shopify blogging in your store.
How to enable Shopify Blogging on your Store
To quickly get started, go to your Shopify store and follow the steps given below:
Add a Blog section to your Shopify Store
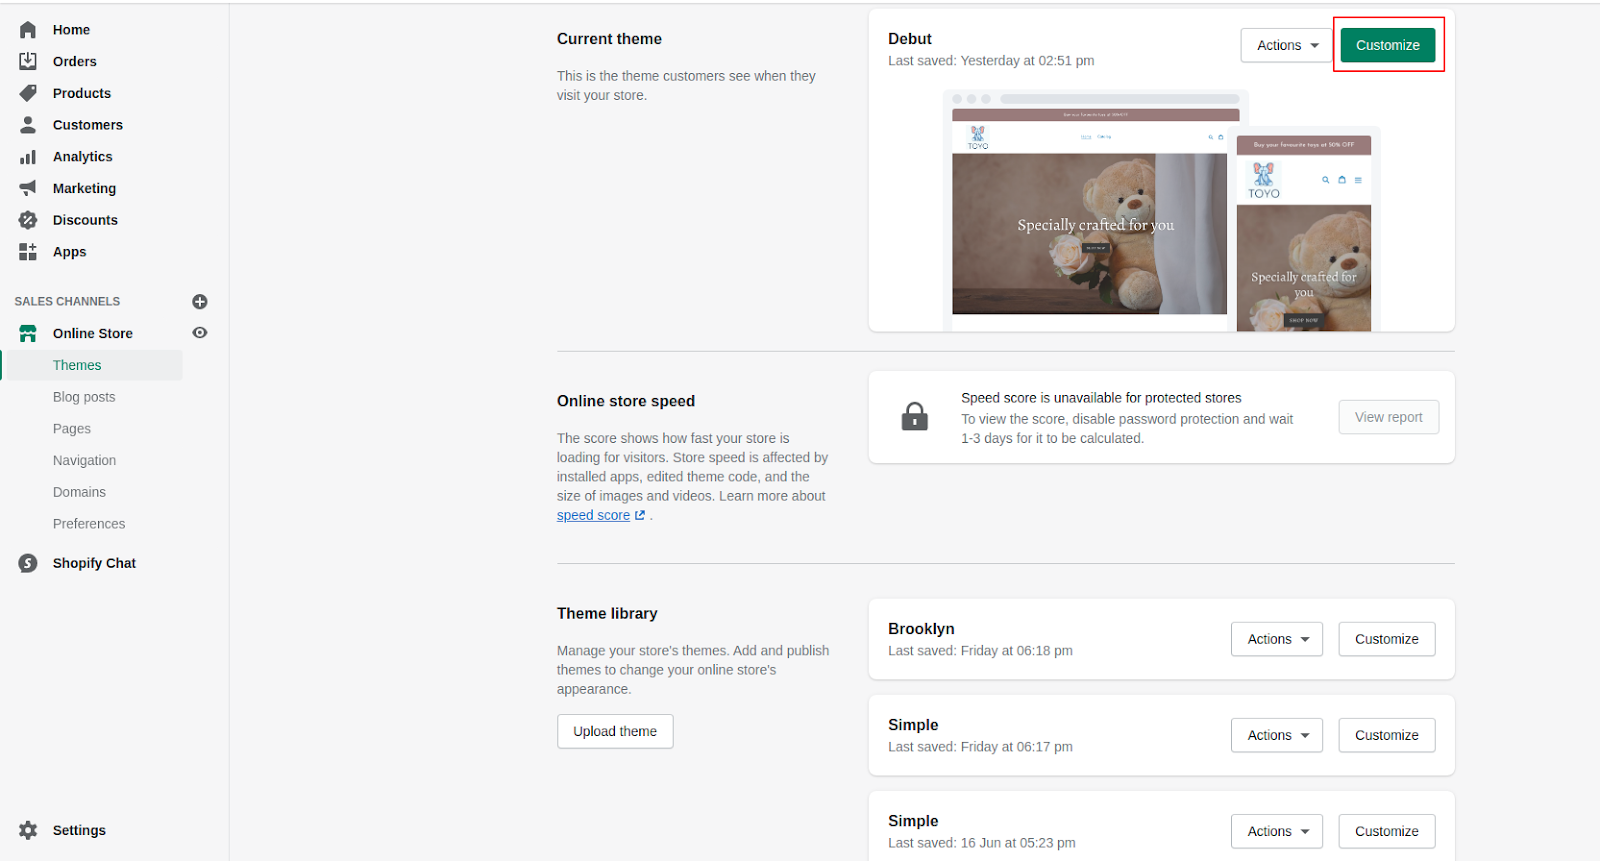
Step 1: Log in to your Shopify store.
Step 2: Go to Online Store > Themes.
Step 3: Click on the Customize button.
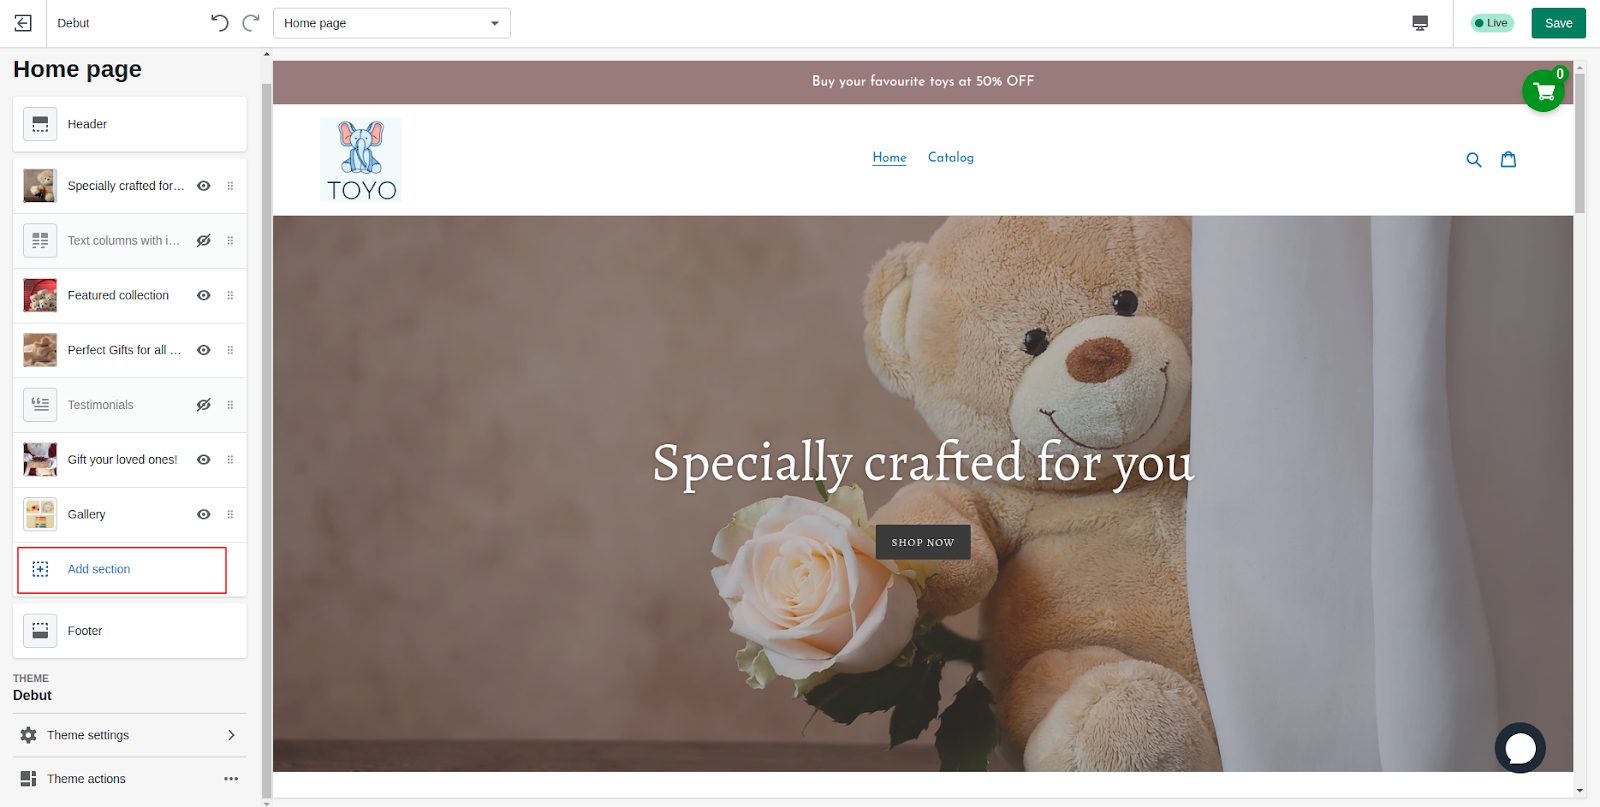
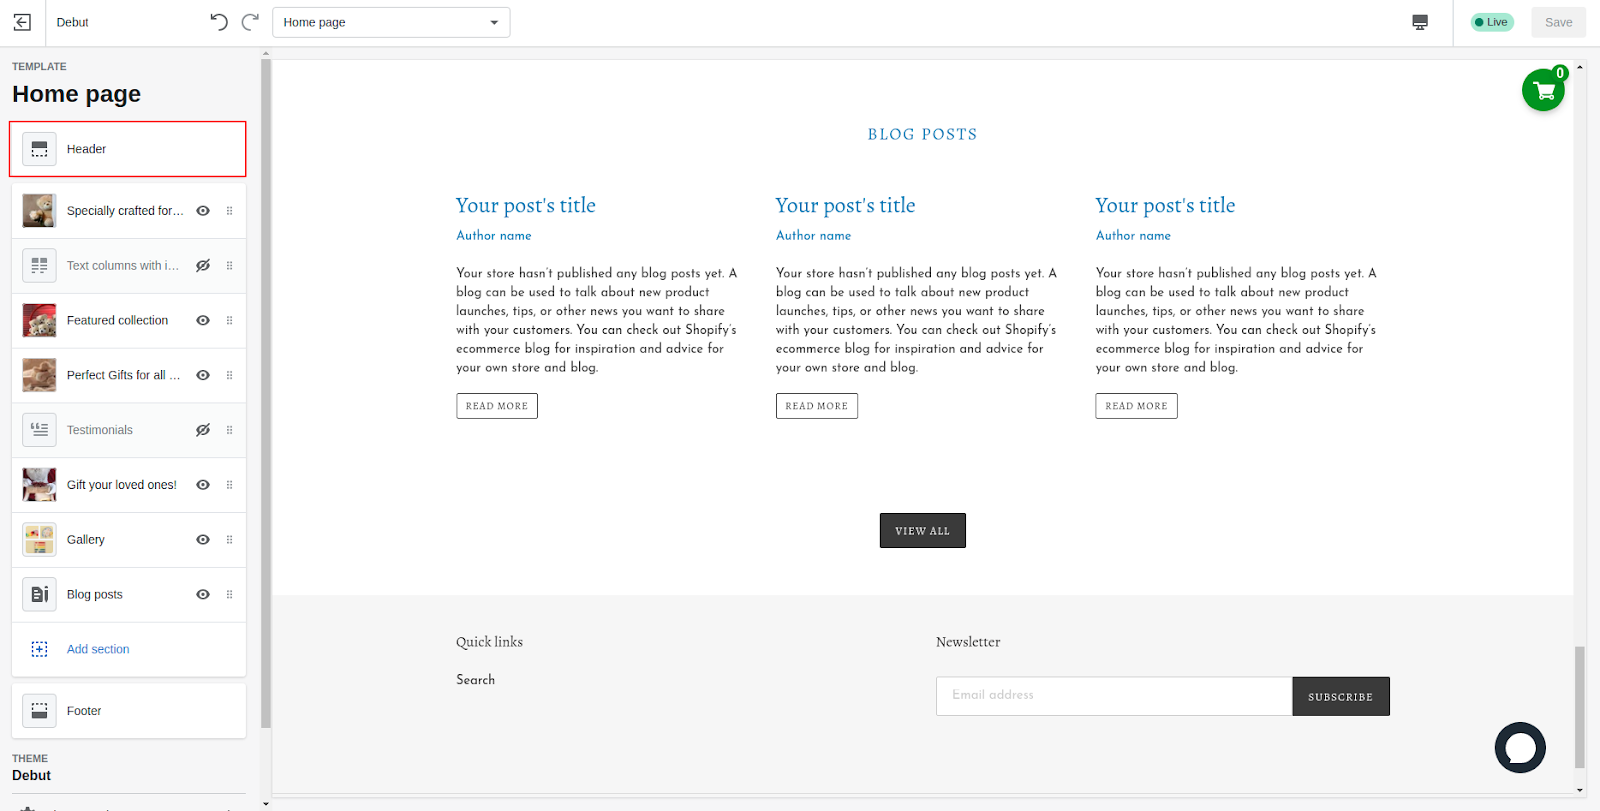
Step 4: Click on the Add Section button. This will open a list of sections you can add to your homepage.
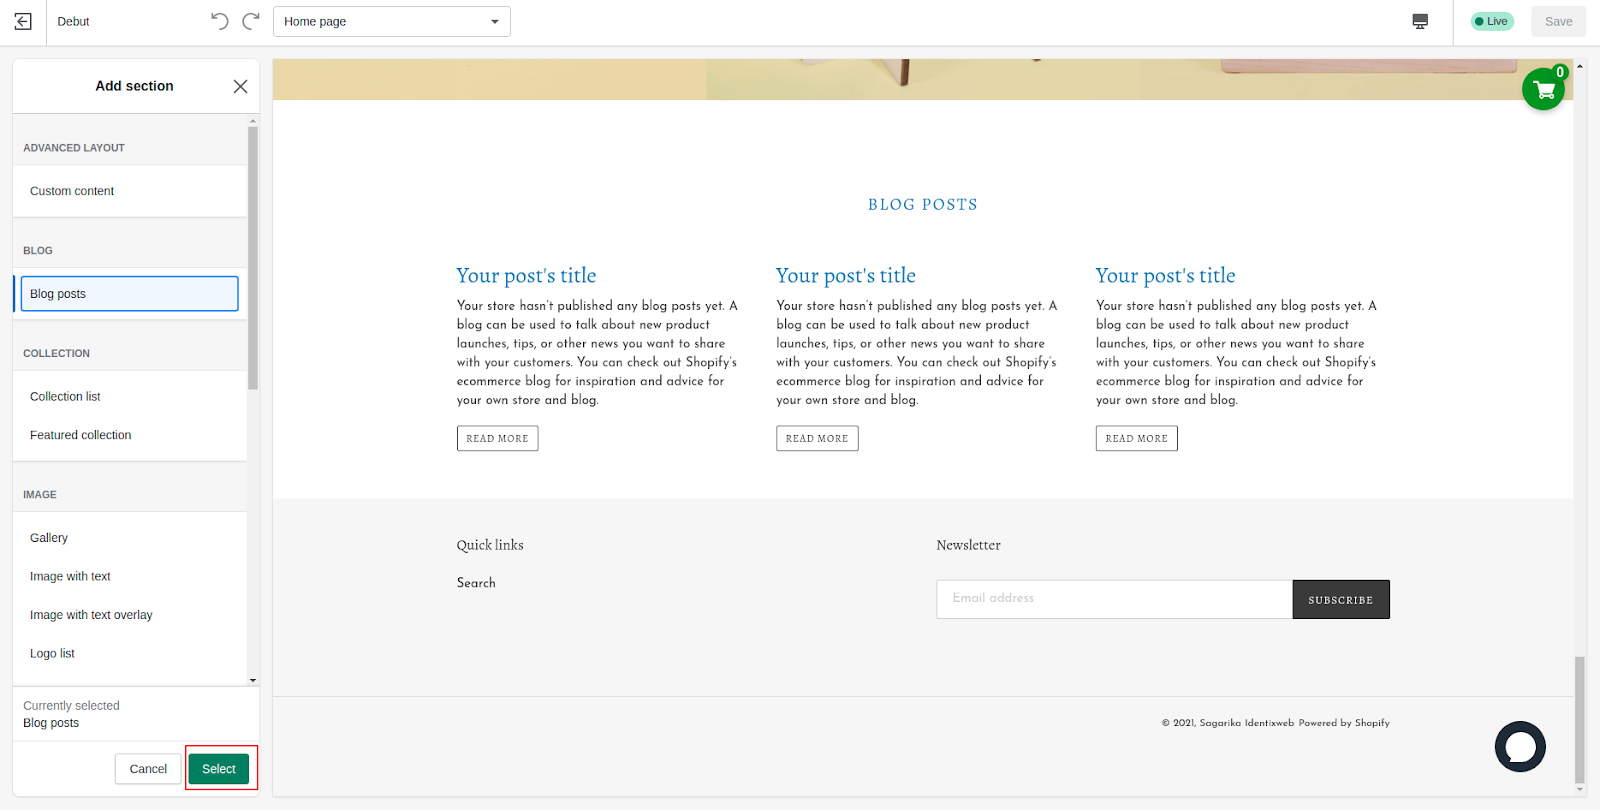
Step 5: Select the Blog Posts option and click on the Select button.
Hurray, the blog posts section is added to your store. Now, you may need to customize the sections as per your store requirements.
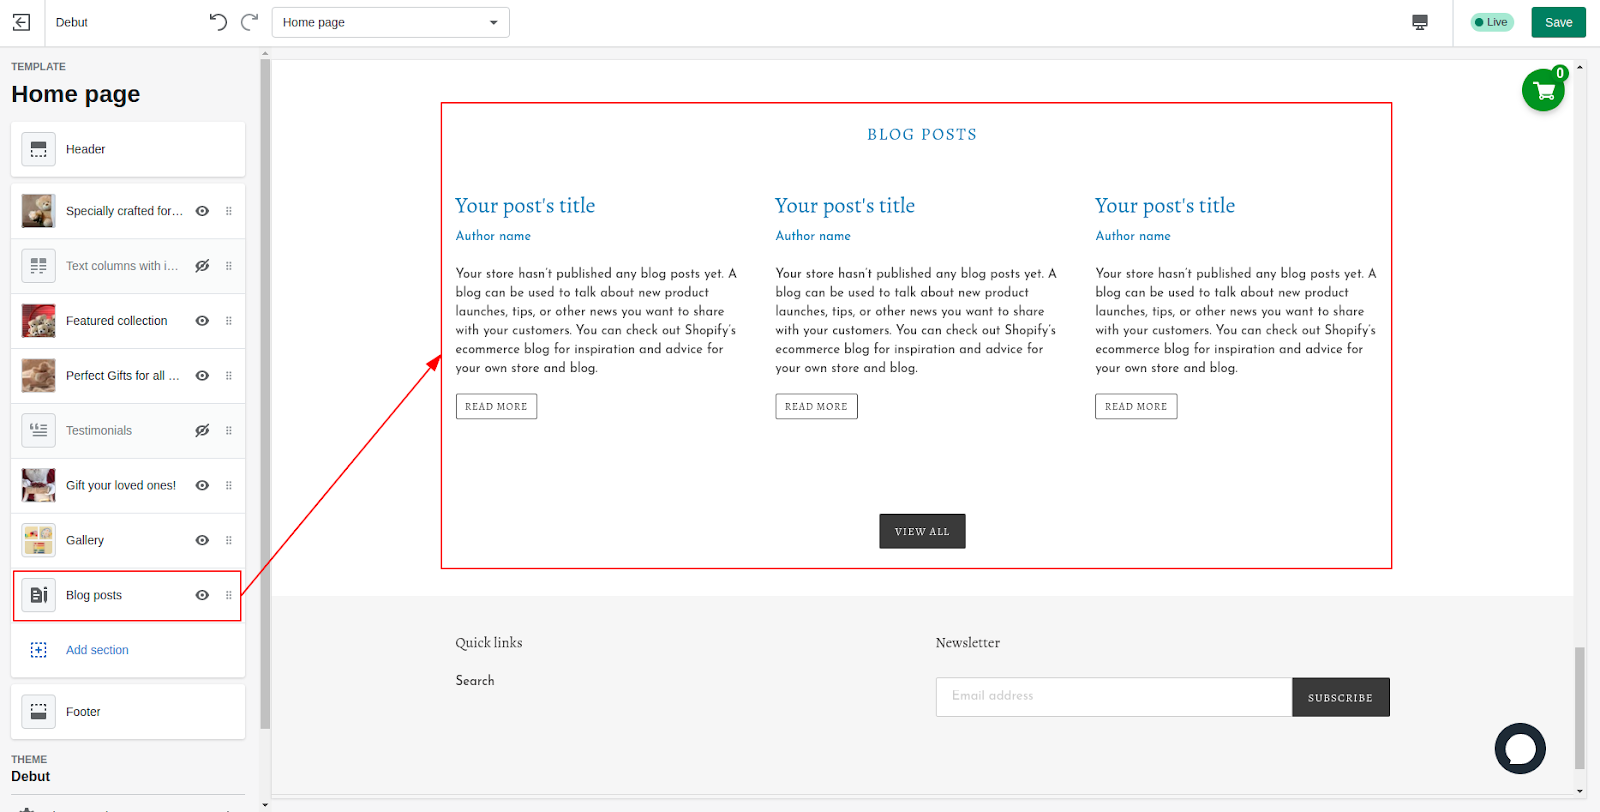
Step 6: Click on the Blog Posts section.
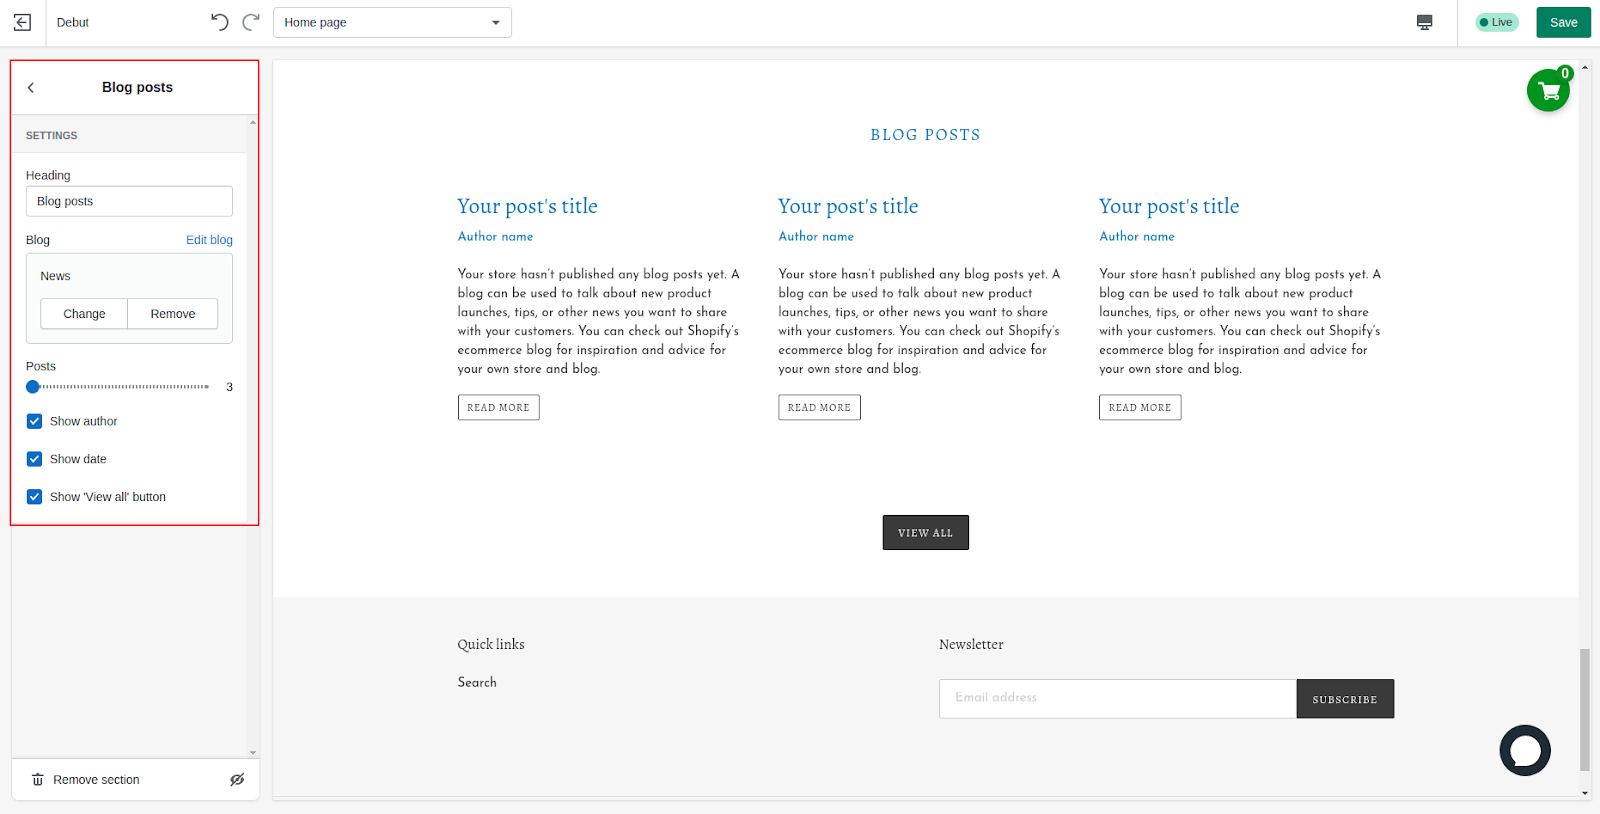
Here, you can modify the default settings as per your needs.
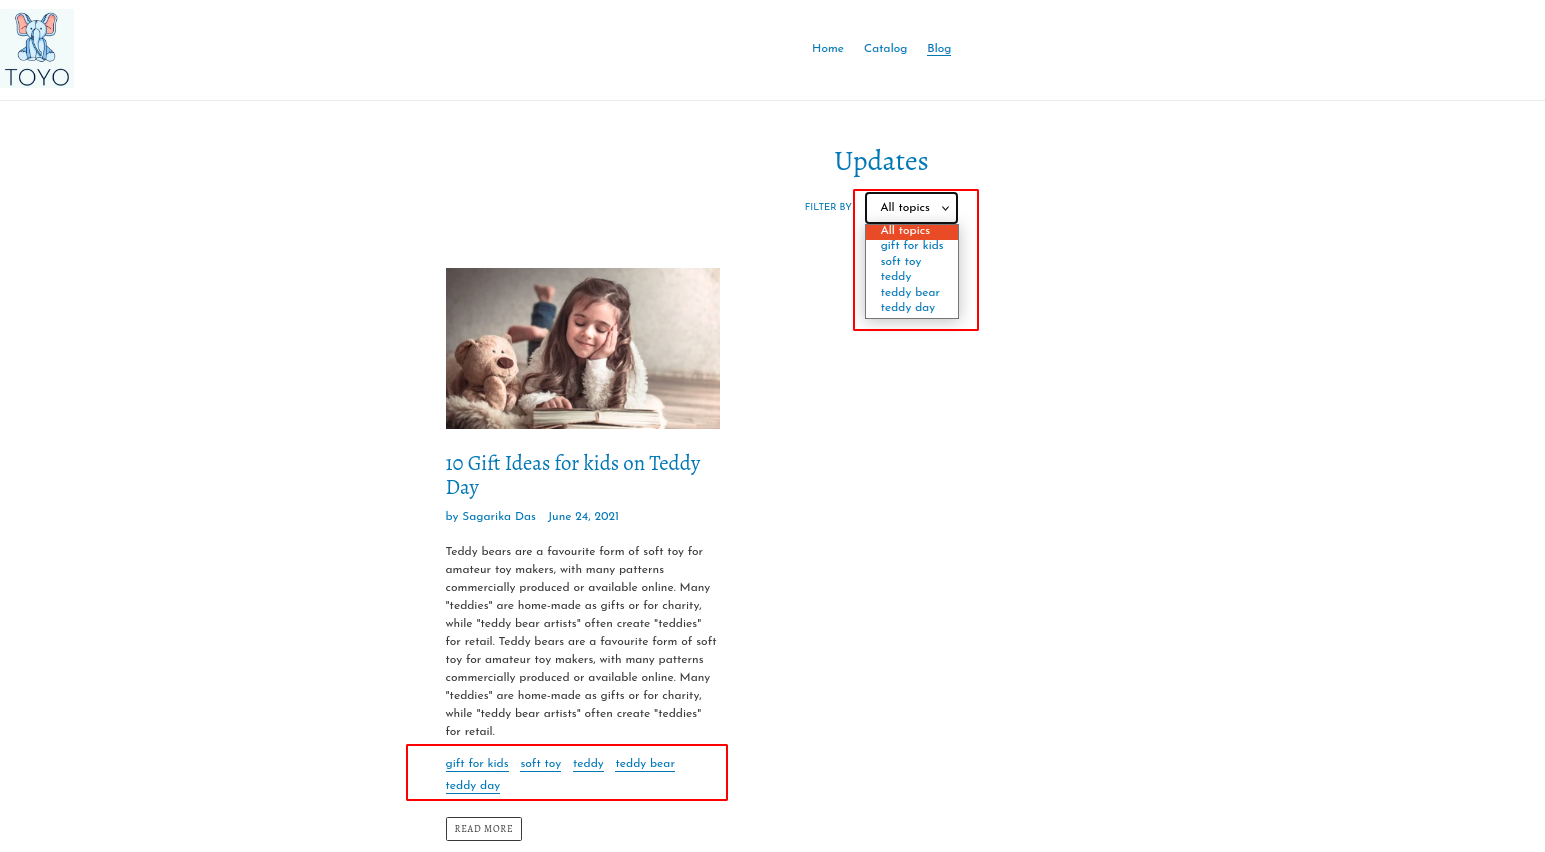
Organize your blog section
- Select the number of grids (blog posts) you want to show in the blog section.
- Click on the Edit Blog link to modify the blog category. If you want to create a new blog category, click on the Change button. (I have created one called “Updates”).
- Tick the checkboxes if you want to show the author, date of publication, and View All button in the blog section.
Create navigation to your blog page
Let your store visitors easily find your blogs. For that, you have to create some navigation (in Header or Footer or both) to your blog page on the landing page of your store. Follow these steps to add a blog menu on the header:
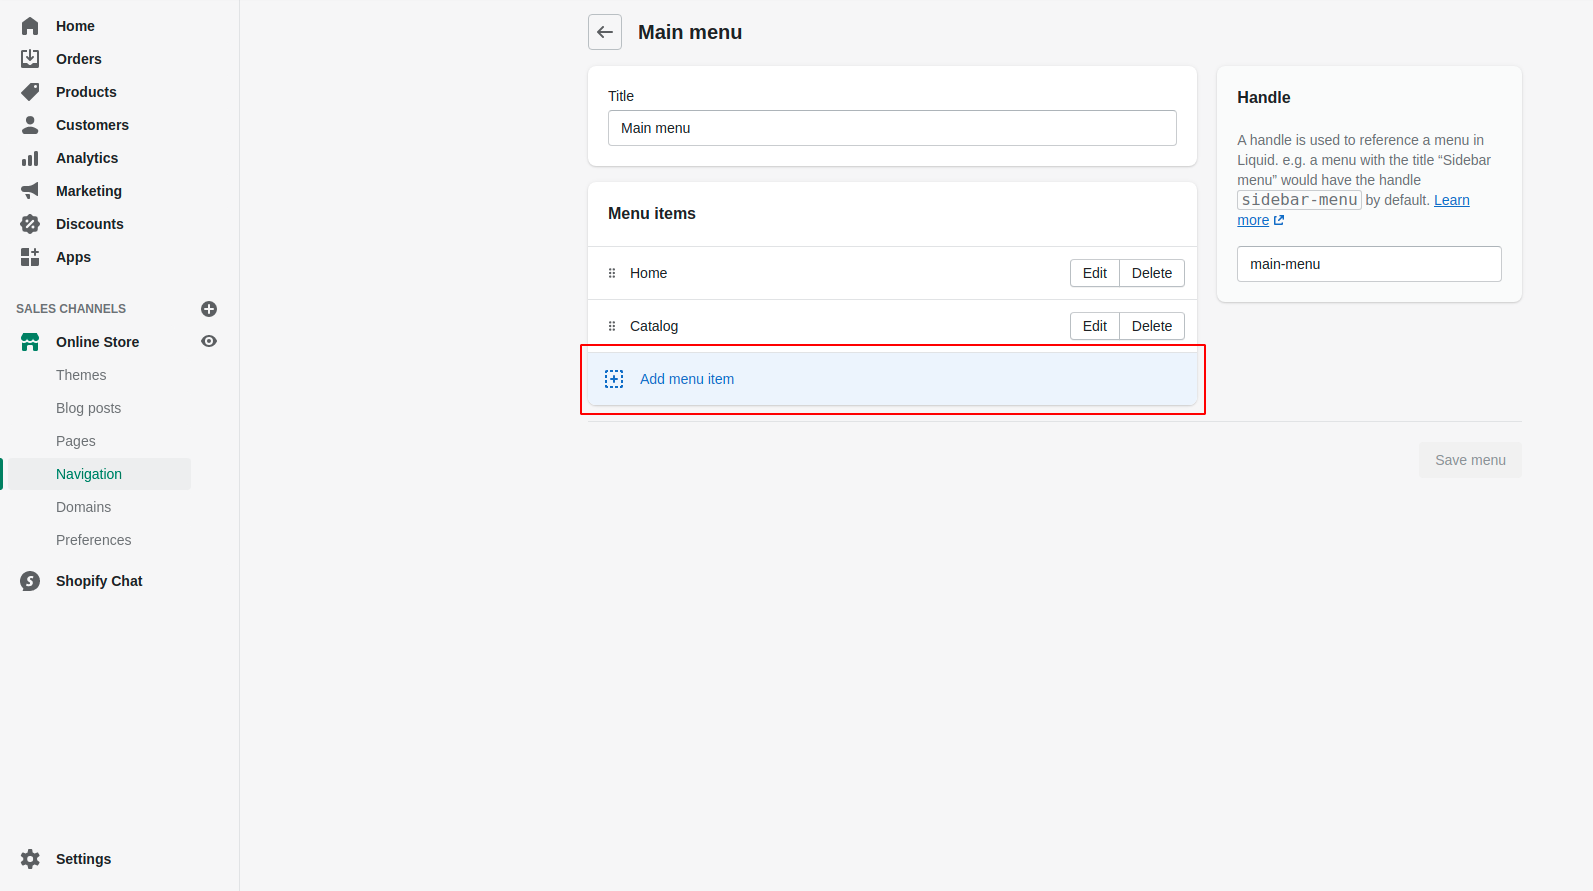
Step 1: Go to the Header of your current theme.
Step 2: Click on the Edit menu link. By default, there are two main menus: Home, Catalog.

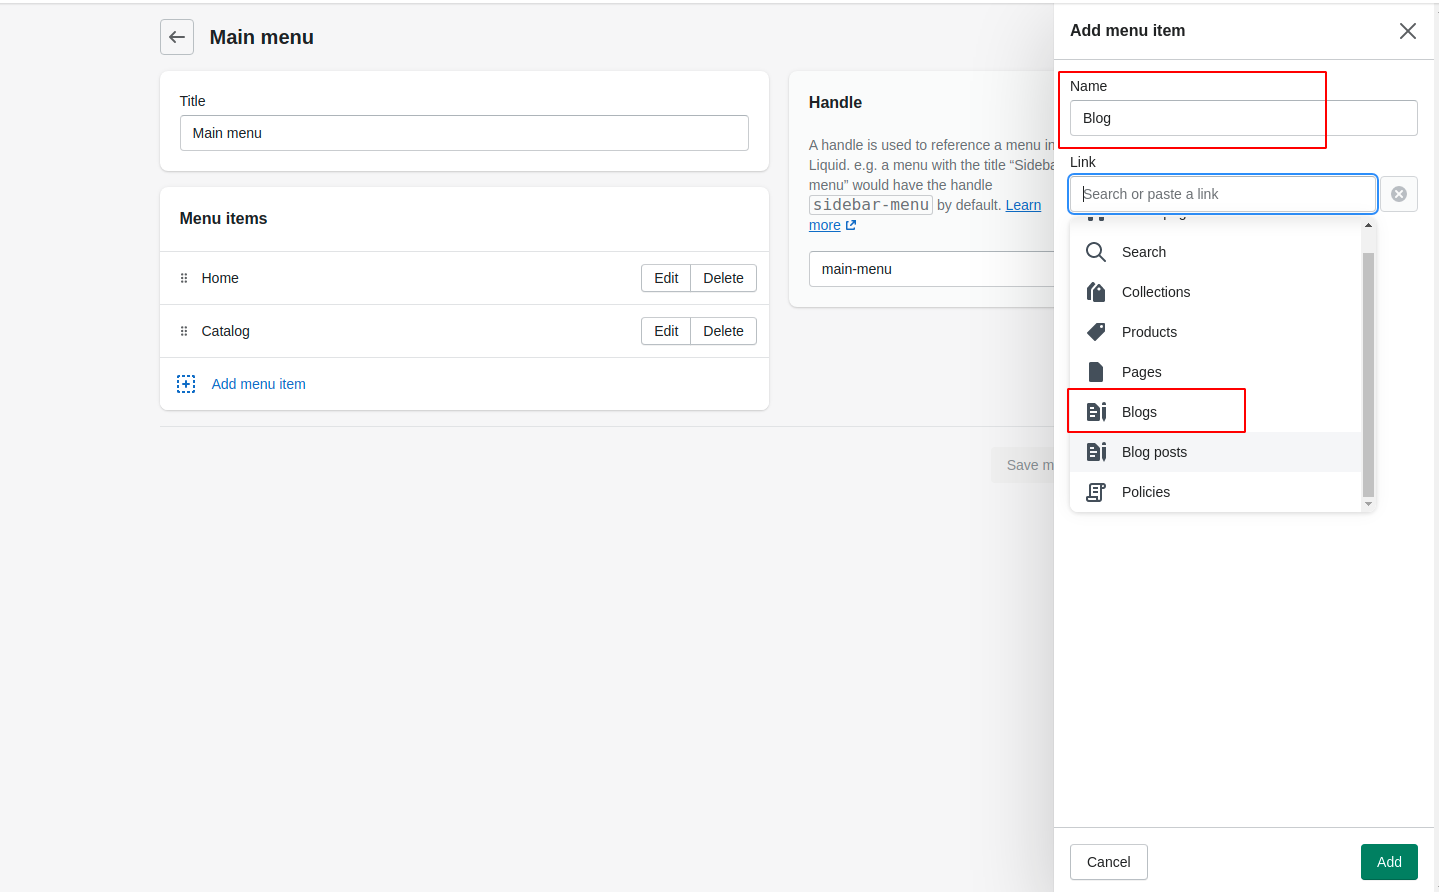
Step 3: Click on Add menu item to add a new menu in the header for the blog.
Step 4: Enter the menu name as “Blog” and select Blogs in the link.
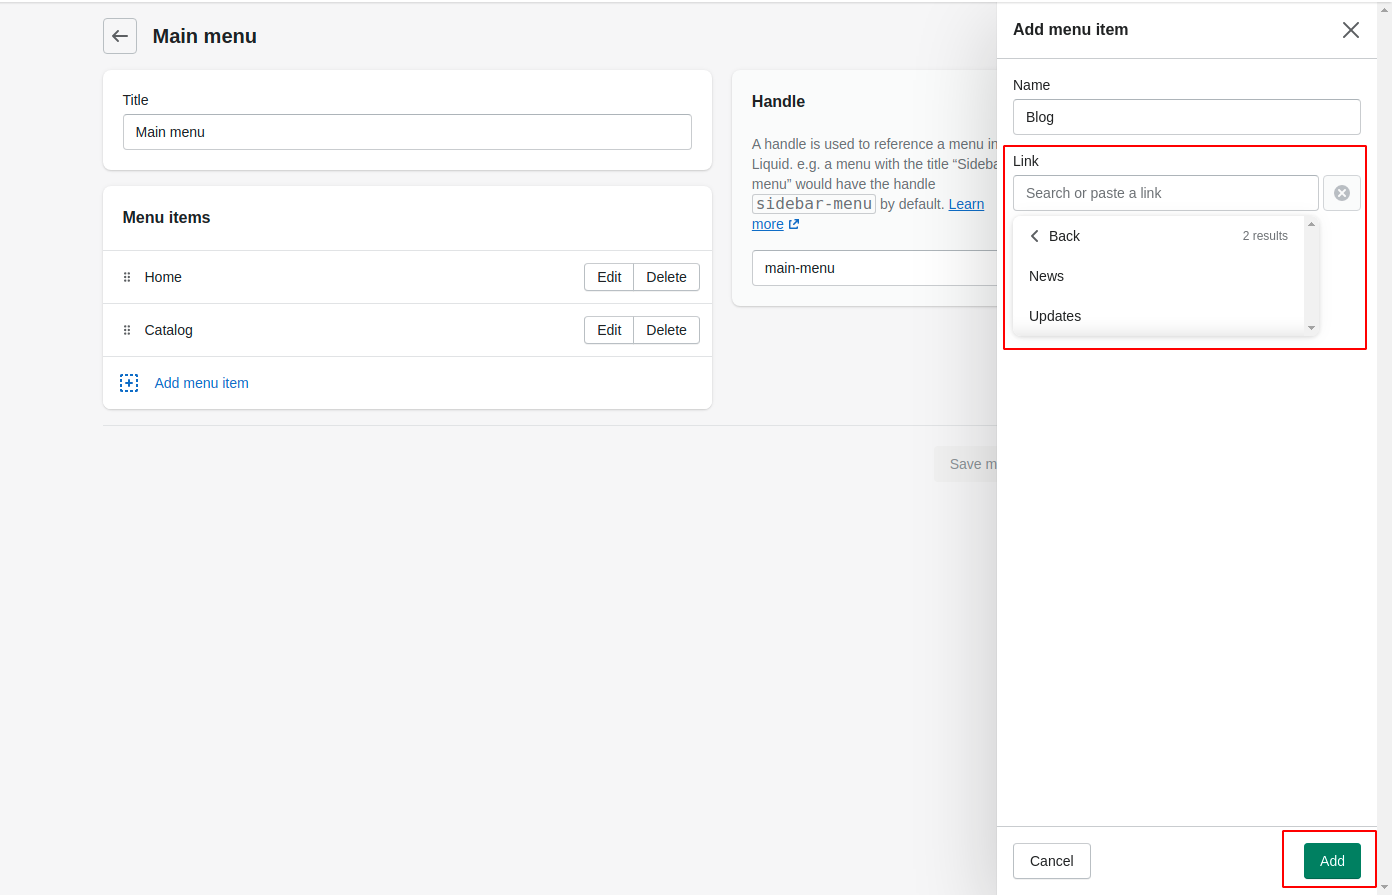
Step 5: Select the blog category and click on the Add button. (I will add “Updates” that I’ve created earlier).
Step 6: Click any on the Save button to save the changes.
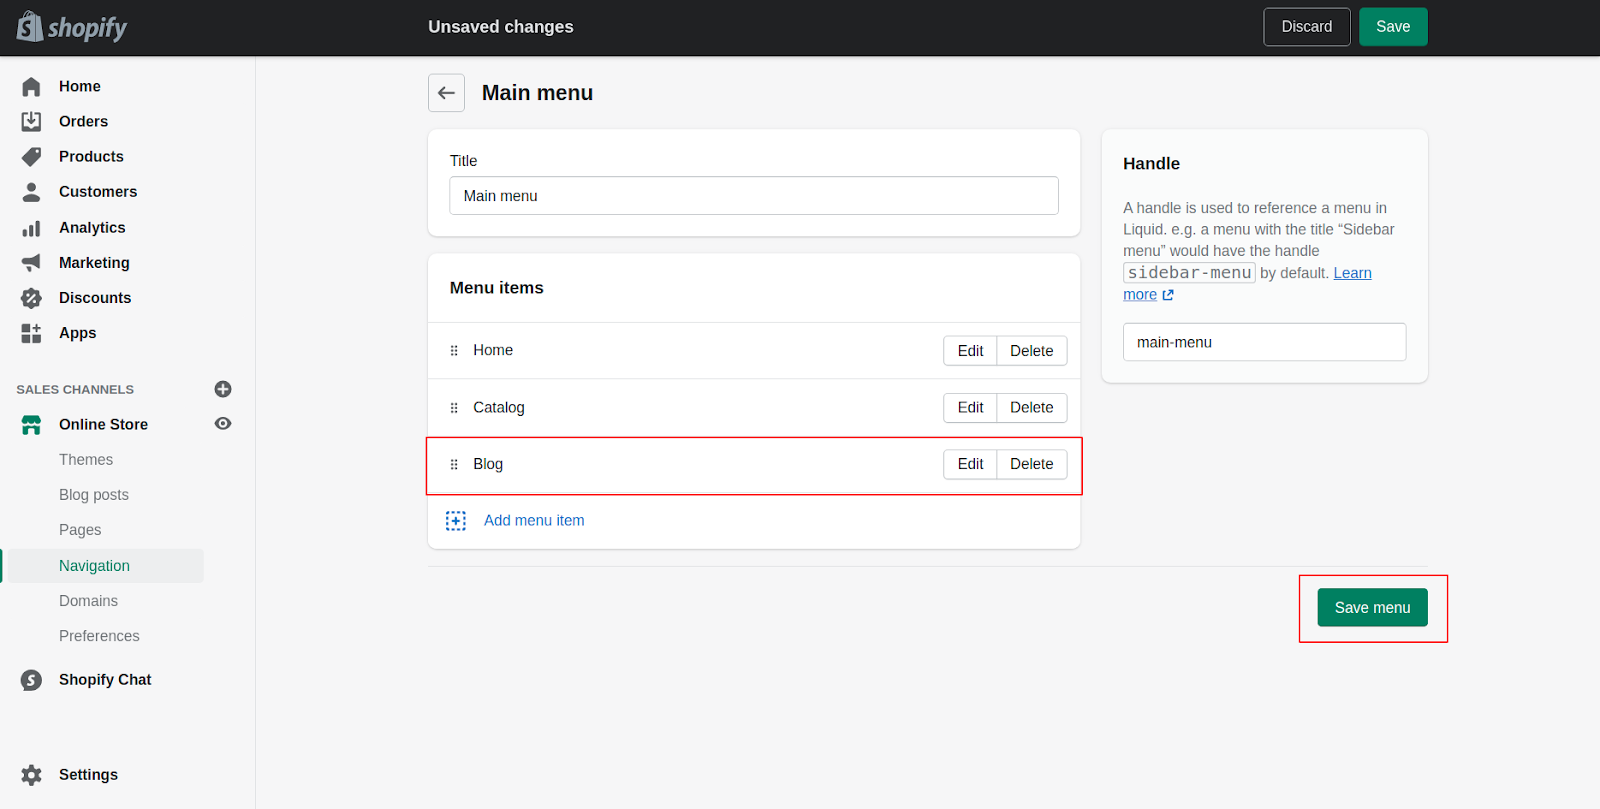
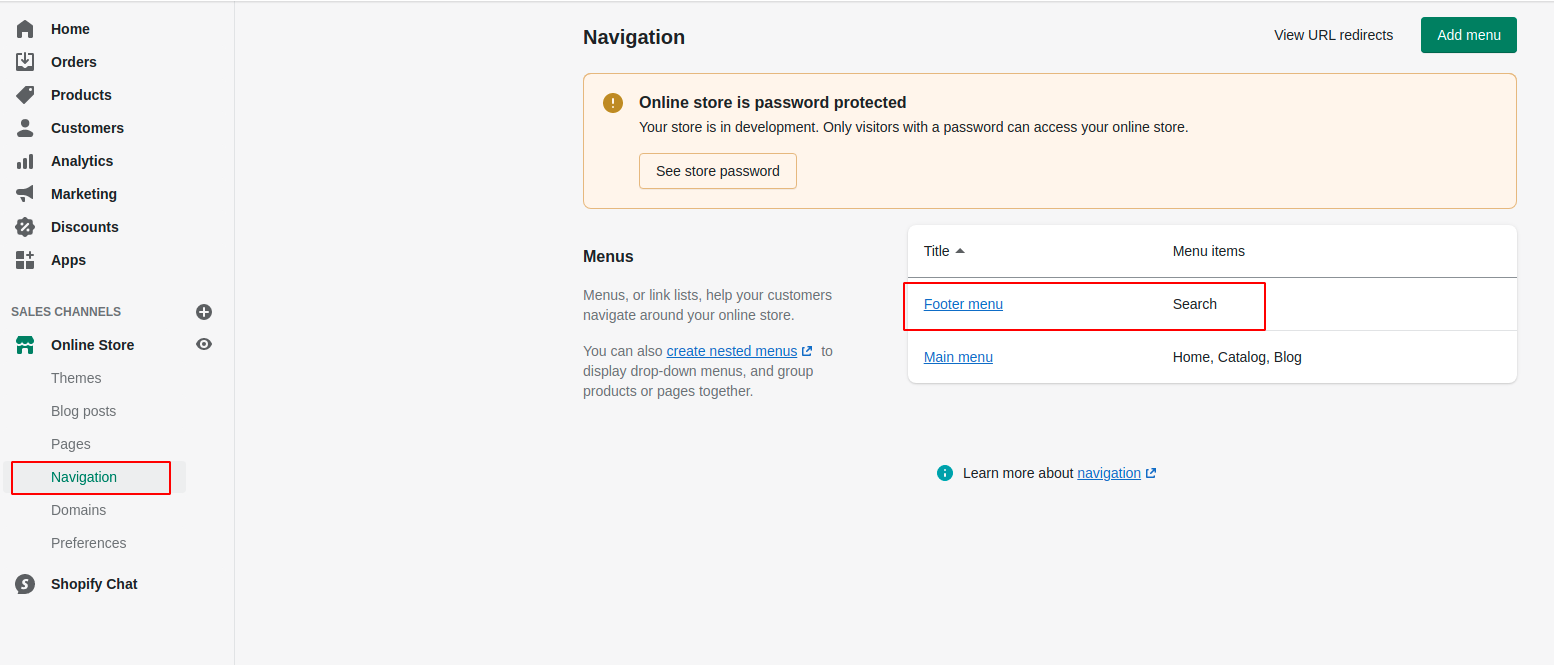
You can see in the above image, the Blog menu is successfully added to the menu list of the main menu. Let’s check how it's visible on the website.
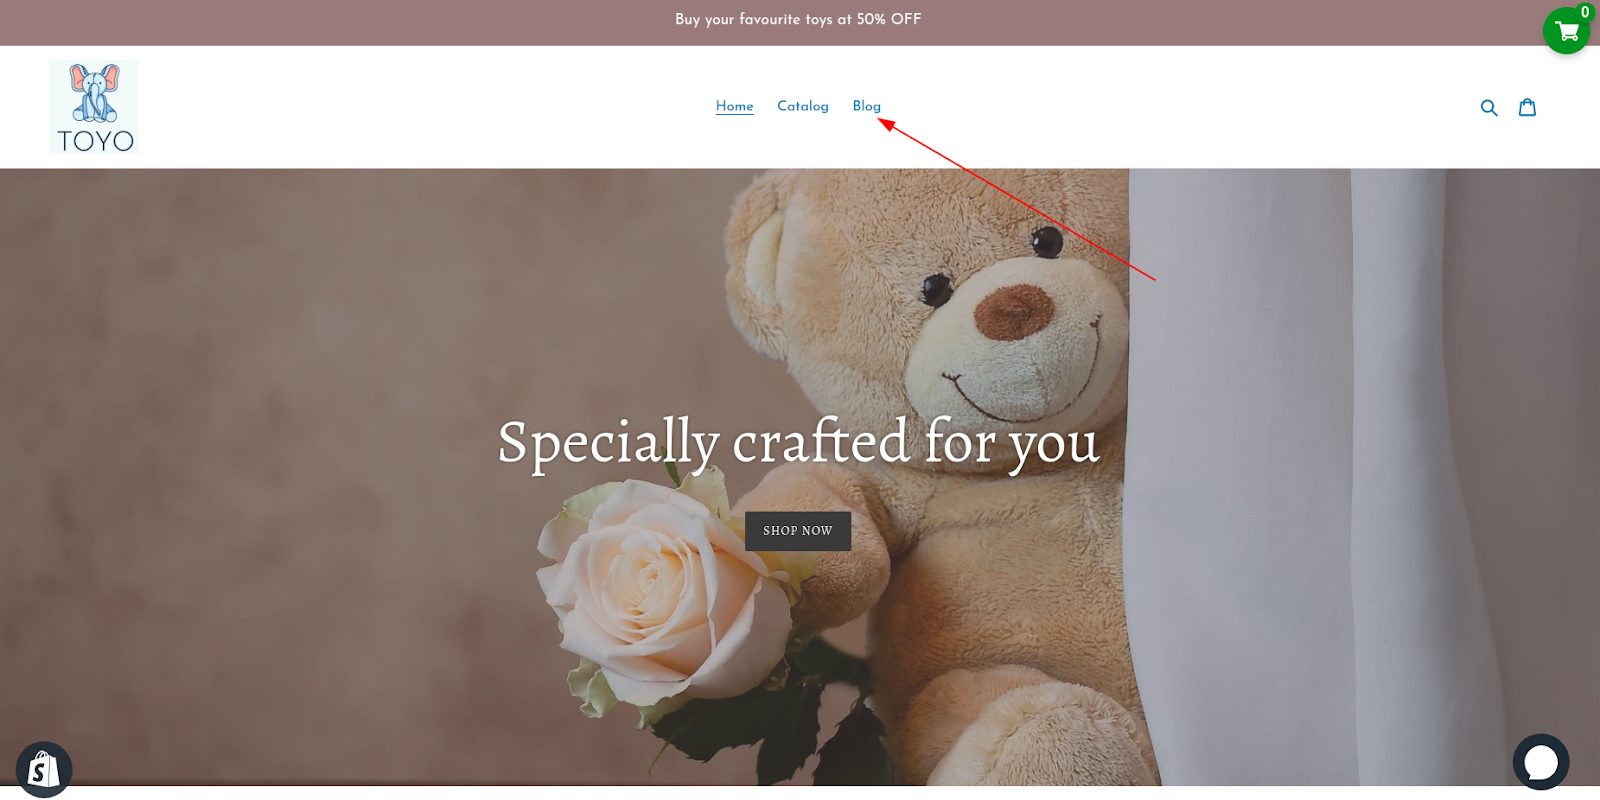
Yeah, you’ve got the Blog menu added to your website header - that's half the battle. In the same way, you can add the blog link in the footer menu.
The blog page is empty as we didn't add any blog posts yet. Let’s understand how we can do that.
Creating a Blog on Shopify
Step 1: Go to Online Store > Blog Posts.
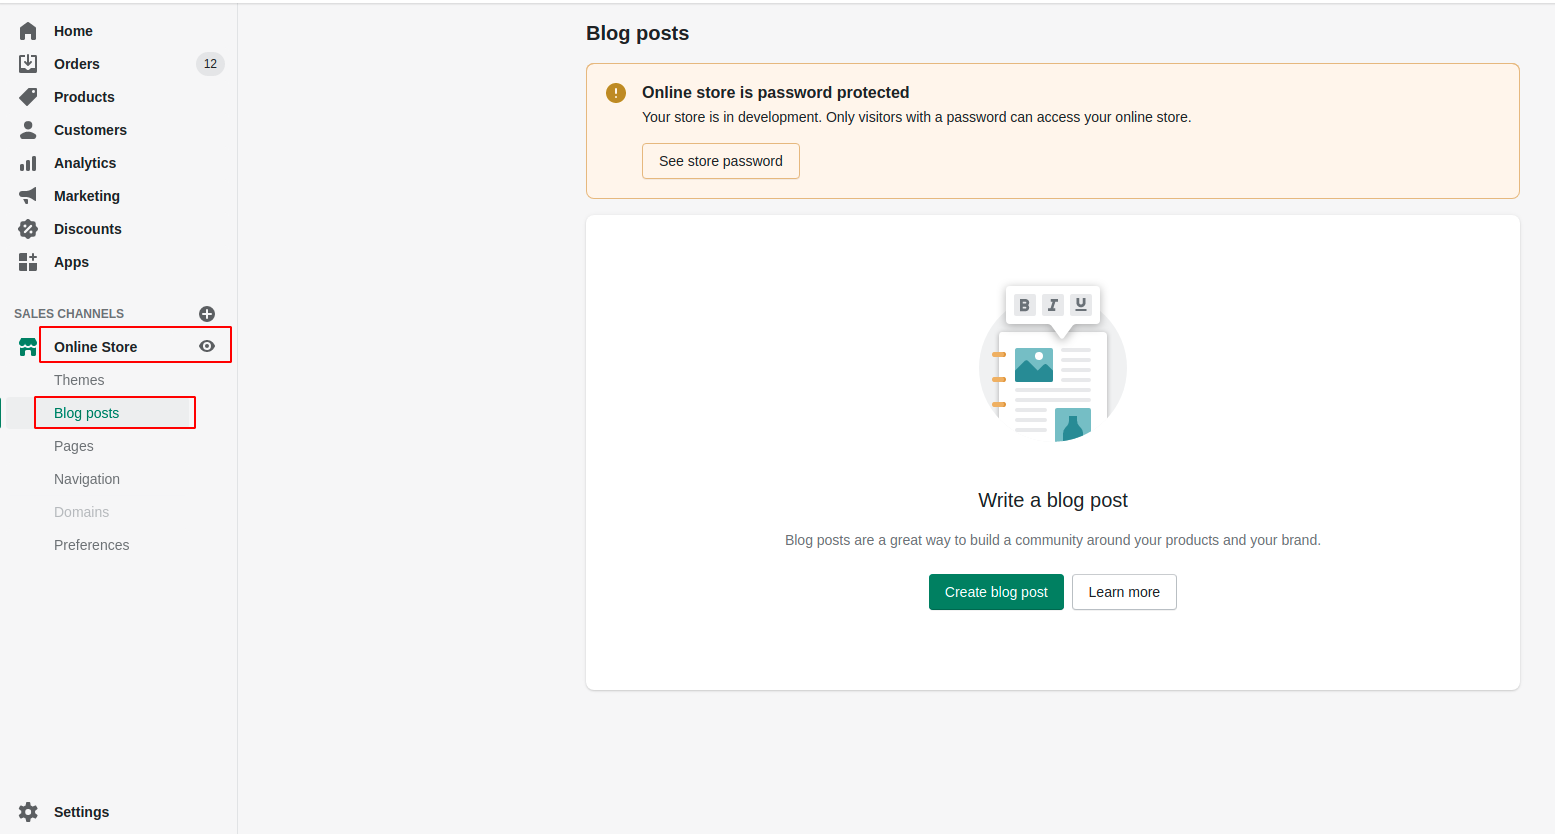
Step 2: Click on the Create blog post button.
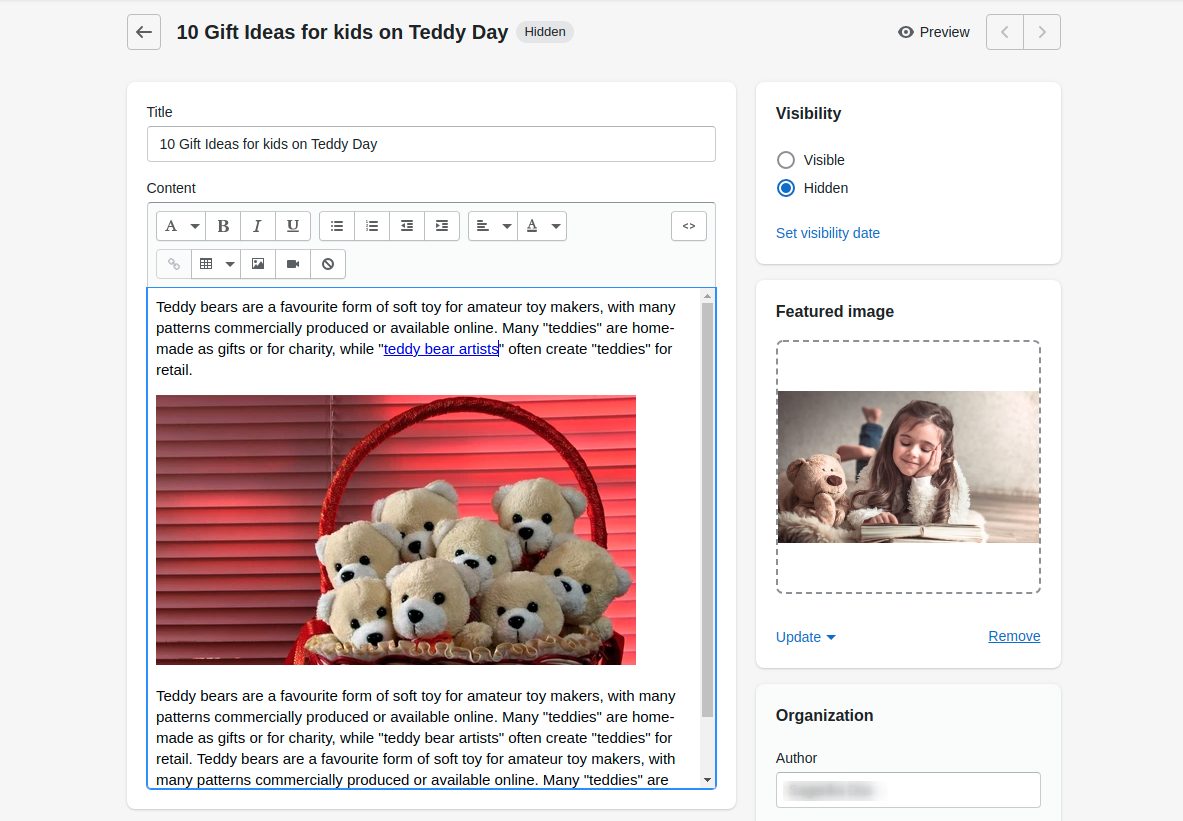
Step 3: Give a title for your blog post. See here how to write catchy Blog Titles your readers can't resist.
Step 4: Write the blog post content. You can format your post content using the rich text editor. You can also add an image, embed a video or other media, or insert a link that is necessary to make an effective blog post.
Not a writer? Do you need help? Hope this will help you.
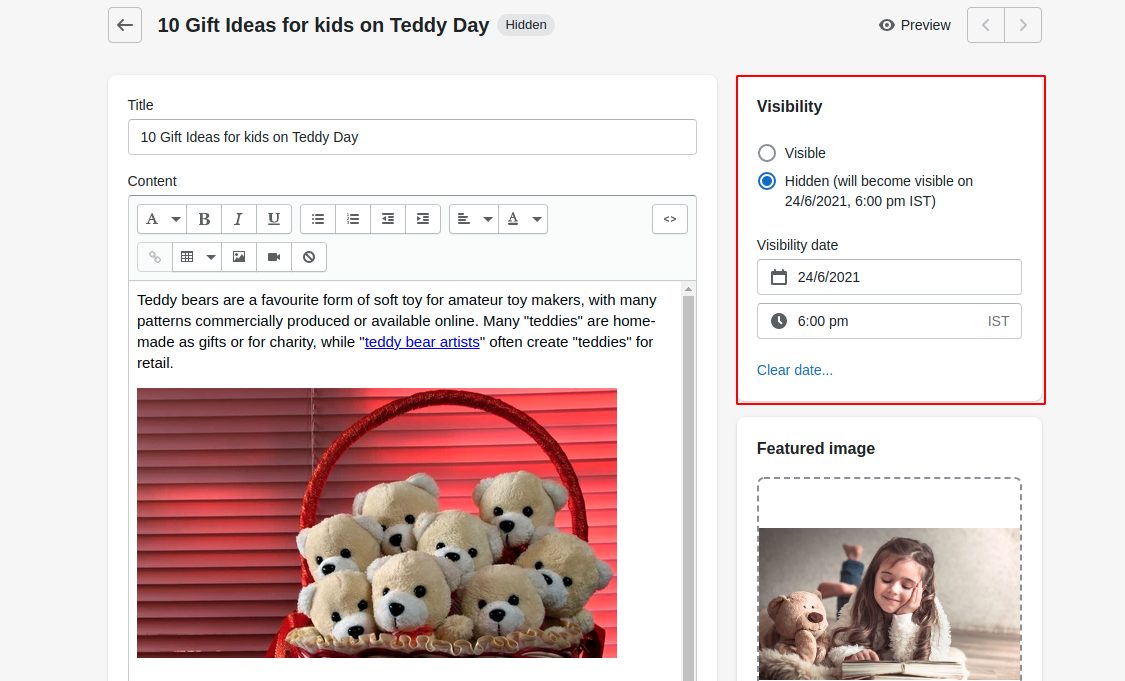
Step 5: Select Visible in the Visibility section, if you're ready to publish the post. Otherwise set a specific publishing date for the post by clicking Set Visibility Date.
Step 6: Click Add image in the Featured Image section, and then select an image to upload. Display an image on the blog landing page. It's advised to use Stock images for your Shopify blogging.
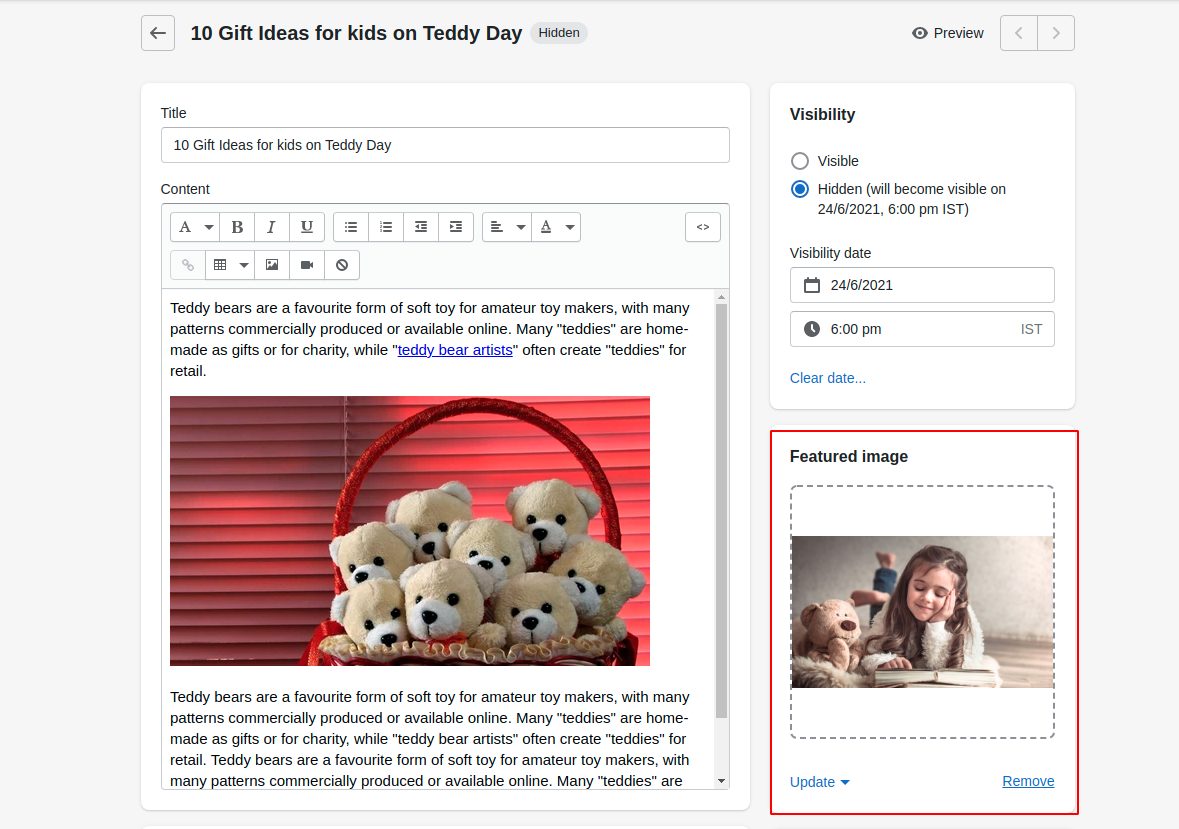
Step 7: Add the Author of your blog from the drop-down menu that will only show the names of the store owner and staff.
Step 8: Select the blog category where the post will be published. All the blog categories would appear in the drop-down list. If you don't want to publish to one of your existing blogs, then you can create a new one.
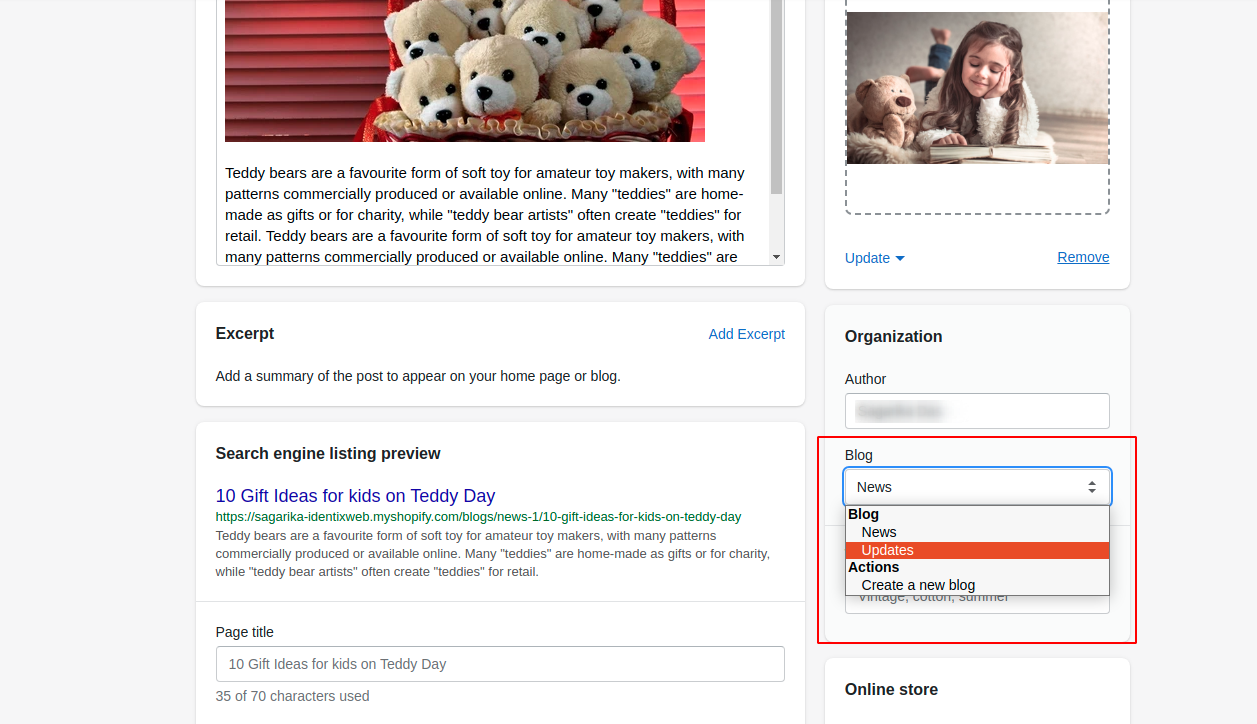
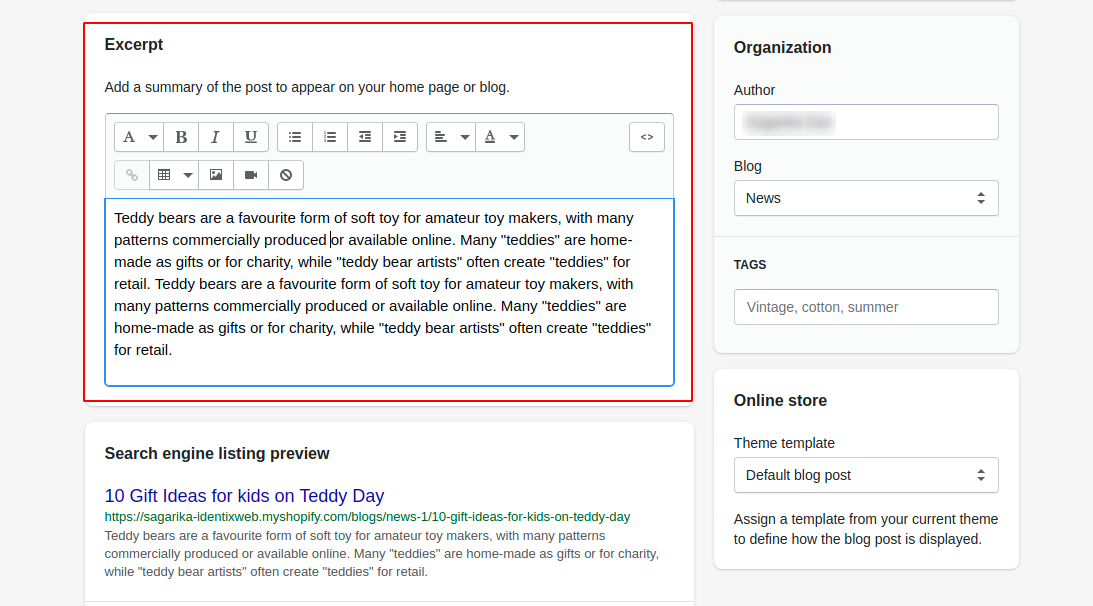
Step 9: Add an excerpt or summary of the post that will appear on your home page or blog. (Optional)
Step 10: Enter tags in the tags field for your blog posts to organize them by category or subject.
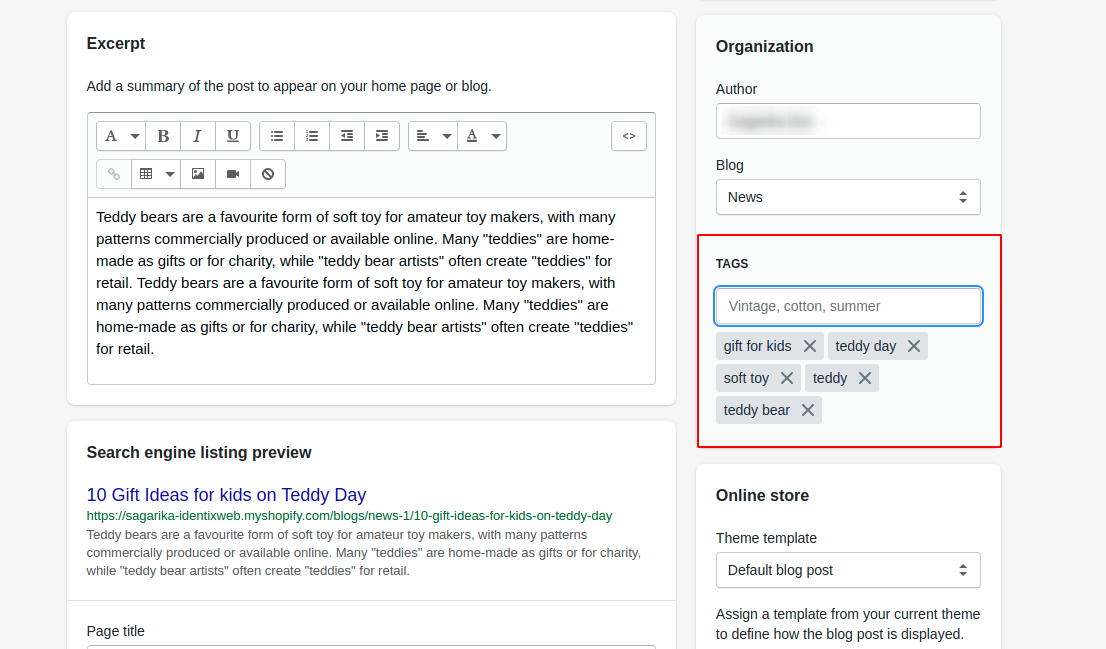
The visitors can click the tags to find other blog posts in the same category. When a reader searches for a tag in your online store, matching blog posts will appear in the search results.
Step 11: Select the template that you want to use for the post. If you have created a custom template for blog posts, then it will appear in the Template drop-down menu. (Optional)
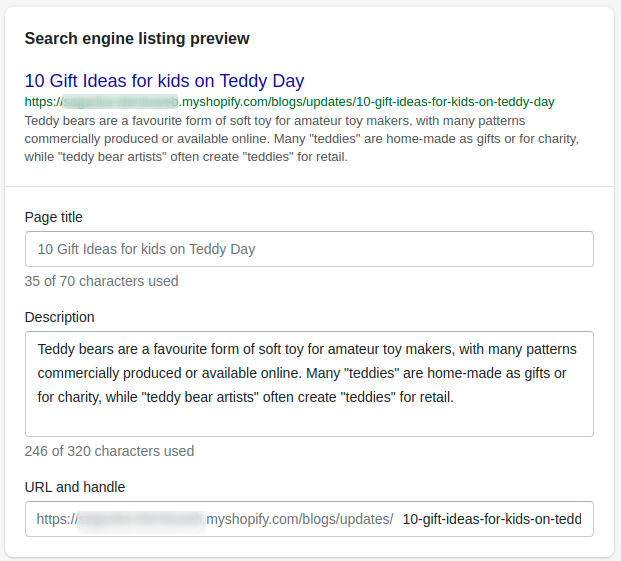
Step 12: Edit the search engine listing for your blog post in the Search engine listing preview section.
Step 13: Click the Save button.
Managing comments on blog posts
Shopify helps you to allow or disable comments on a blog with Manage Comments settings.
The comment settings have three options:
Comments are disabled: Your store visitors can't leave comments on blog posts.
Comments are allowed, pending moderation: Your store visitors can leave comments, but you need to review them before they will appear on your blog posts.
Comments are allowed, and are automatically published: Your store visitors can leave comments and they will appear on your blog without your review.
To allow or disable comments on a blog:
Step 1: Go to Online Store > Blog Posts.
Step 2: Click Manage blogs.

Step 3: Click the name of the blog you want to edit.
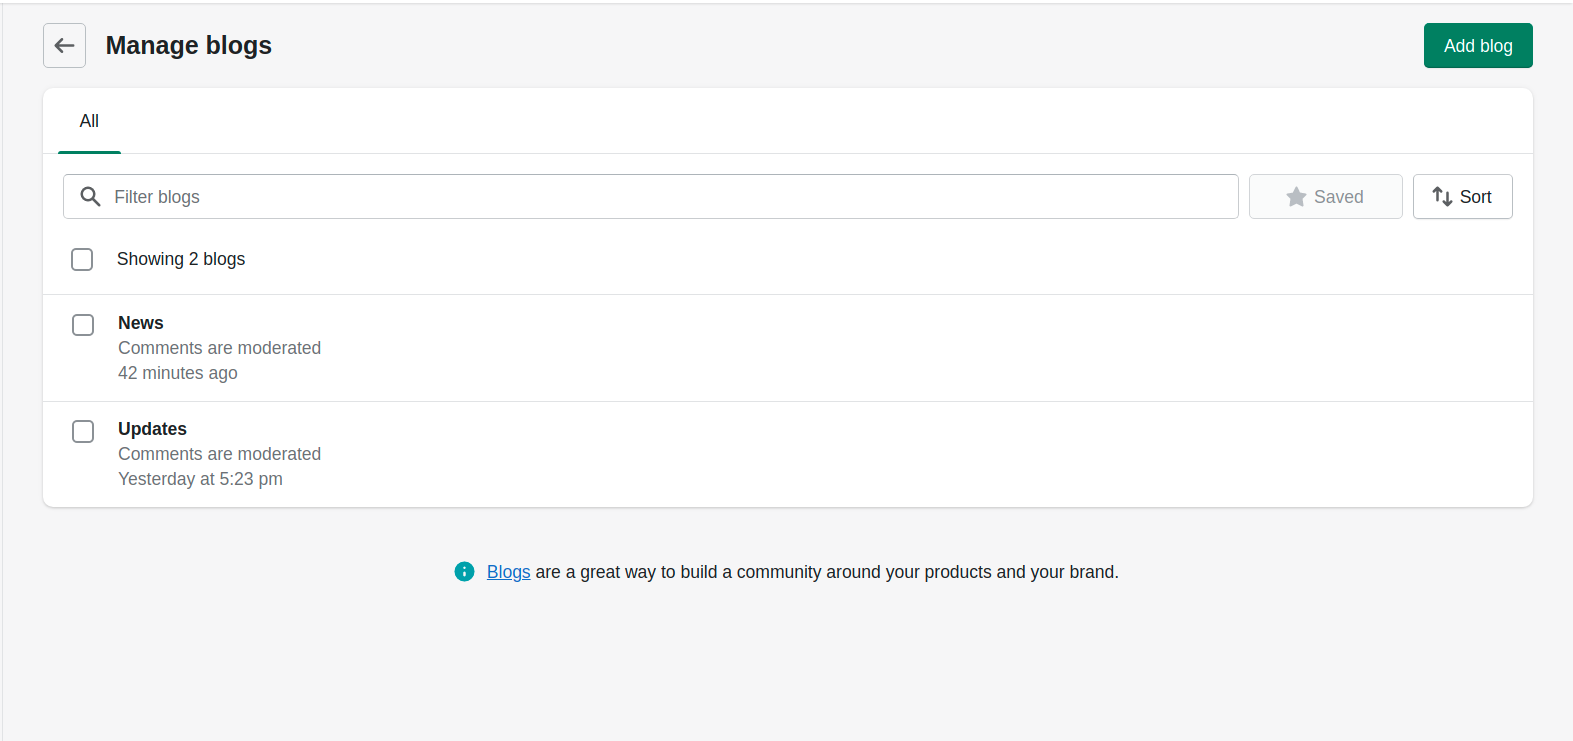
Step 4: In the Comments section, select one of the three options that you want, and then click the Save button.

Promote your blogs
Let's see how you can promote your blog.
Invite Customers to Subscribe
Let your store visitors subscribe to your newsletter that informs them about new blog posts, offers, and other announcements.
All the Shopify themes support the newsletter sign-up section. You can also add a pop-up Subscription box to your website
Add Social Media Buttons
Your visitors may like to share your blogs in their groups to inspire them. At that time, the Social Media Button will help out.
There are many Shopify apps that will help you to add the Social Media Button to your blog posts or to the entire website.
Make your blog SEO optimized
A blog that is prepared with on-page SEO content, will easily grow your reach. Shopify makes it easy for you to optimize your blog with the Search engine listing preview option. It offers built-in SEO functionality in blogging where you can add and edit the SEO content like page title, meta description, and URL.
Quick Tips to Create an Effective Blog:
- Find trending topics for blogs.
- Research for target and related keywords thoroughly. Use those keywords in the blog content in appropriate proportion.
- Add more related images, and videos to the blog.
- Add some internal and external links to your blog.
- Use headings, bulleted lists, etc. to organize your blog content.
- Let your audience easily comment on your blog.
- Add an awesome Featured blog image.
- Keep it easy to read and understand. Avoid complex words.
- Allow easy sharing and following your blogs.
- Optimize your blog for mobile users.


About the author
Sagarika Das
Sagarika Das is a content writer with a passion for the ecommerce world. She crafts engaging, SEO-friendly content that helps online businesses connect with customers and grow.