


Best Upsell For WooCommerce is an all-in-one plugin for Upselling & Cross-selling. With this WooCommerce upsell plugin, you can easily create bump sales to boost your sales and skyrocket Average Order Value (AOV)! This WooCommerce upsell plugin provides a Checkout Button widget, that helps you to provide a super easy buying process to your customers.
Haven't installed this WooCommerce upsell plugin yet? Check out how to install the Best Upsell plugin in the WordPress eCommerce store?
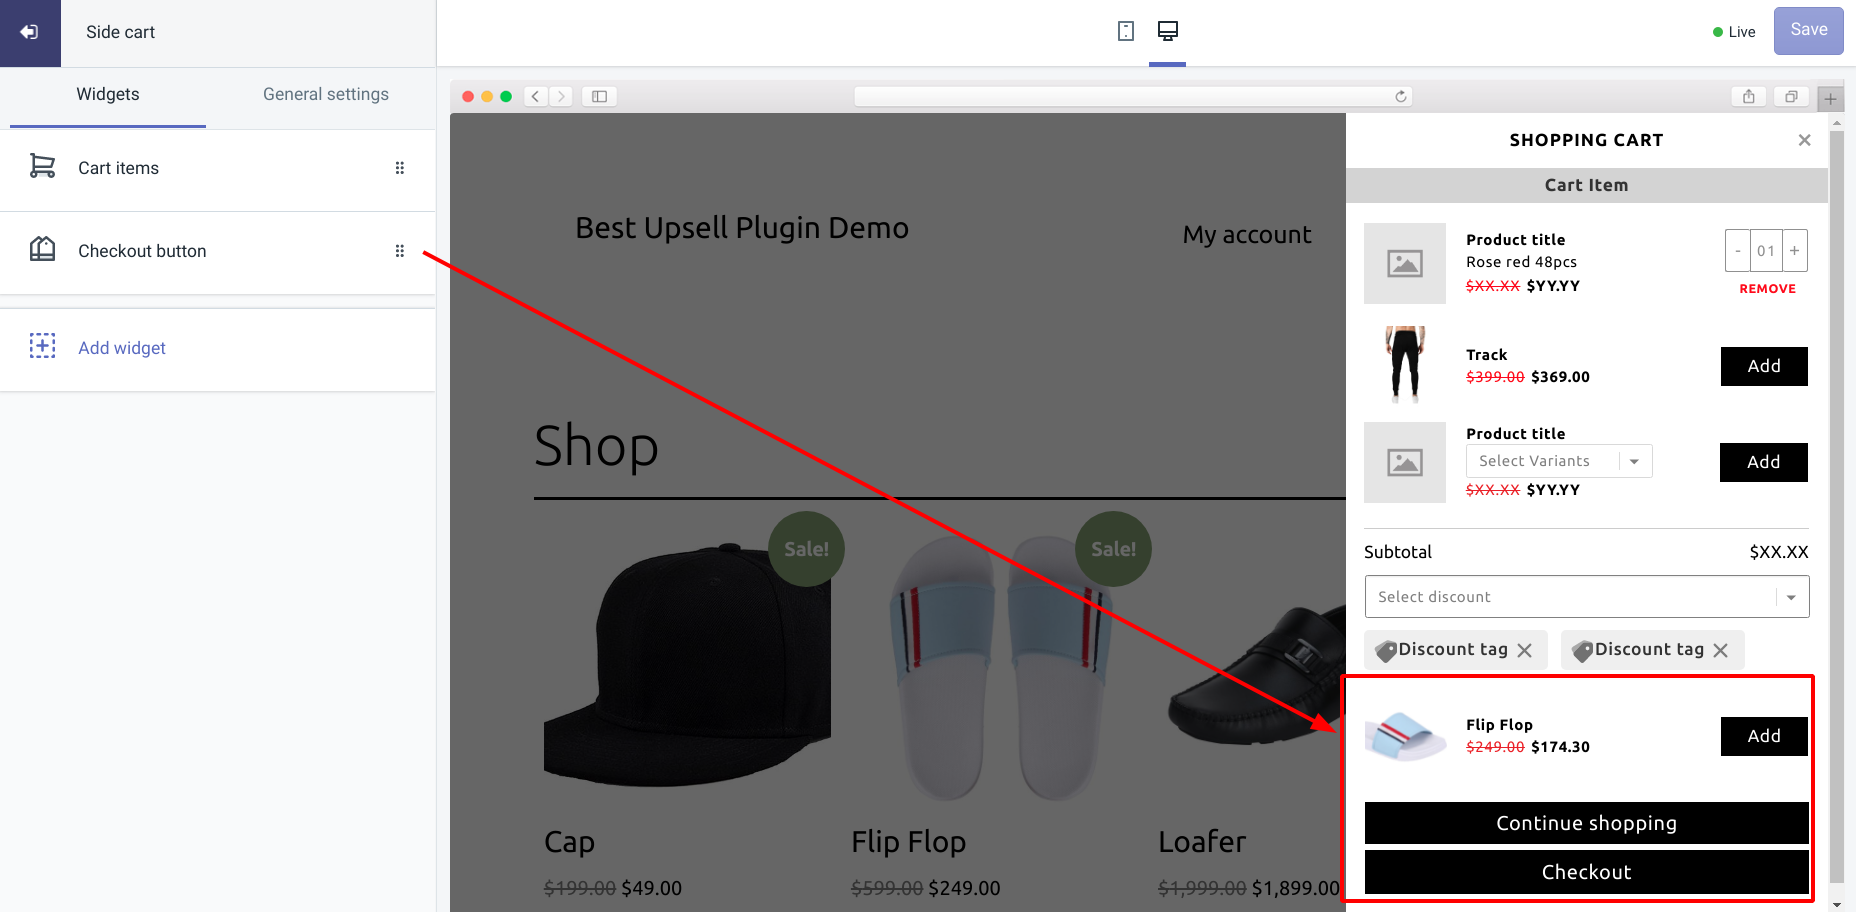
Customizing the Checkout Button Widget of Best Upsell
Let's get familiar with the Checkout button widget and learn how to customize the shopping cart with this Best Upsell widget.
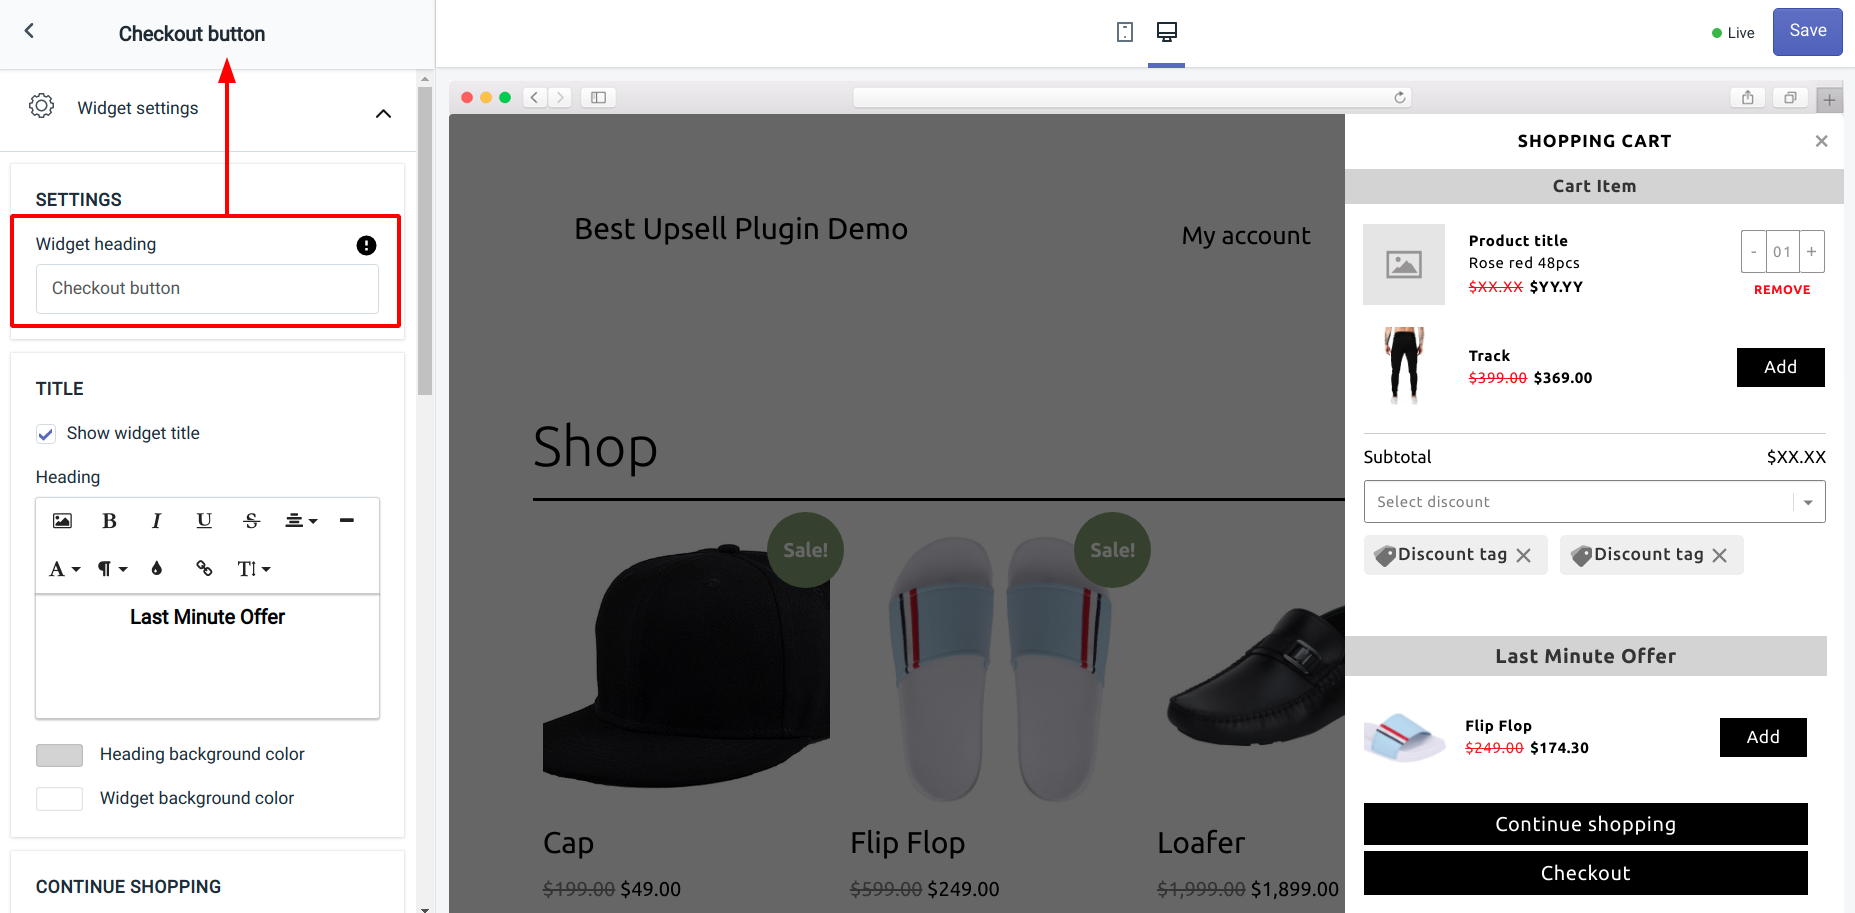
Widget heading
The widget heading allows you to change the default widget name. This will help you easily identify them in case you have added multiple checkout button widgets in the Best Upsell plugin.
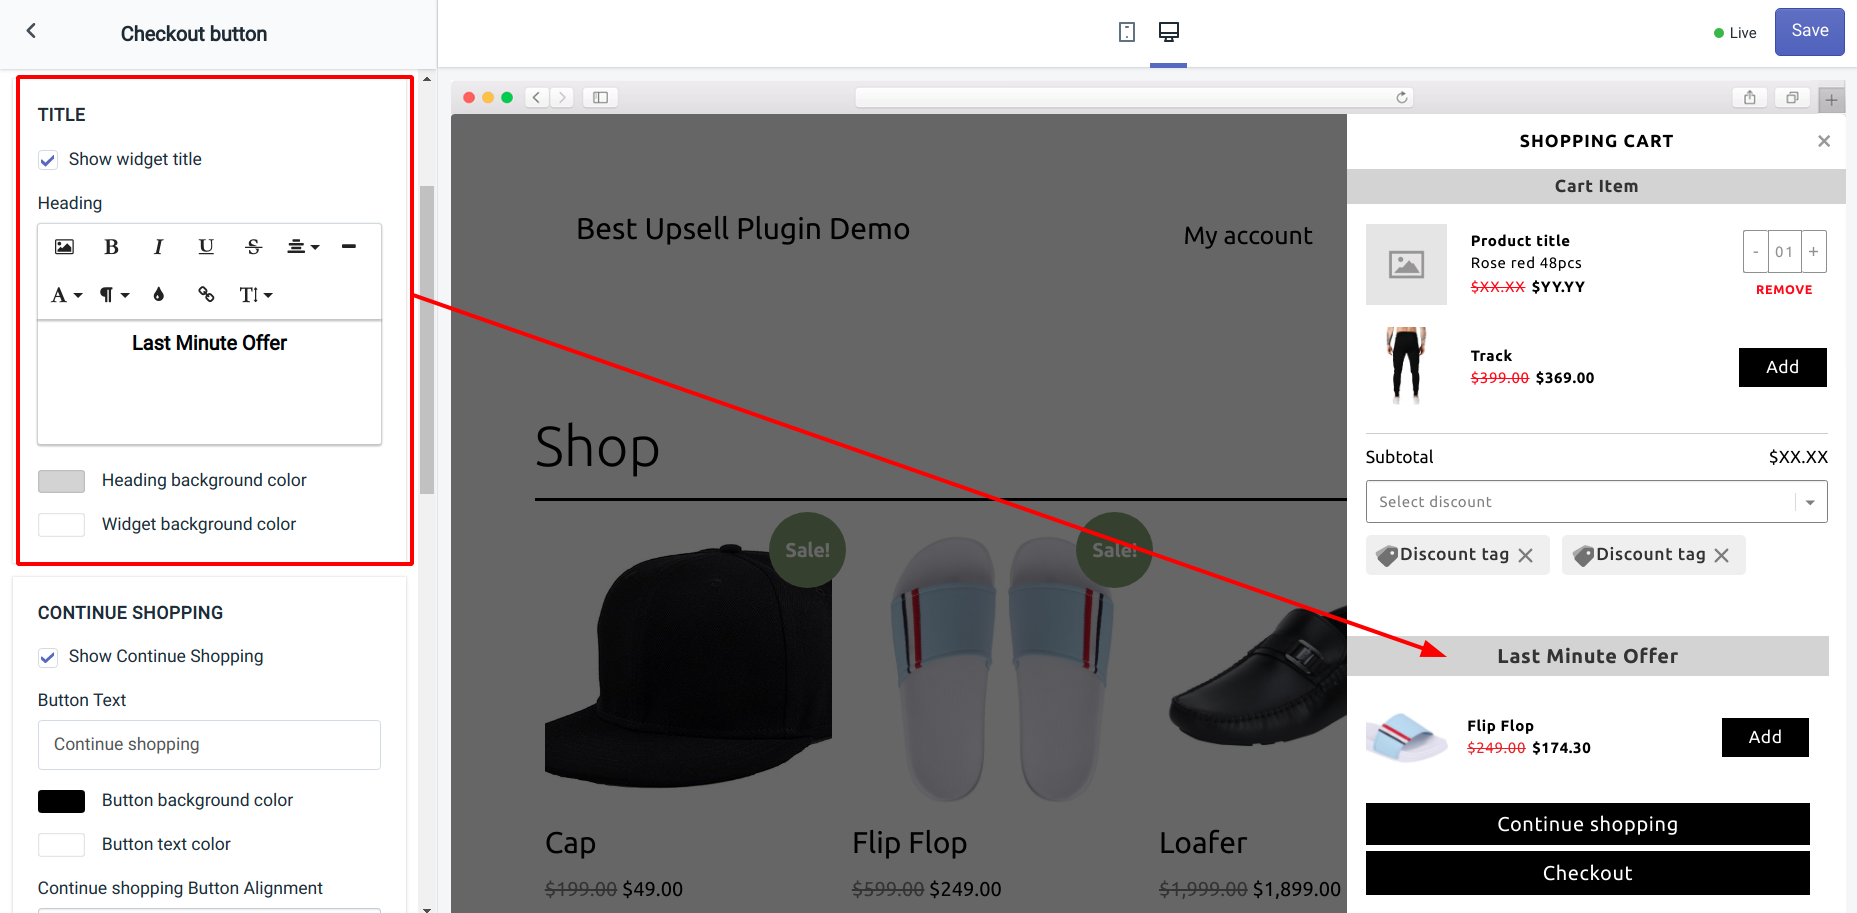
Title
The title settings allow you to customize the widget title in your shopping cart. You can show/hide the title using the Show widget title option. The heading option helps you with the title formatting. Also, consider changing the header and background color to match your store theme.
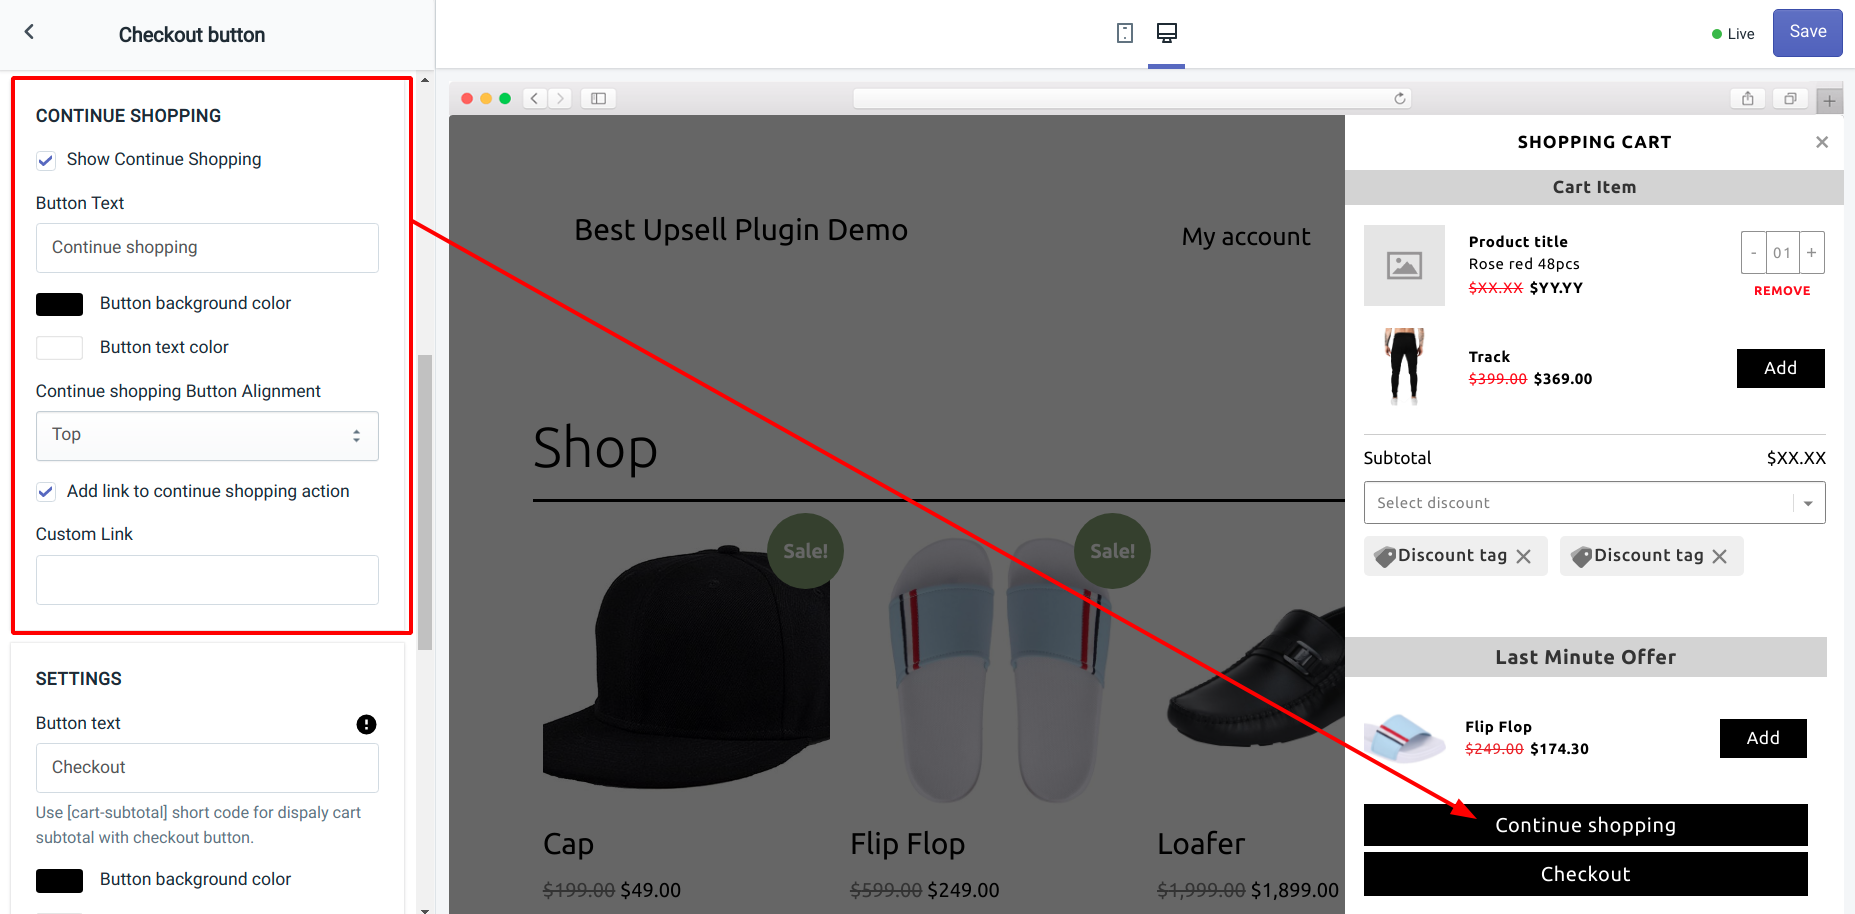
Continue Shopping
The Continue Shopping button allows your customers to go back to the page they visited just before the shopping cart. Let's see how to customize the "Continue Shopping" button for your store's shopping cart.
Show Continue Shopping - By selecting the checkbox you can make the "Continue Shopping" button visible to your customers in their shopping cart.
Button Text - Enter the text you want to show on the "Continue Shopping" button. You can also change the text and background color of the button using the color palettes.
Continue Shopping Button Alignment - Choose where you want to show the "Continue Shopping" button from the options: Top, Bottom, Left, Right of the "Checkout" button.
Add link to continue shopping action - If you want to redirect your customers to a specific page when they click the "Continue Shopping" button, then you can enable it from here.
Custom Link - Only visible when you've enabled the Add link to continue shopping action option. Add the page link here where you wish to take your customers by clicking "Continue Shopping".
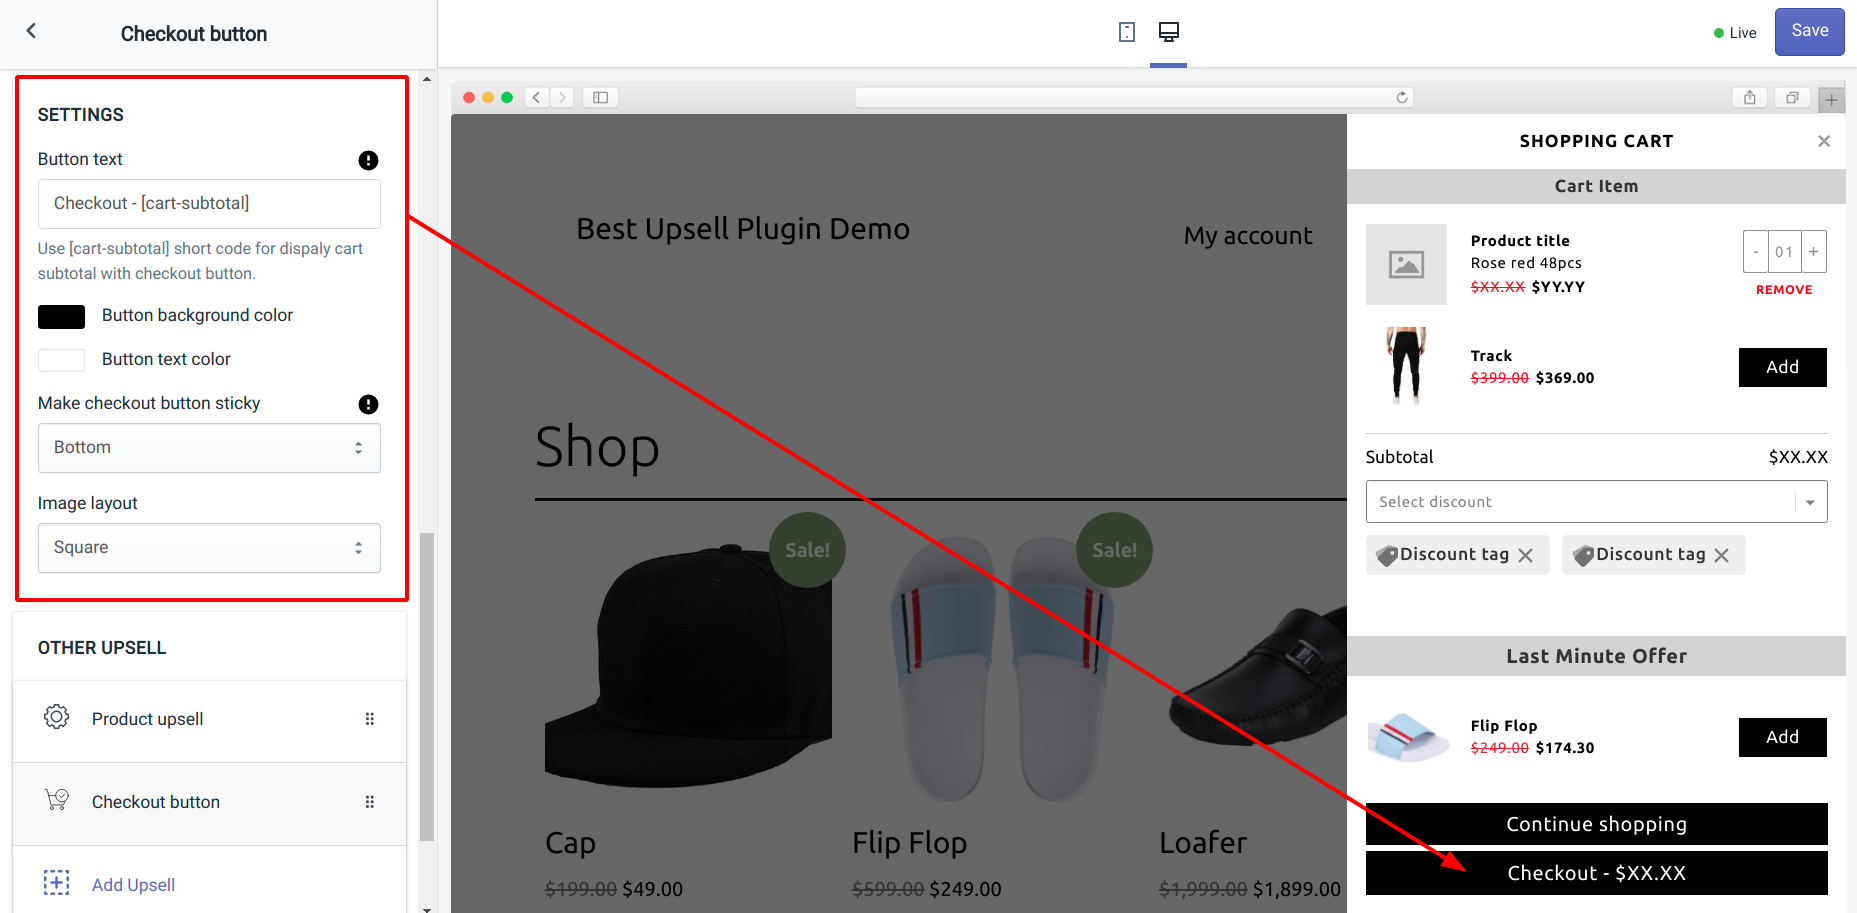
Settings
Here you can customize the "Checkout" button in the shopping cart.
Button Text - Enter the text you want to show on the "Checkout" button. Using the "[cart-subtotal]" shortcode, you can show the total cart amount on the button.
You can also change the text and background color of the button using the color palettes.
Make checkout button sticky - Choose "Top" or "Bottom" if you want to keep the checkout button sticky at the top or bottom of the shopping cart respectively. By selecting "None", you can make it flexible to move anywhere in the cart.
Image Layout - Allows you to change the product image layout (in the upsell) to either square or circle.
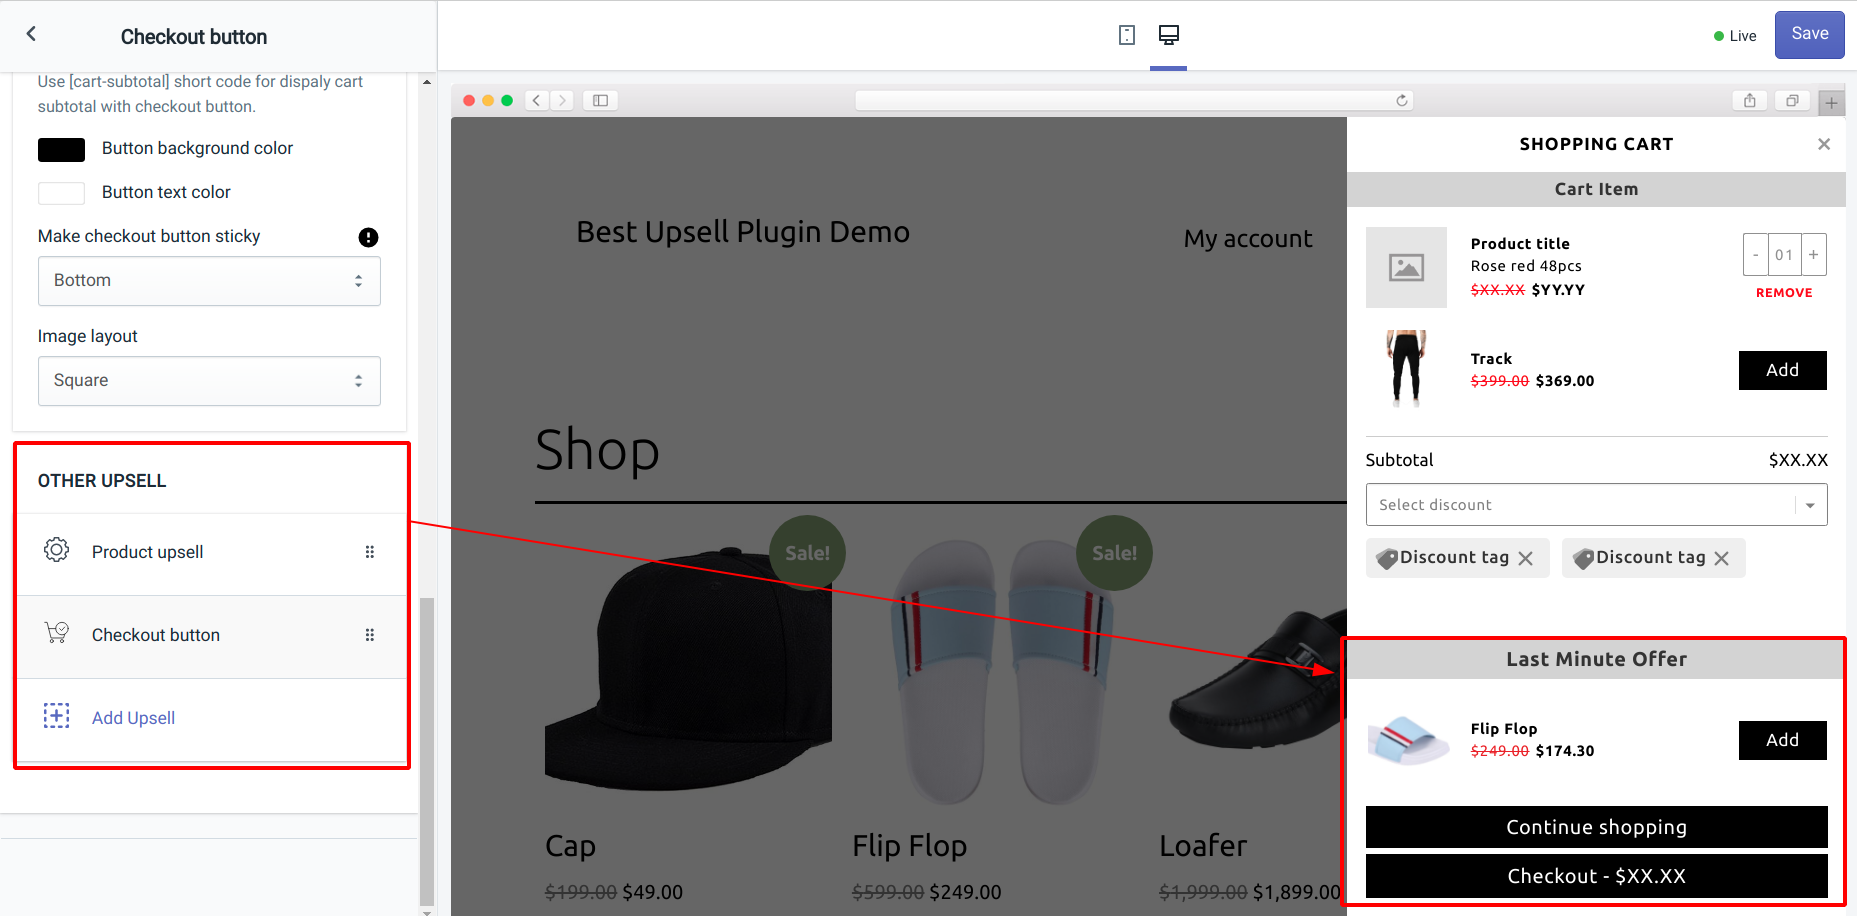
Other Upsell
Here you can see how many upsell offers are added to the checkout button widget. By simple drag and drop, you can reorder the upsell tabs and the checkout button.
This section of the widget allows you to create product upsells within the checkout button widget.
Creating Product Upsell in the Checkout Button Widget
Let's learn how to create product upsells in the checkout button widget of the Best Upsell plugin. Simply click on the Add Upsell button and start product setup for your upsell.
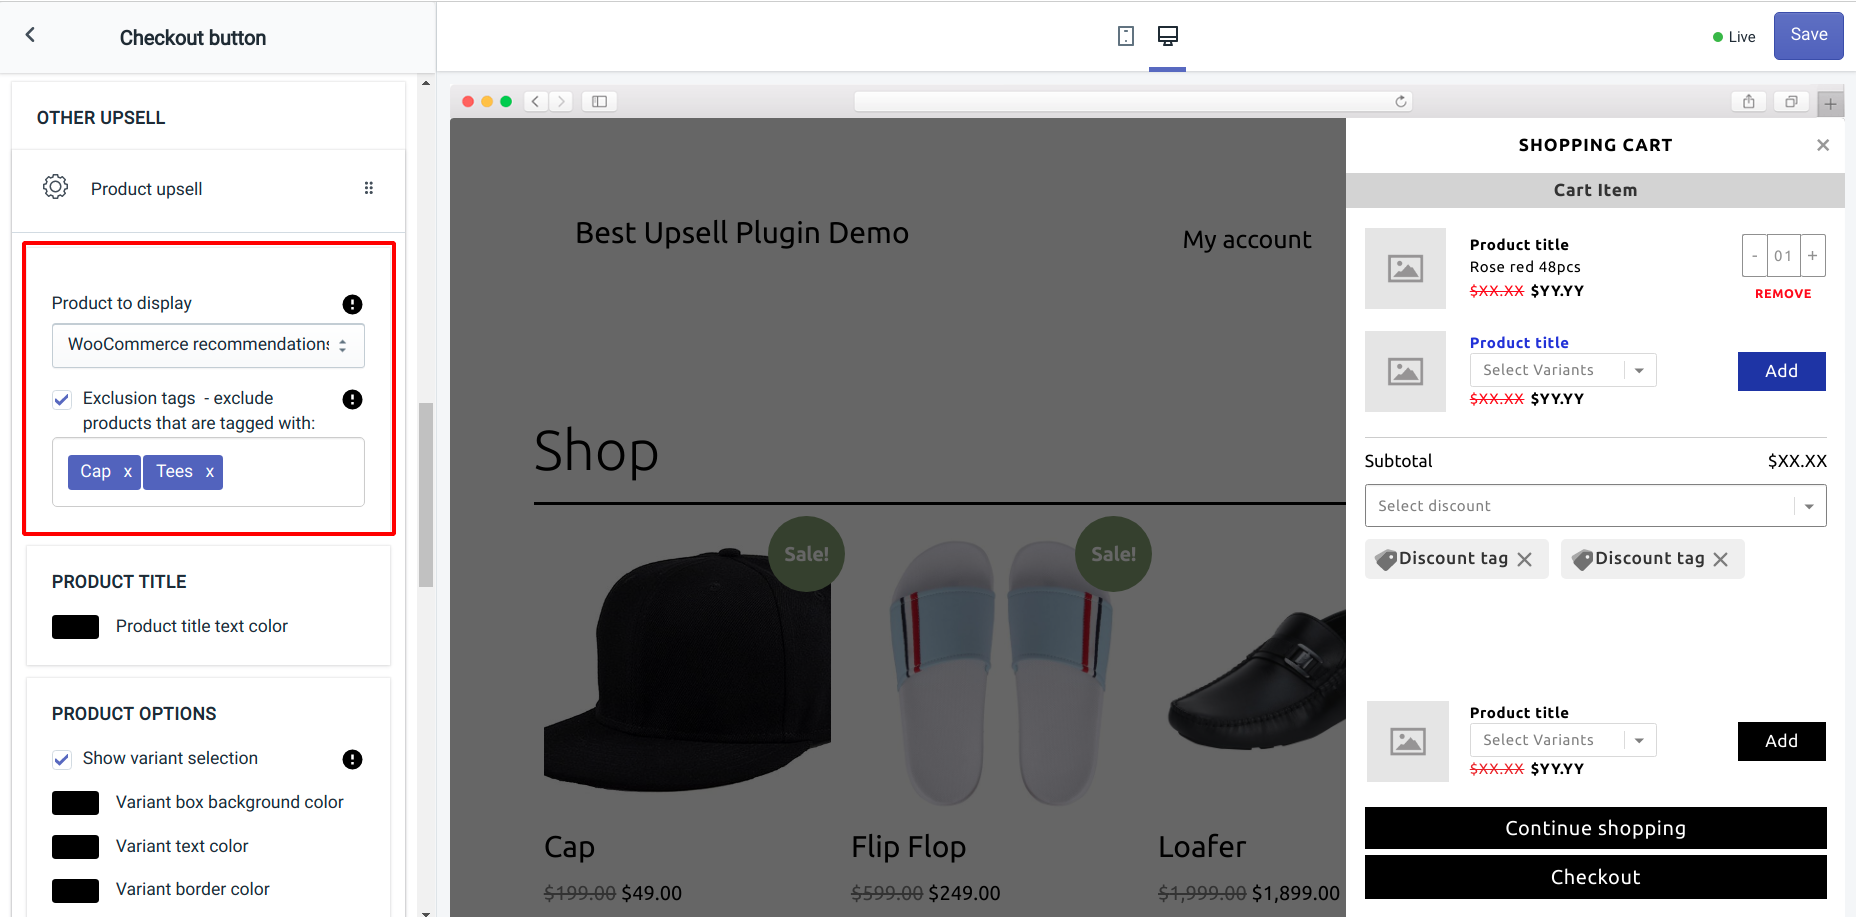
Product to Display
This option lets you choose the product you want to upsell by the Checkout button. Pick any method from the given options for product selection:
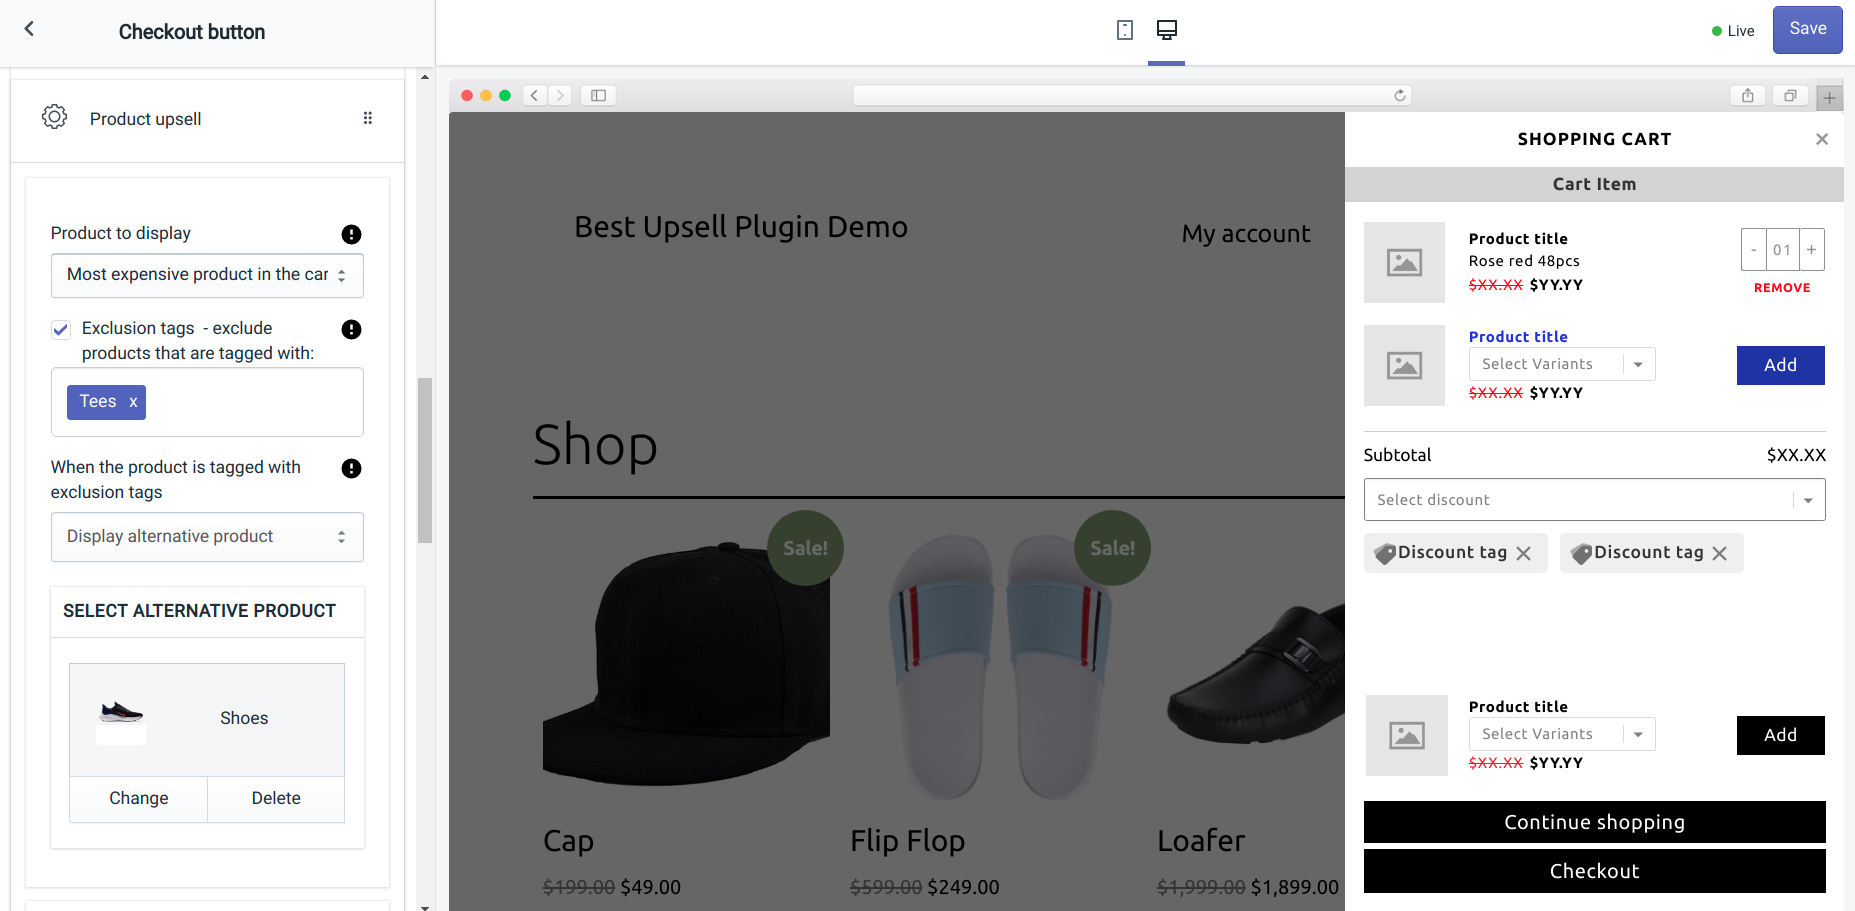
(1) WooCommerce Recommendation - Product will be automatically selected for upselling by WooCommerce based on its recommendation algorithm. You can also exclude some products by checking the Exclusion tags checkbox and defining the tags you want to avoid.
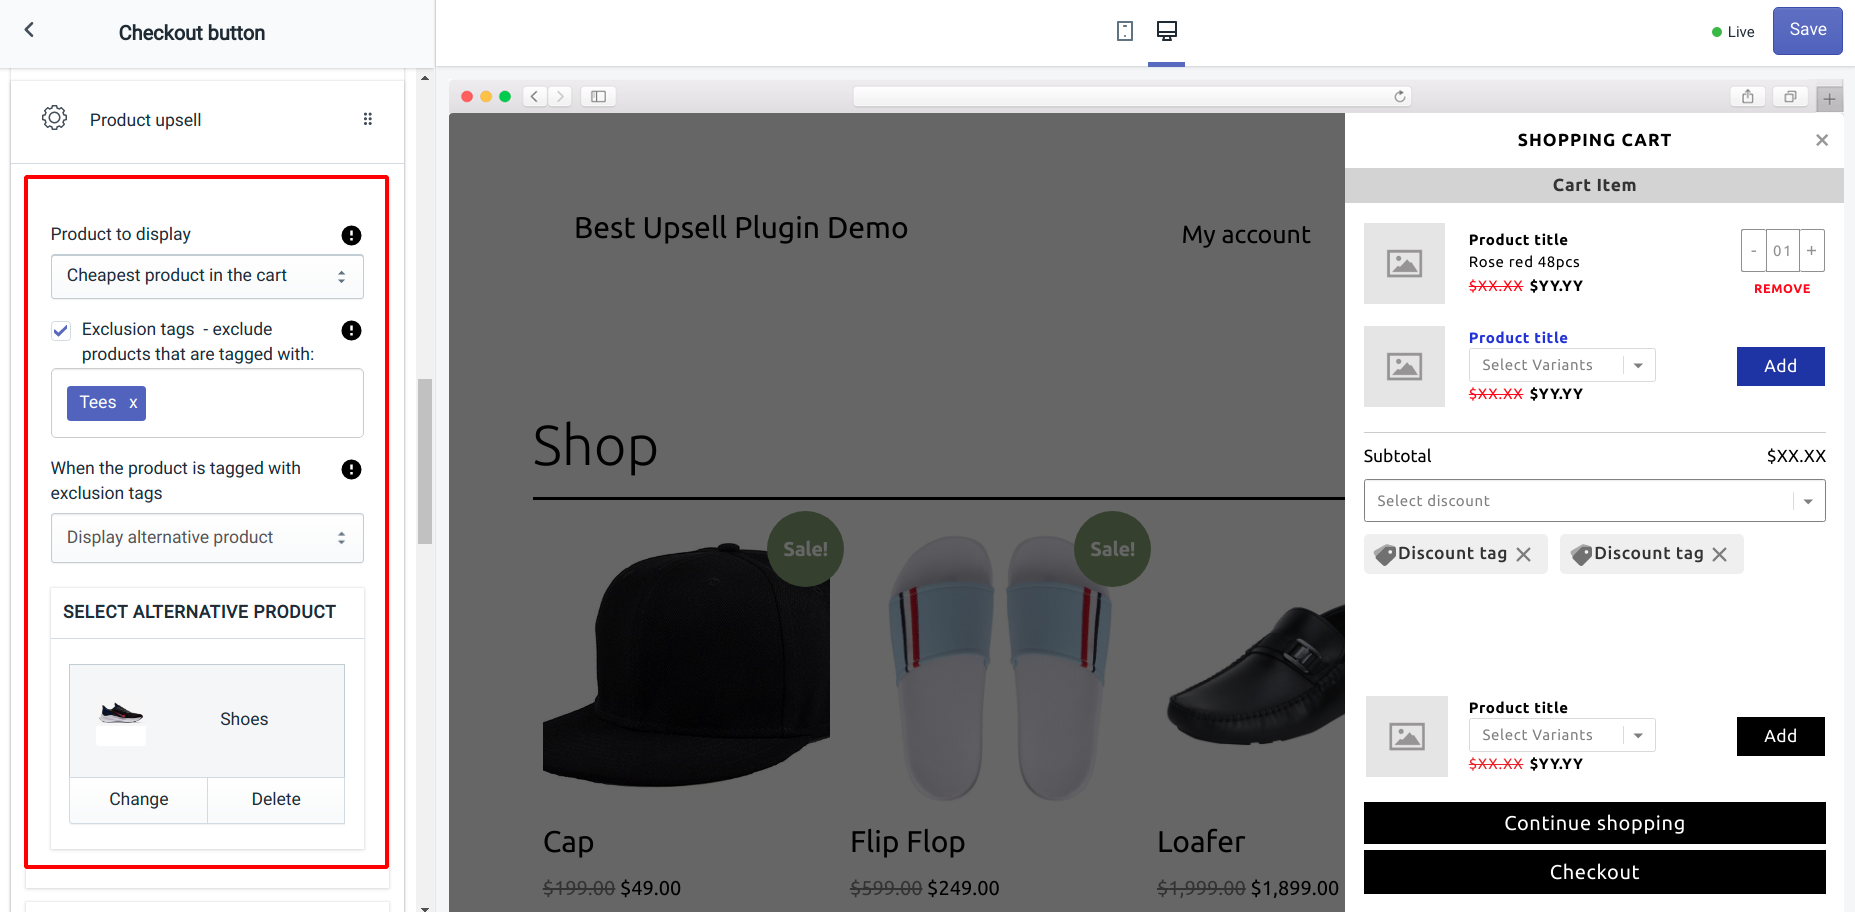
(2) Cheapest product in the cart - The product in the cart item with the lowest selling price will be displayed in the product upsell.
To avoid the product tagged with the exclusion tags, you can hide the product by selecting the Hide featured product option else display another product by the “Display alternative product” option.
If you select the Display alternate product option then you need to choose a product manually by clicking on the Select product button.
(3) Most expensive product in the cart - The product in the cart item with the highest selling price will be displayed in the product upsell.
(4) Specific product - If you want to show a specific product in the product upsells, then you can select this option. Next, you need to choose the featured product manually by clicking on the Select product button.
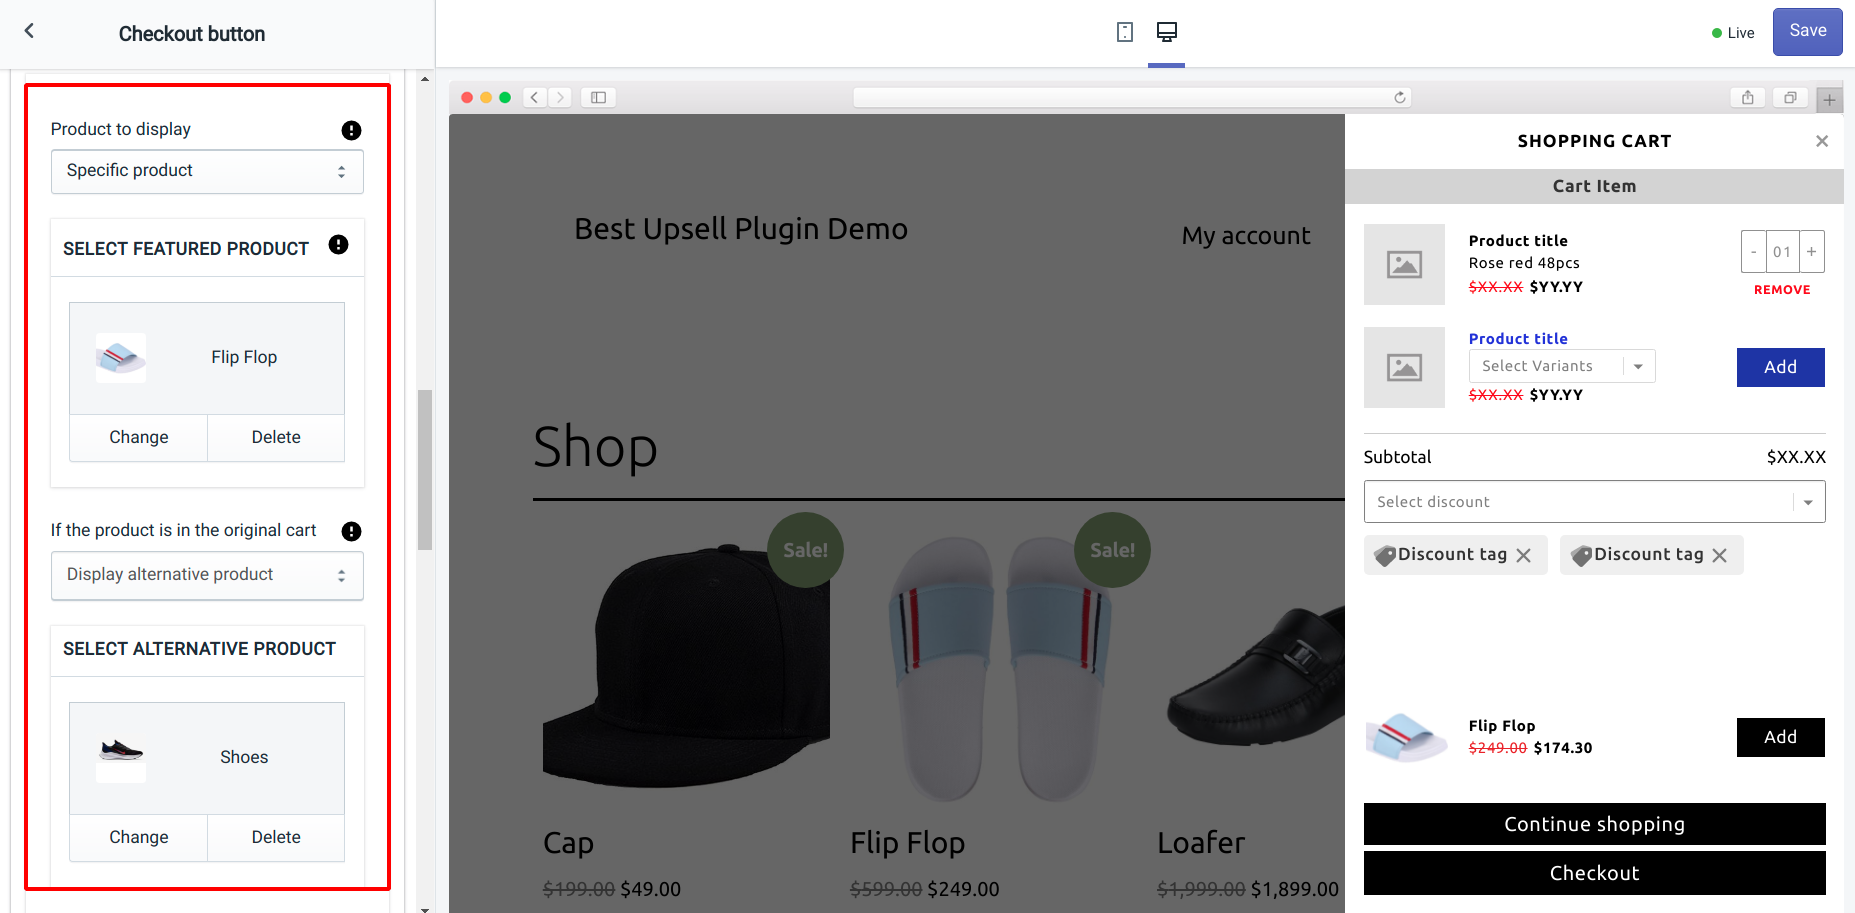
There comes an option to select what will happen if the product is already available in the cart. You can select the:
- Display selected product anyway option to allow repeated products in the cart.
- Hide featured product option to restrict repeated products and hide the product upsell section.
- Display alternative product to show another featured product in the product upsells to avoid repetition.
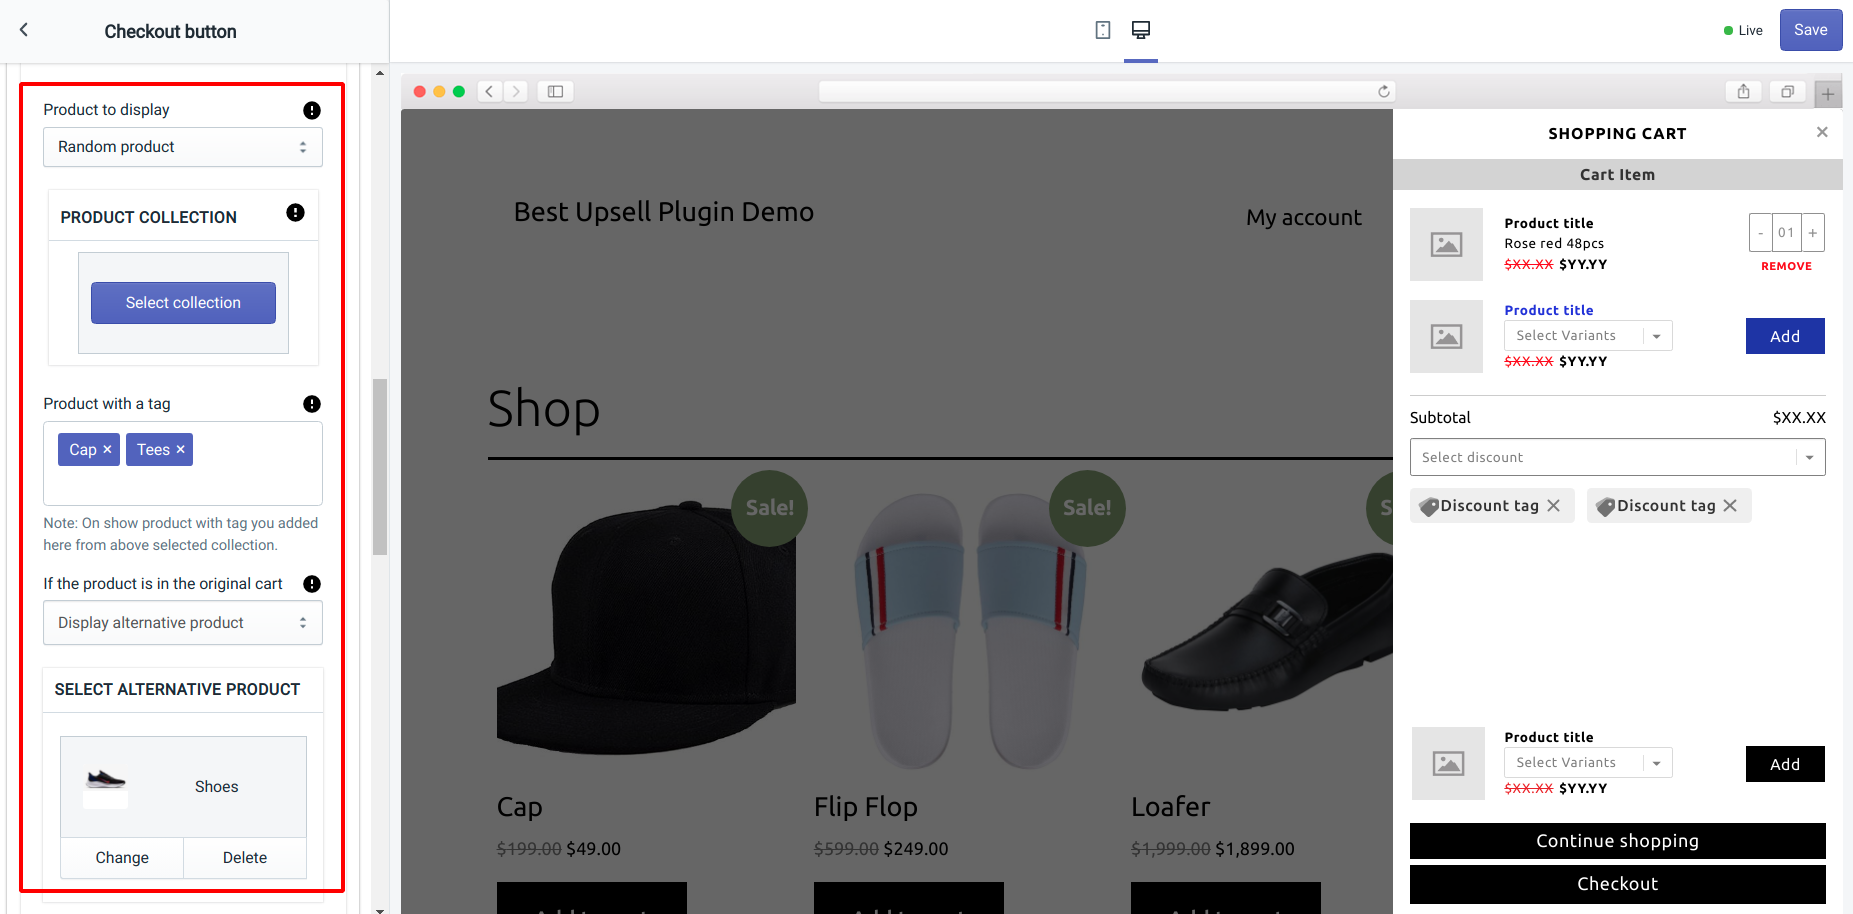
(5) Random product - Select the product collection from which you want to show the upselling product. You can also precise the product selection by defining the product tags.
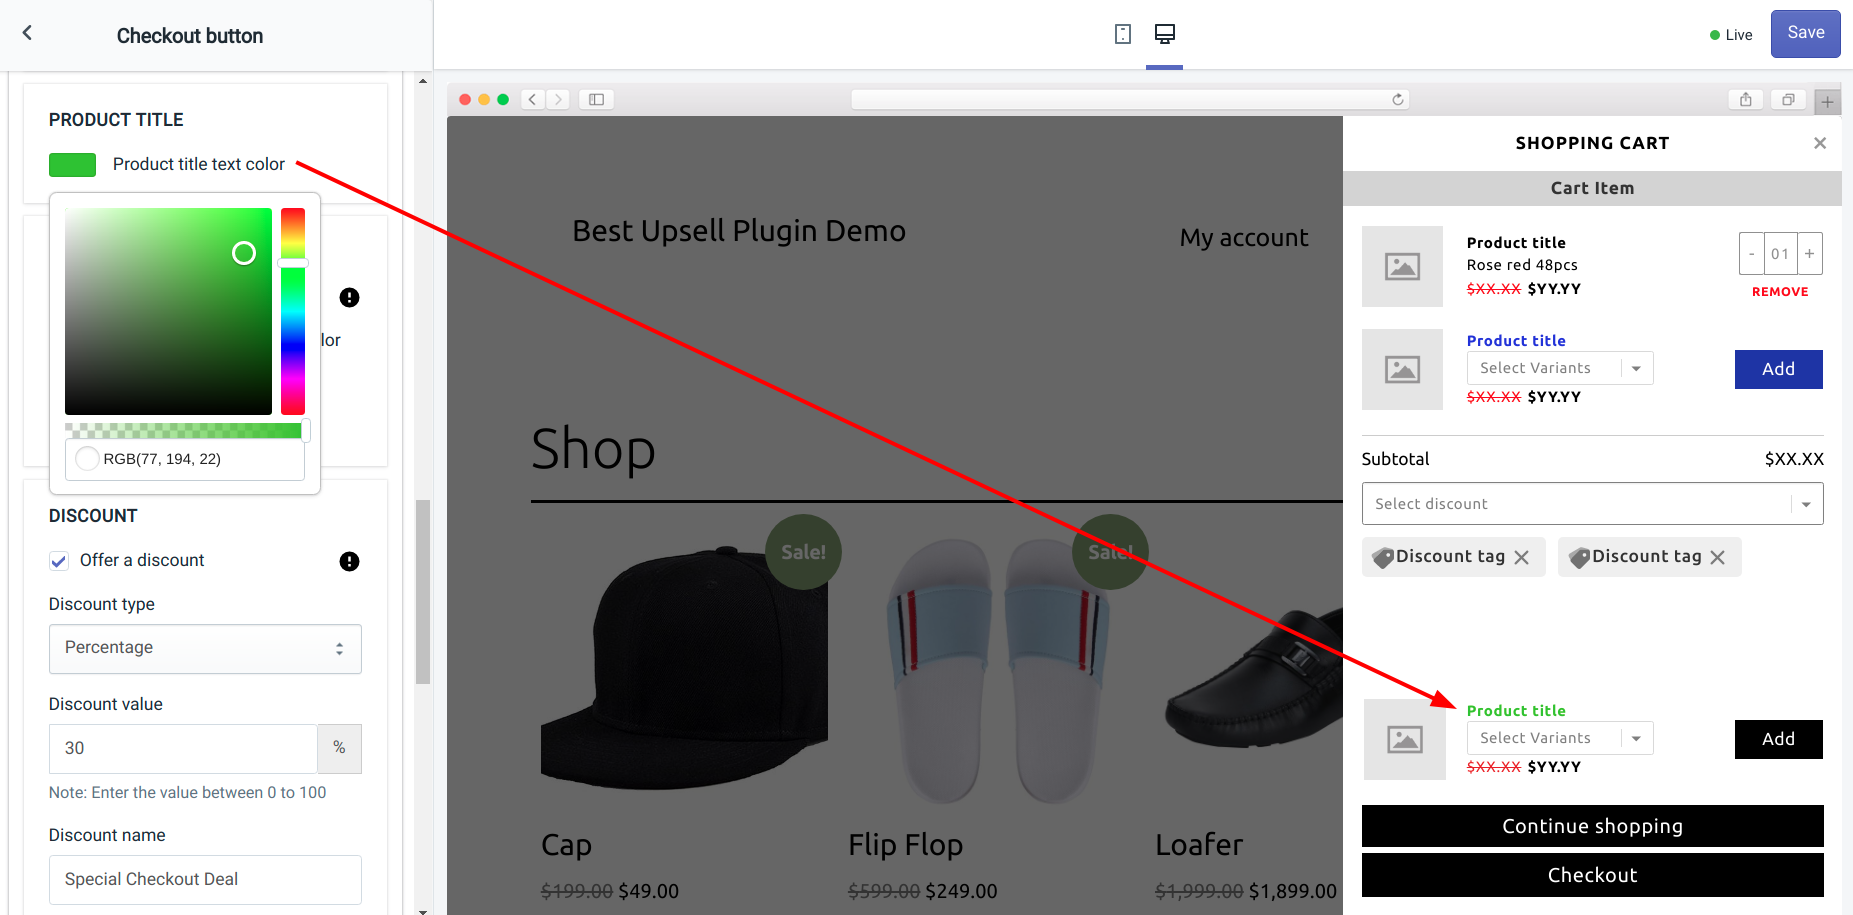
Product Title
Product title color - Select the text color for the product title in the product upsells.
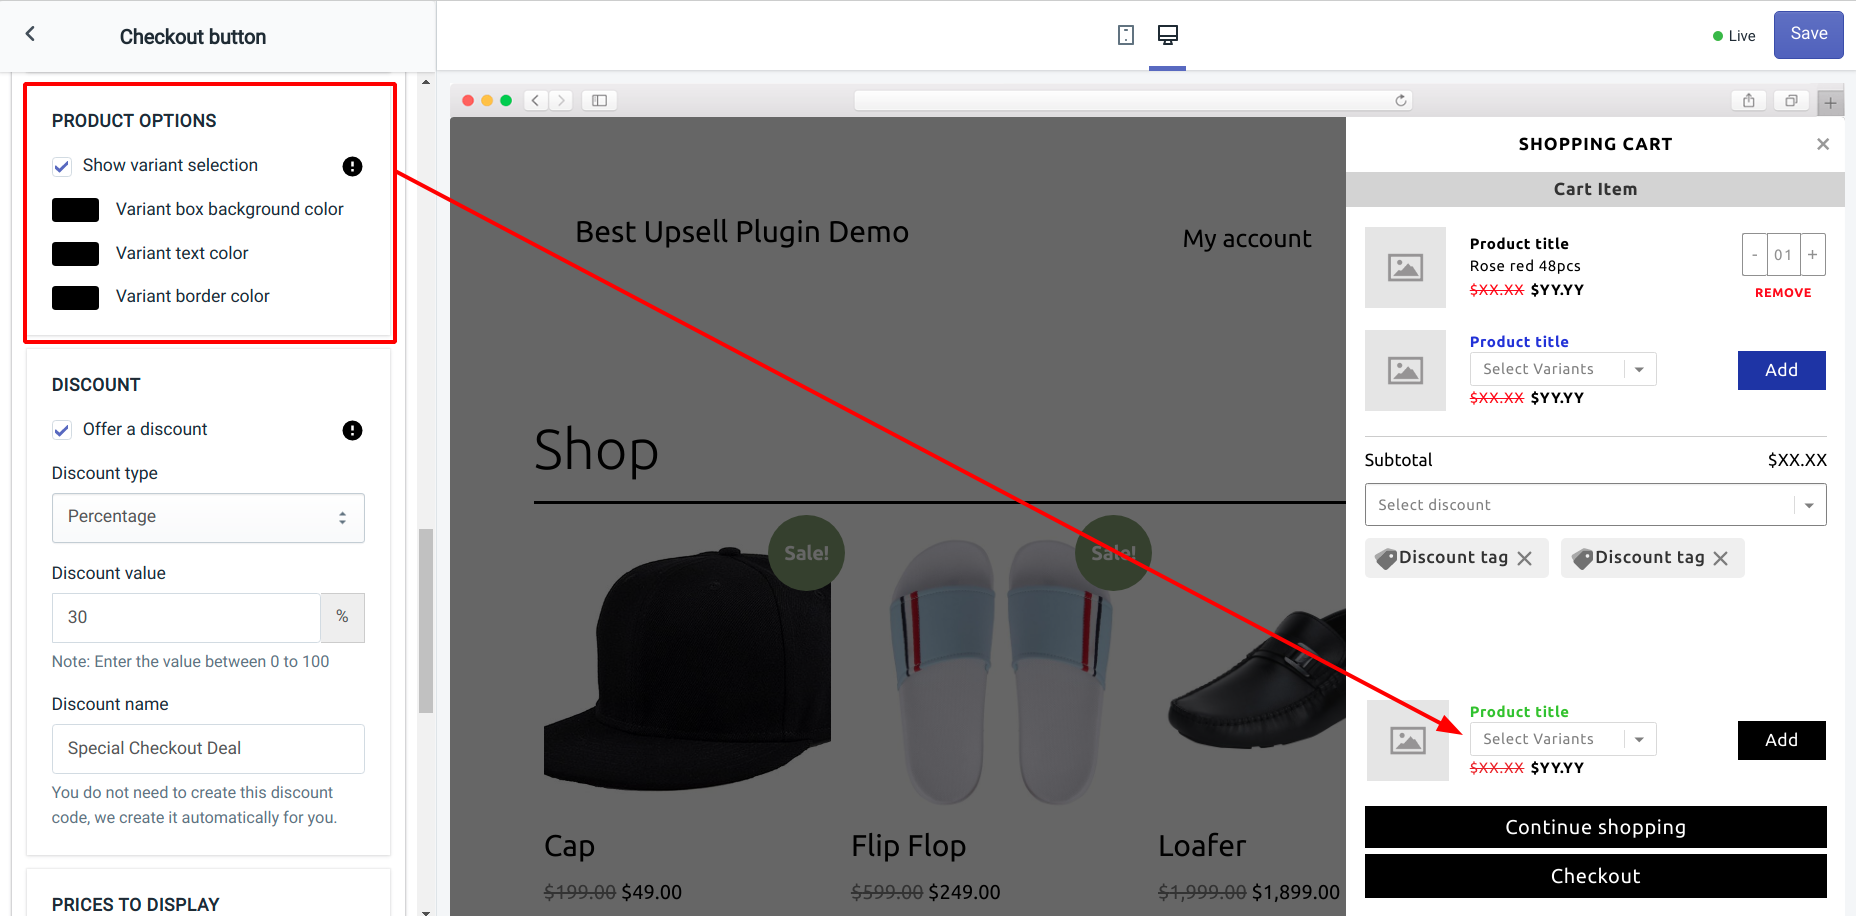
Product Options
The Product options allow you to show or hide the variant of the upsell product. Using the color palettes you can customize the product variant design.
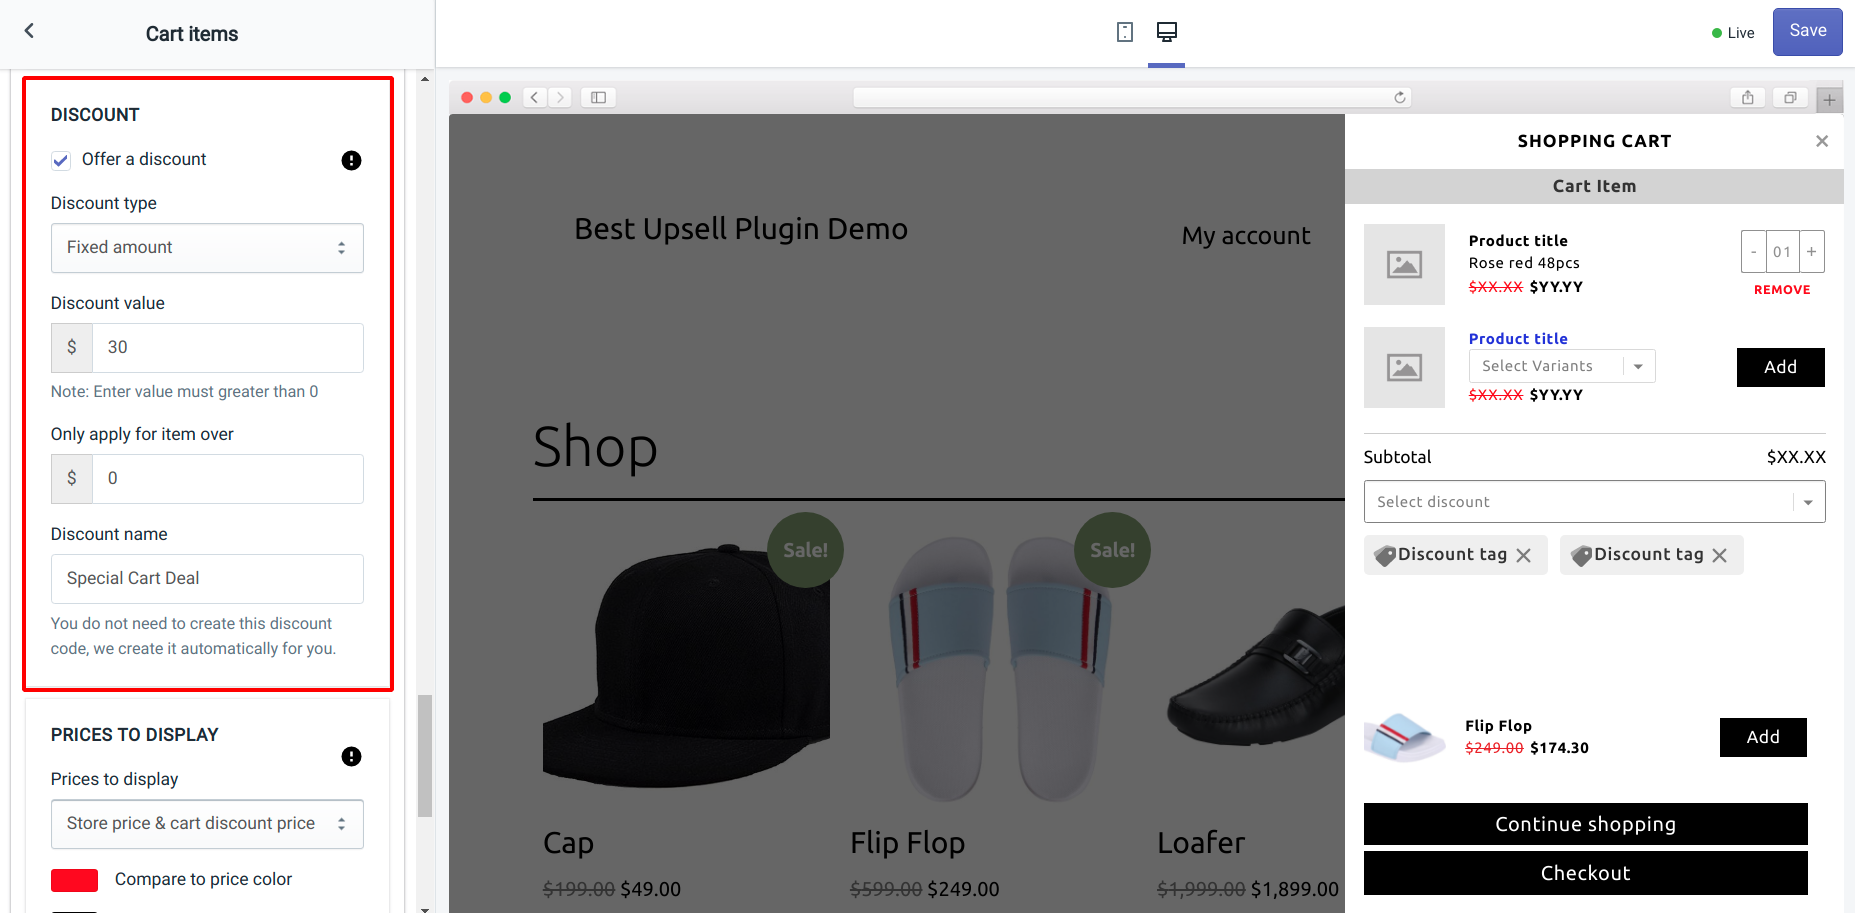
Discount
If you want to offer any discount on the upsell product, check the Offer a discount option and select the discount type you want to offer. Following are the discount options available:
- Percentage: Offer a discount in percentage that will apply to the upsell product.
- Fixed amount: Give a fixed amount OFF on the upsell product.
Discount value - Enter a value that you want to offer on the upsell product.
Only apply for item over - Discount will only apply to the upsell product if its price exceeds the value that you have mentioned in the box.
Discount name - Give a discount name that will be visible to the customer when the discount is applied on the product upsell.
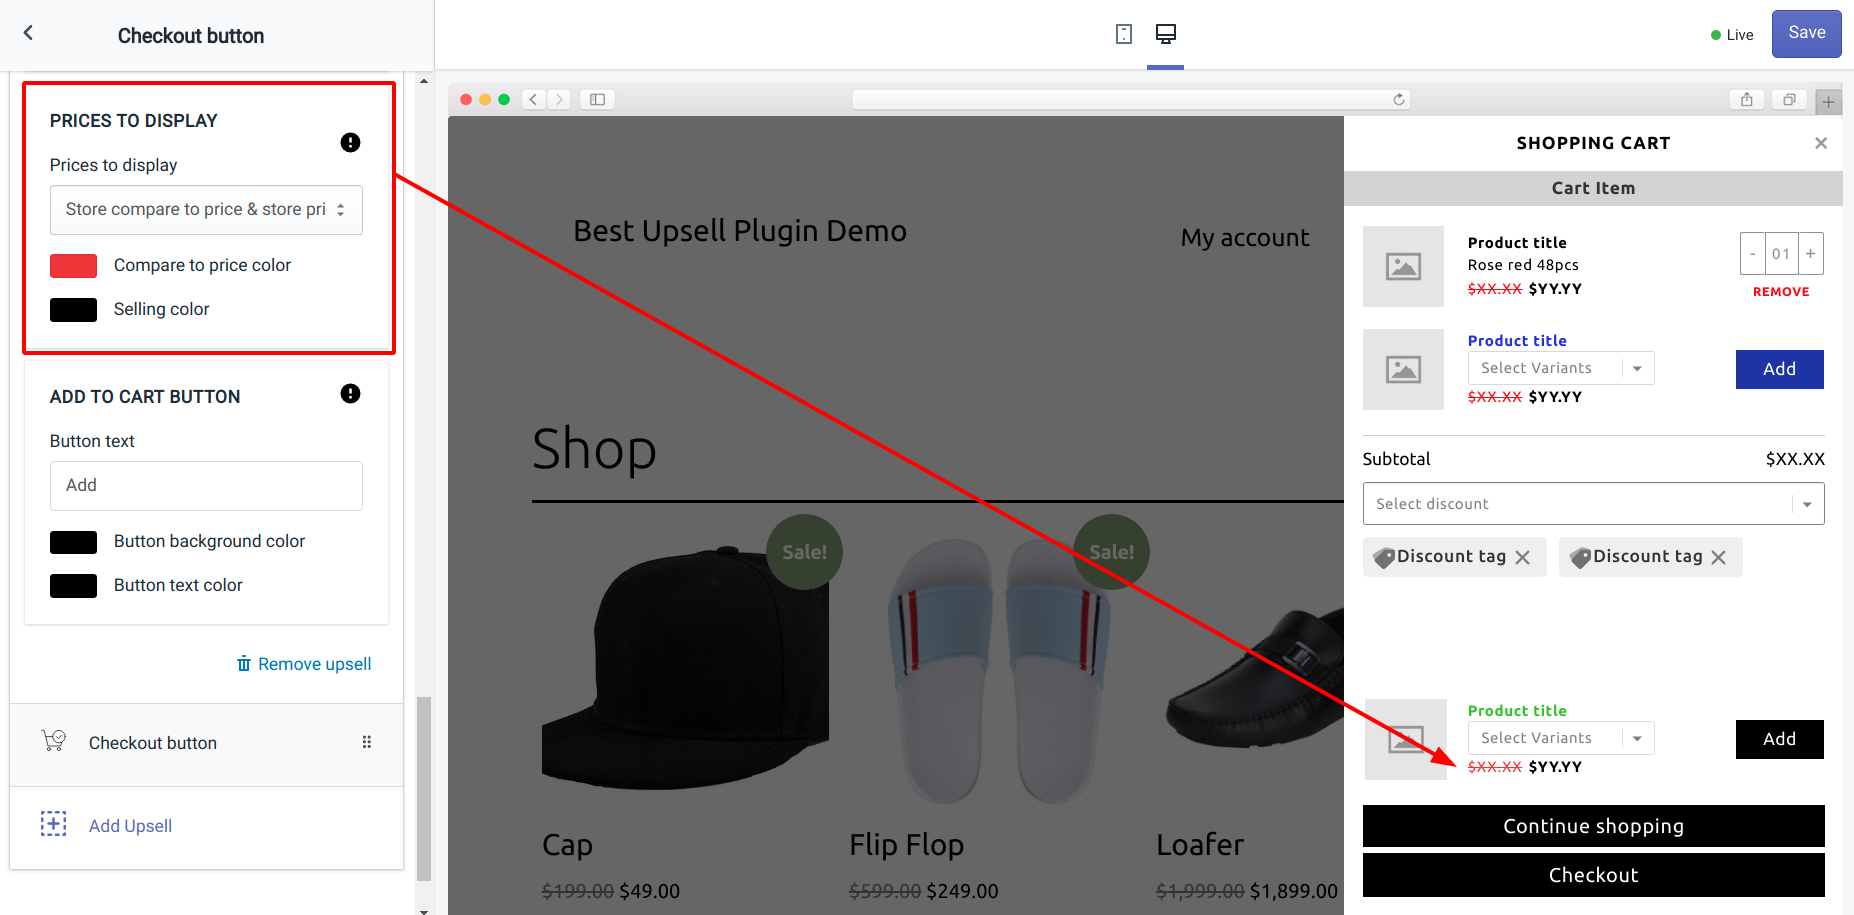
Prices To Display
Here you can choose an appropriate option to show the upsell product price.
- Store price only: The selling price of the product will be displayed to the customer.
- Store compare to price & store price: The price to compare and the selling price of the product will be displayed.
- Store compare to price & cart discount price: The price to compare and the final selling price (after deducting the discount) will be displayed.
- Store price & cart discount price: The original selling price and the final selling price (after deducting the discount) will be displayed.
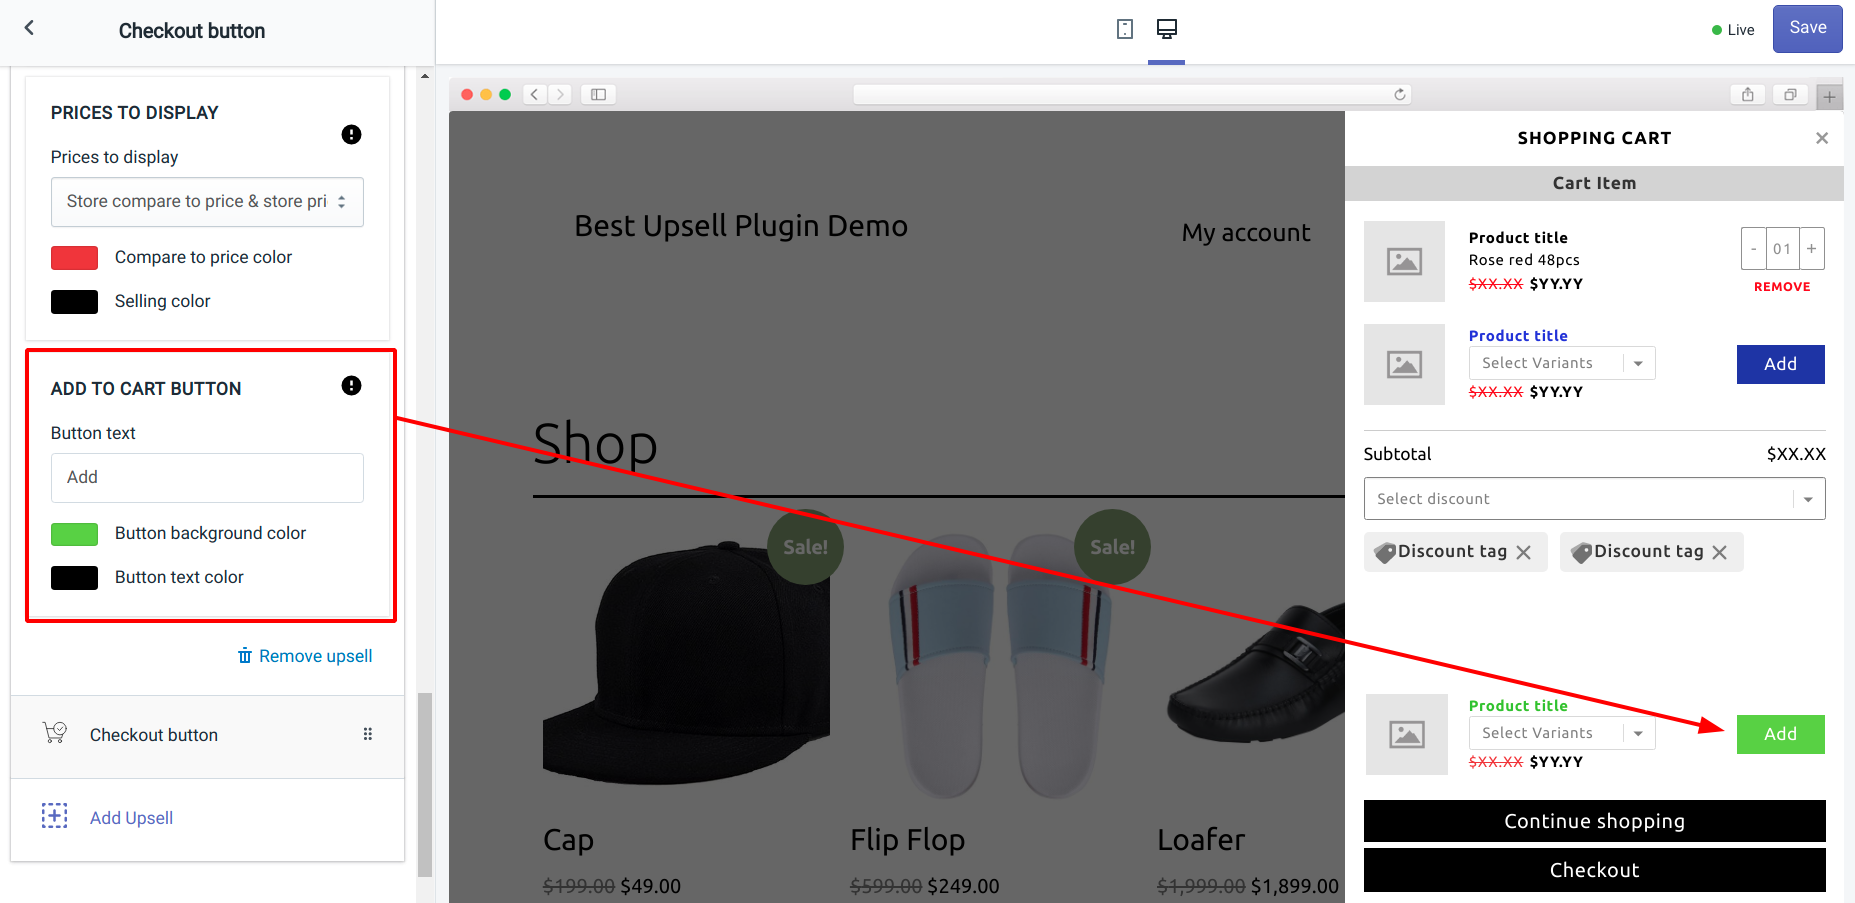
Add To Cart Button
This option lets you customize the Add To Cart button of the upsell product. Provide the display text for the Add button and change the text or background color as you want.
Remove upsell
By clicking on the Remove upsell button will delete the product upsell from the checkout button widget.
Make sure to click on the Save button to save the changes you made in the checkout button widget.

")

")

About the author
Sagarika Das
Sagarika Das is a content writer with a passion for the ecommerce world. She crafts engaging, SEO-friendly content that helps online businesses connect with customers and grow.