


iCart is an all-in-one Shopify app for cart customization and conversion optimization. No need for coding knowledge is required in using iCart. iCart is developed in a way that anyone from a non-technical background can use this app.
With iCart, you can design your side cart easily with its intuitive drag and drop interface and can increase sales by showing upsells and cross-sells in it. iCart comes with multiple features that will help to boost sales of your online store. If you have not yet installed the iCart app on your store check out this guide.
This guide will let you explore the iCart’s checkout button widget. This widget allows you to customize the following options:
Settings
Widget heading
Widget heading helps to differentiate your widget so that you can easily identify your widget from the widget list.
Title
The title is the name of your widget that will be displayed in the cart drawer. You can show/hide the title, change the heading background color, and widget background color.
HTML
Here in this option, you can add the HTML that you want to add to the side cart drawer.
Rules
Rules are used to hide/show the widget. Once the discount is applied using rules then it will not get removed automatically using any rules. This option allows you to change your condition based on different parameters like:
Parameter
You can show the widget visible to your customer based on different parameters like cart sum, number of items in the cart, a specific item, a specific collection, product tags, and user location.
Condition
You can set the condition from any of these options: greater than lesser than, or equal.
Value
Here you can enter the value that your customer’s cart must contain. Now let’s jump into an example to understand how these conditions work. Basically, this Rules option provides you 2 conditions i.e, AND, OR.
First will see how AND condition works:
Suppose parameter > cart sum, condition > is greater than, value > 300
AND
Parameter > a specific item, condition > is in the cart, value > shirt
So in this scenario, if both conditions meet the customer’s cart i.e if his cart sum is greater than 300 and one of the items added to his cart is a shirt then the Custom HTML widget will be visible to him.
Similarly, it works for other parameters too in AND condition.
Now let’s see how OR condition works:
Suppose parameter > number of items in cart, condition > is greater than, value > 2
OR
Parameter > a specific item, condition > is the only item in the cart, value > shirt
So in this scenario, if any of the conditions meet the customer’s cart i.e if the number of items in his cart is greater than 2 or the shirt is the only item his cart contains then the Custom HTML widget will be visible to him.
Remember after applying any options click on the Save button.
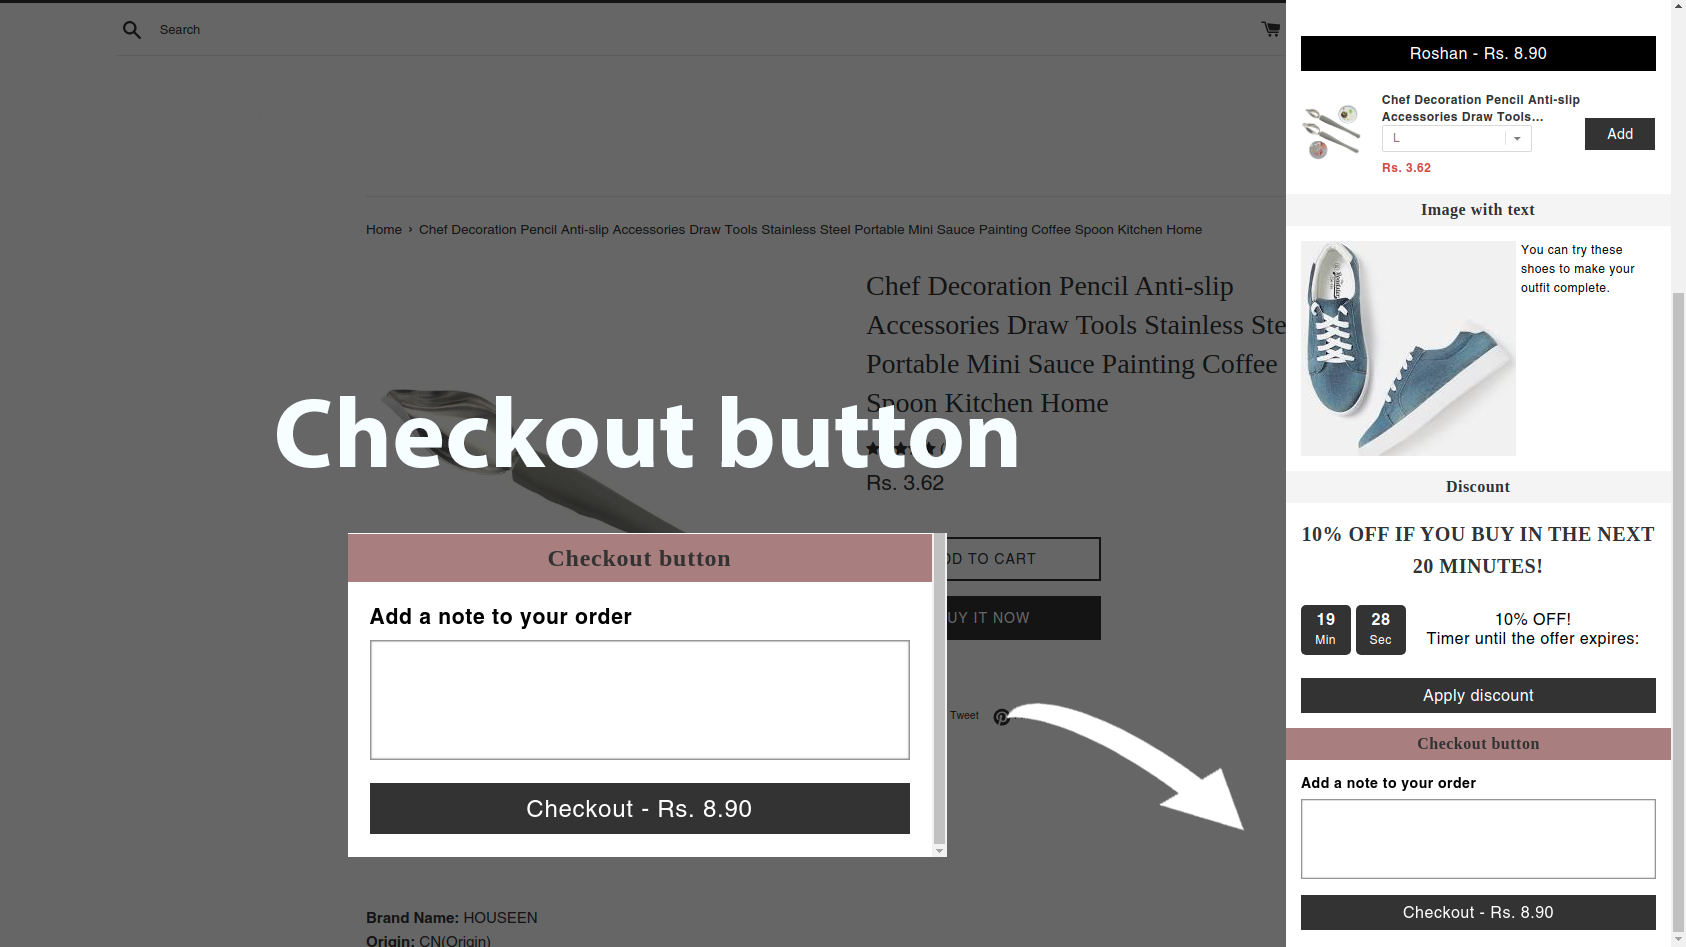
When you add the checkout button to your cart after customizing using these options it may look like this as shown in the screenshot below:
Delete widget
If you want to delete the widget then click on the delete widget button.


About the author
Sajini Annie John
Meet Sajini, a seasoned technical content writer with a passion for e-commerce and expertise in Shopify. She is committed to helping online businesses to thrive through the power of well-crafted content.