How to Display Images Using Metafields in Shopify

As we all know how important metafields are for building an outstanding storefront for your online store. After the Online Store 2.0 launch, Shopify merchants have a built-in metafields feature in their store. This guide is to help you how to use Shopify metafields to display images in your store.

Shopify Metafields Overview

Shopify metafields helps you store additional information related to your products, orders, collections, customers, and many more. Using these metafields, you can add dynamic data to your storefront and make the shopping experience better for your customers. Apart from this, to give more personalized buying options for your customers you can install any of the best Shopify apps like iCart in your store.

icart cart drawer cart upsell

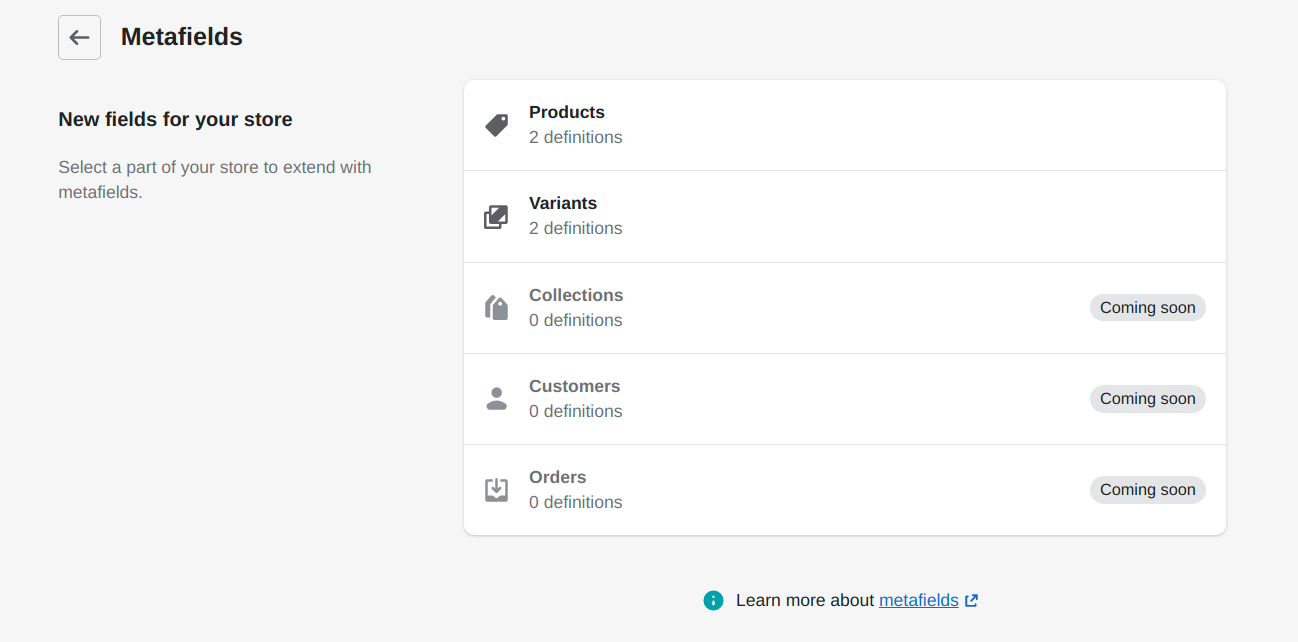
Shopify metafields are basically categorized based on the places where they can be used such as Products, Variants, Collections, Customers, and Orders. Know more about the types of Shopify metafields!

Adding Images via Shopify Metafields

Do you want to add more value to your online store using custom images? Here you will learn how to add images in Metafields Shopify.

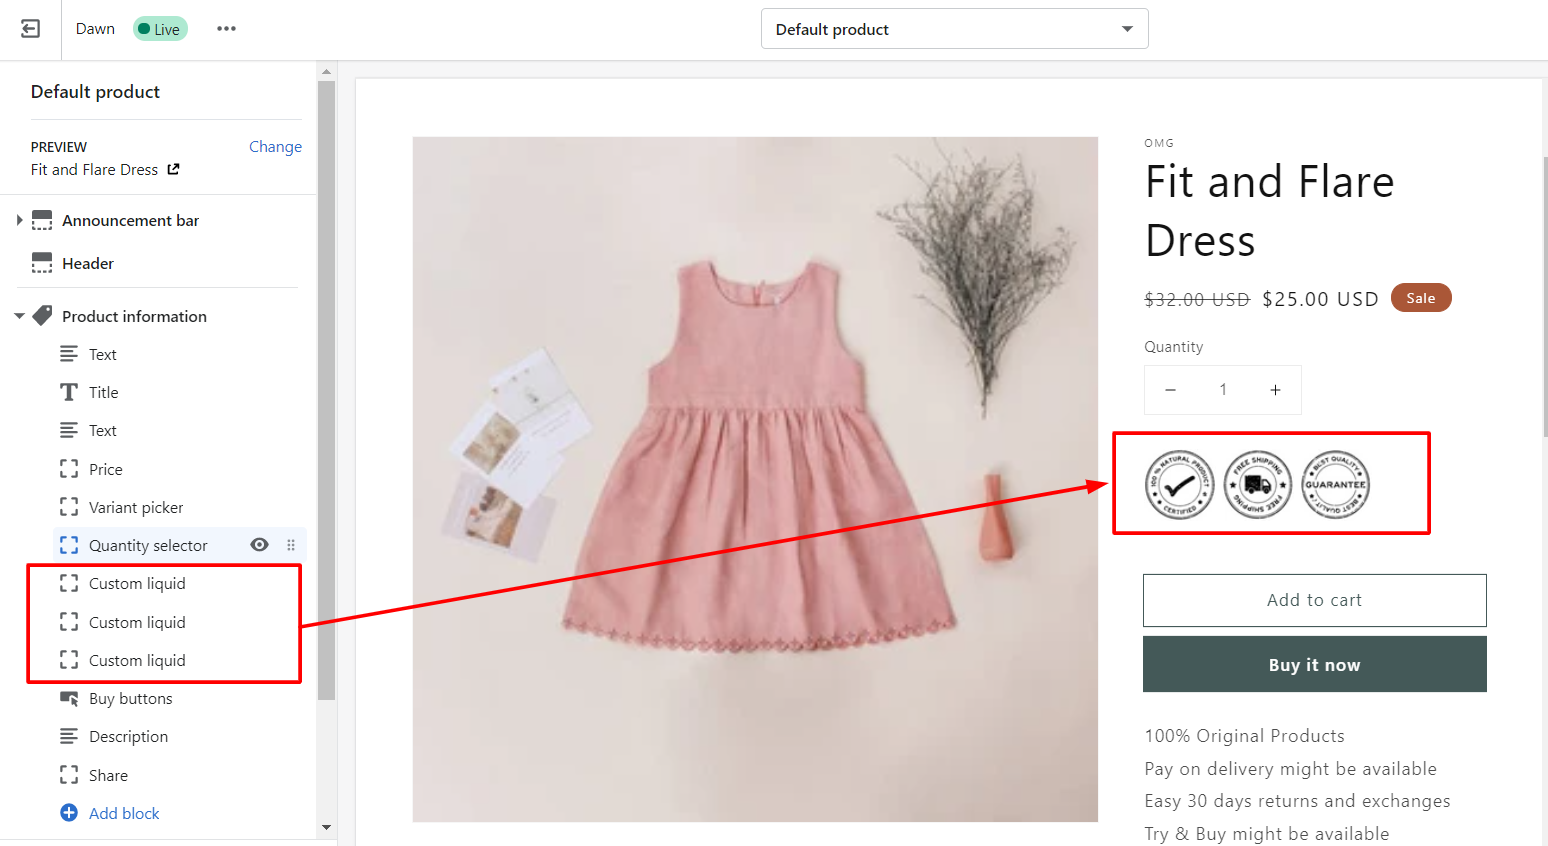
You may need to add some icons to your product page that represents your product or brand values. For example, warranty stamps, non-toxic seals, cashless shipping, cash on delivery, and many more to build the trust of your shoppers in your products. If you are looking for the same solution, you can continue with us!

Using this solution you can expect the result as below in the screenshot.

badge-images-using-metafields

Add Trust Badges on Shopify Product Page

Let’s start adding extra images on the product page using metafields in Shopify.

Creating a Metafield Definition for images

Step 1: From your Shopify admin, go to Settings > Metafields.

Step 2: Select “Product” from the given type of metafields.

manage-metafield-definitions

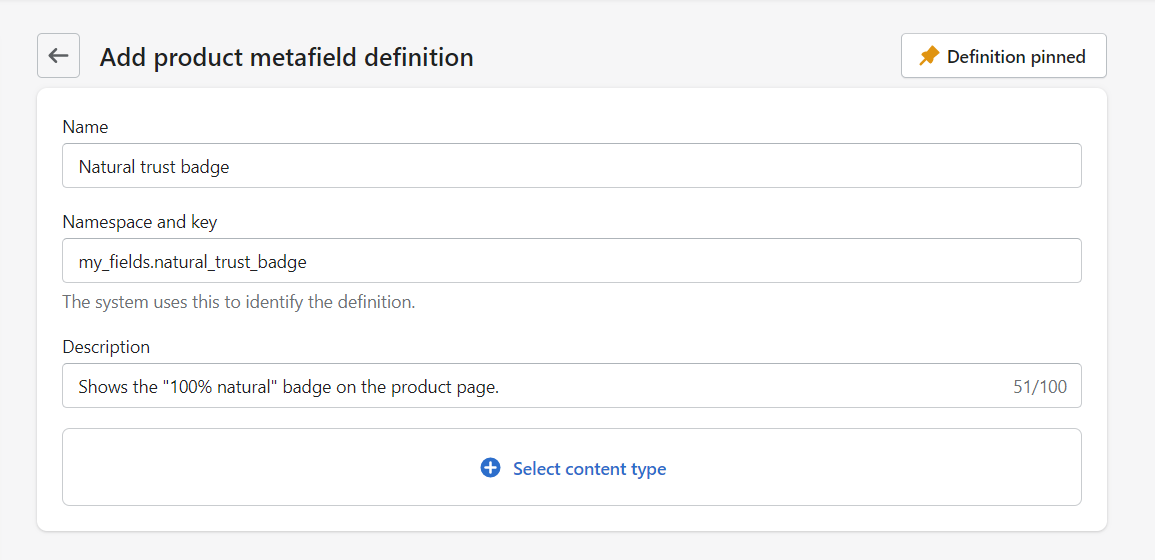
Step 3: Click on the Add definition button.

add-metafield-definitions

Step 4: Give a name to your metafield definition.

Step 5: Keep the Namespace and key as it is. The system will use it to identify the metafield definition.

Step 6: Add a description to your metafield definition (optional). You can include the purpose of creating it.

create-metafield-definition

Step 7: Select the “File” content type from the list.

select-content-type

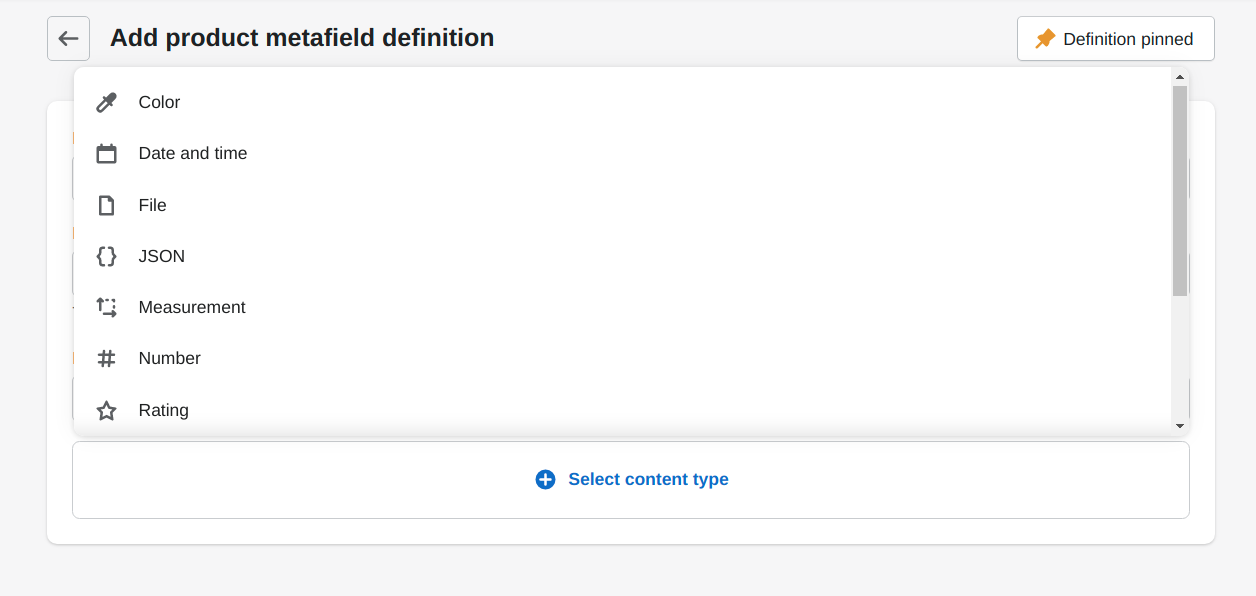
Step 8: Make sure you set the validation rules carefully.

Step 9: Hit the Save button.

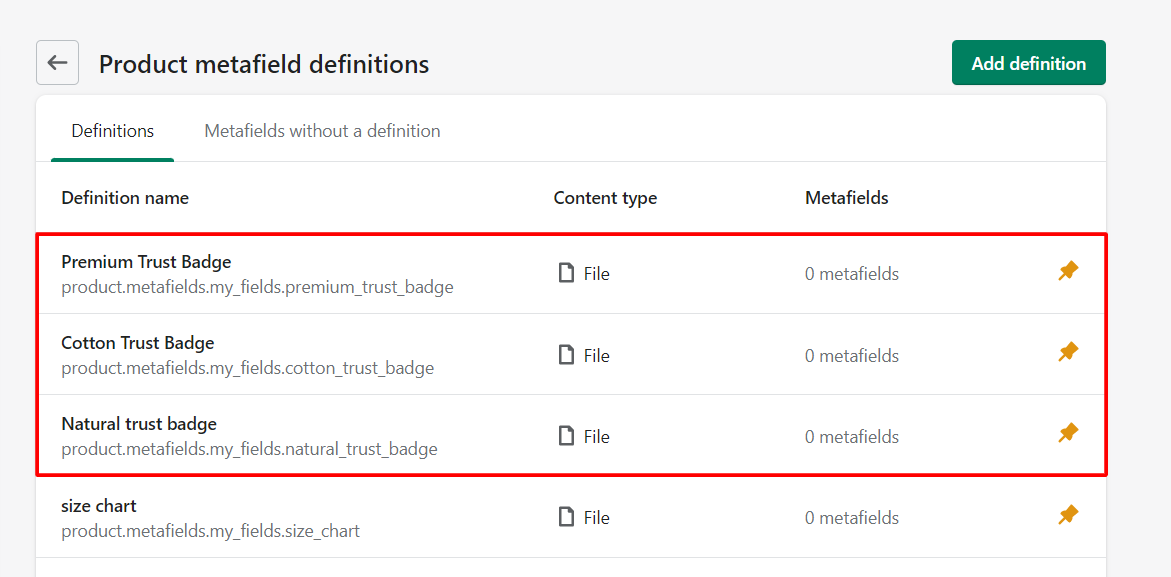
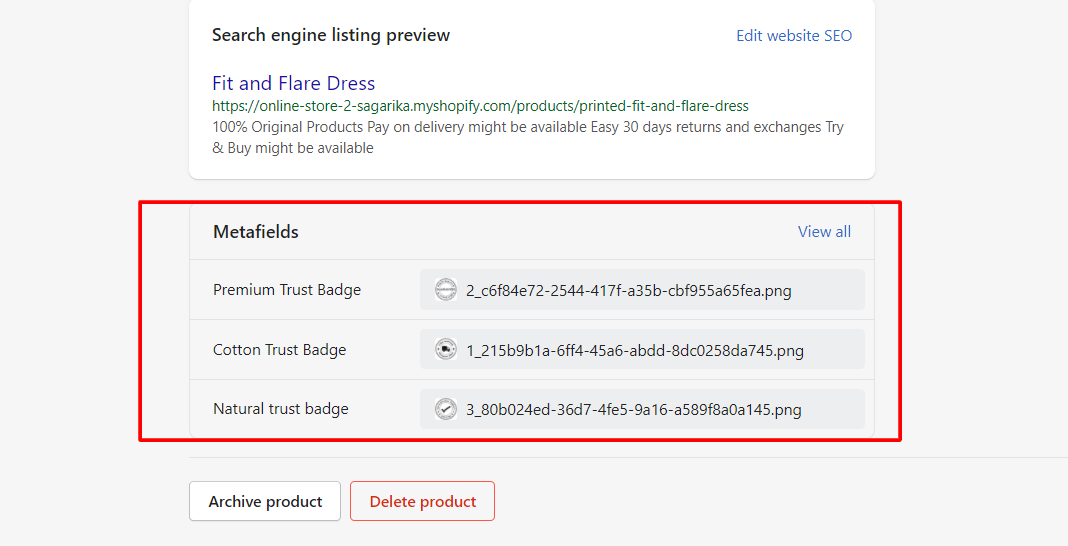
This way we can create metafield definitions for all the images we want to display on the product page. I have created 3 product metafields to add 3 trust badges on my product page. Now, we need to add values to these metafields.

product-metafields-for-trust-badges

Adding Values to your recently created Metafields

Step 10: Go to Products from your Shopify Admin. Open a product for which you want to add the metafield values.

Step 11: Scroll down to the Metafields section. Click on the empty space beside the metafields name. Upload the image for your product metafield.

Step 12: Click on the Save button.

This way you can add images to your other product metafields. Next, you need to customize the product page template to show your recently created metafields on your store.

adding-values-to-metafields

Displaying Metafields on your Shopify store

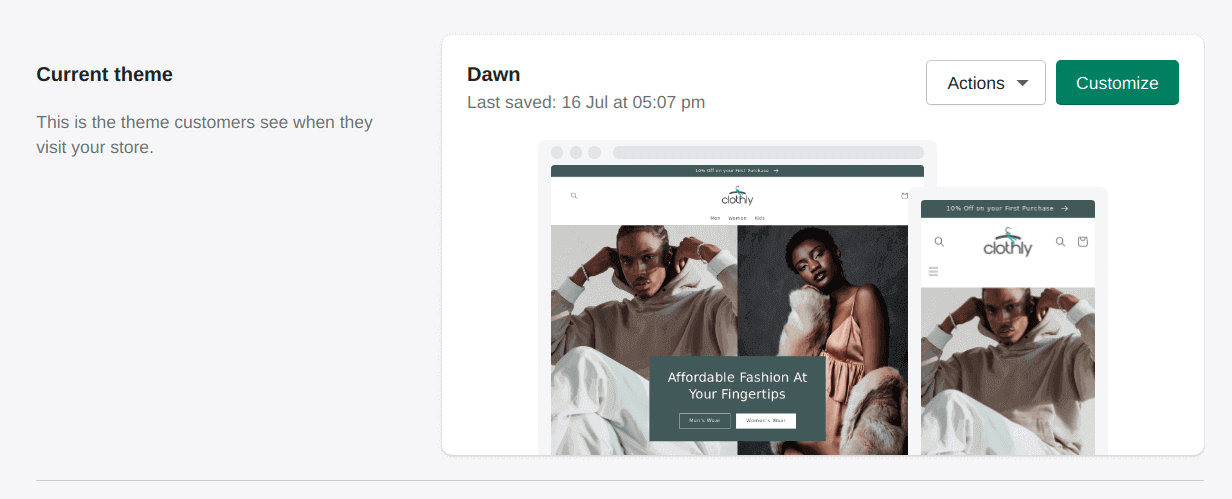
Step 13: From the Shopify admin, go to Online Store > Theme.

Step 14: Open the theme editor by clicking on the Customize button on your current store theme. (Note: Make sure to use a Shopify theme that allows you to add the “Custom Liquid” section on the product page template, i.e. Shopify 2.0 themes).

theme-customization

Step 15: Open the Product page template “Default product” or a custom product page template if you’ve created it.

Step 16: Click on Add block and select “Custom Liquid” to add images on the product page using the recently created metafields.

Step 17: Now copy the below code and paste it to the custom liquid box.

{{ product.metafields.my_fields.namespace_key | img_tag }}

custom-liquid-for-image-metafield

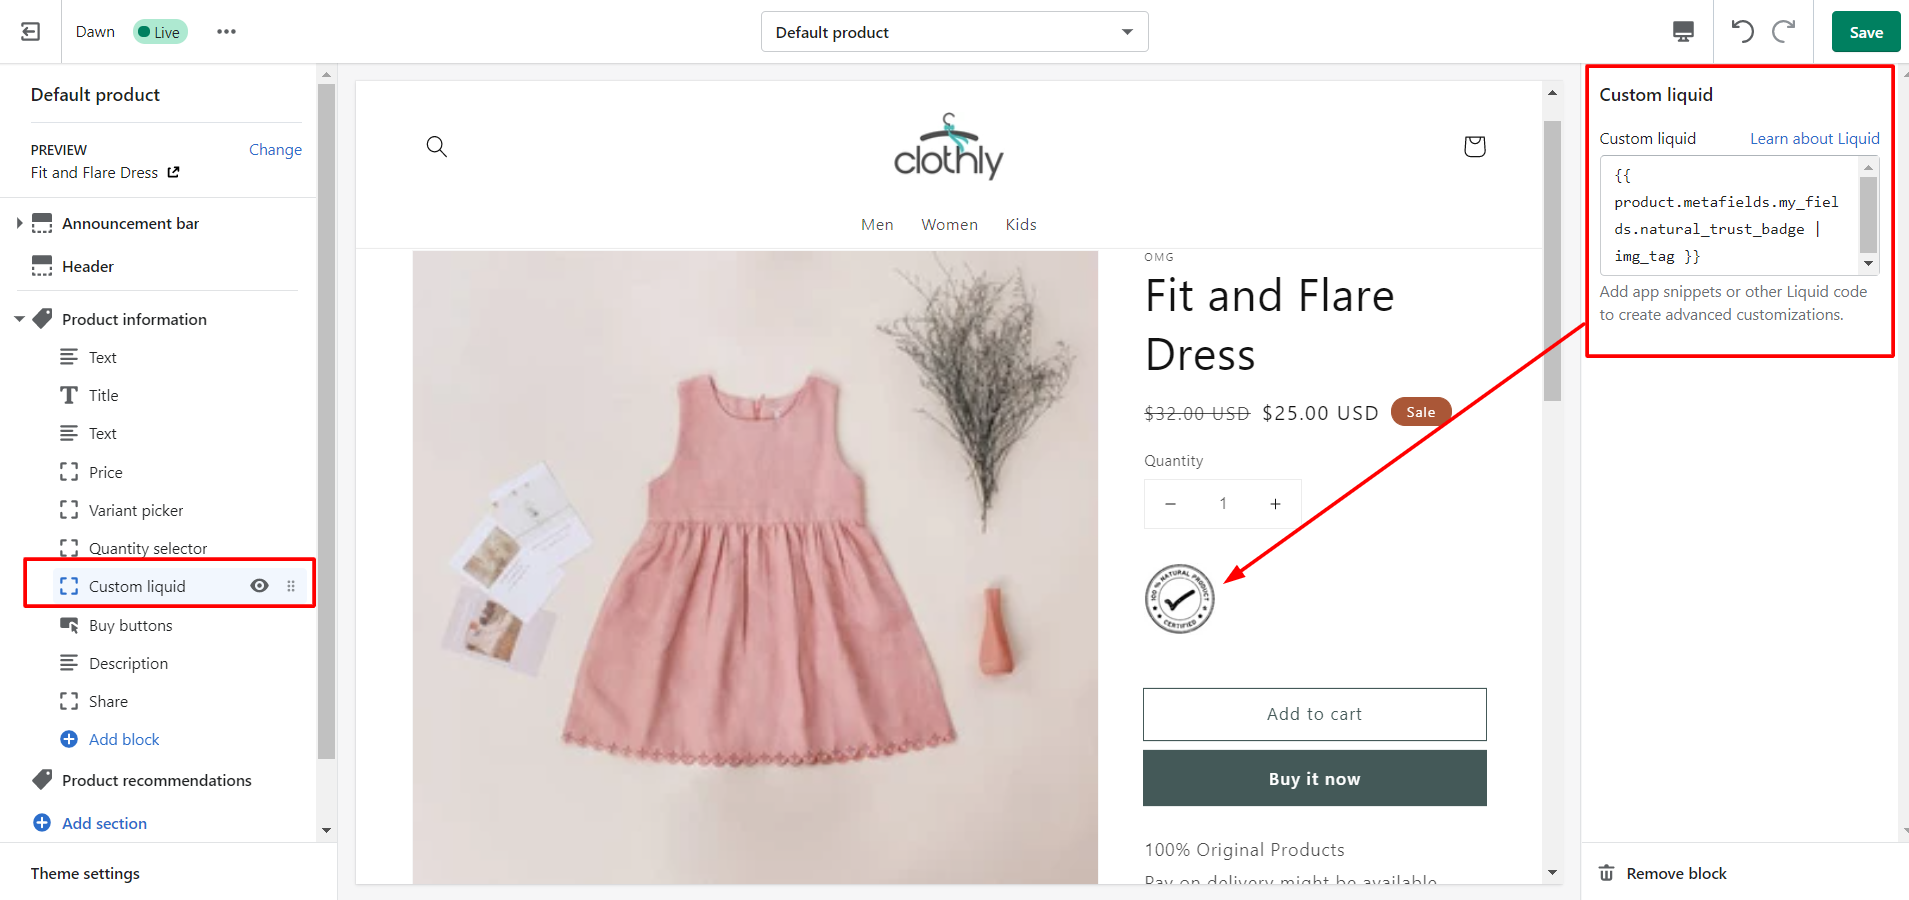
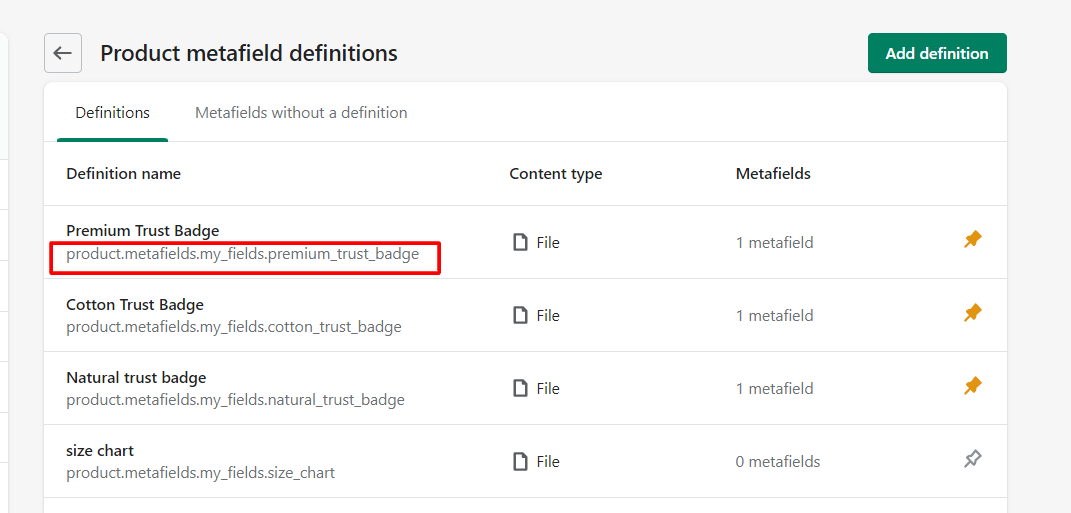
Step 18: Replace “product.metafields.my_fields.namespace_key” with your metafield namespace. You can find your metafield namespace in Settings > Metafields > Products. Simply copy the namespace below the metafield name.

metafields-namespace

Step 19: Hit the Save button.

Now, the same way you can add all the metafield to your product page using the Custom liquid block.

badges-added-using-metafields

Yay!! We did it well. Now, you can add more metafields to your store theme like this and make your online store stand out from the crowd.

Wrapping Up!

Hope this step-by-step guide helps you to display extra images on your product page using Shopify metafields. Please let me know if you are facing any difficulty applying the same given solution. I would love to help you.

Also, would love to know how did you customize your storefront to make it trustworthy. If you need some best Shopify storefront examples, find them here.

sagarika.das

About the author

61 Responses

  1. Hi Sagarika, love the tutorial, I followed your insructions and its worked liek a charm, but a bit small for what I need. I’m just wondering how to change the size of the image? What code do I add to the custom liquid to make it full width?

    1. Hello Stacy,
      Thanks for your response! 🙂

      I am not sure whether we can change the image size as the metafields are meant to show small images. So I would recommend posting a question to Shopify Community or getting the help of Shopify experts.

      1. Hi dear, do you know how to change the size?

        1. I think it’s not possible.

    2. {{ Key | image_url: width: 500, height: 500 }}

      1. Can you explain in detail where to put this?

        1. Hello Martin,

          After creating the metafield go to your product page and choose the product that you want to show the image. Scroll down to the Metafields section in the product page. Click on the empty space beside the metafields name. Upload the image for your product metafield.

          1. I meant the code for the size. Or is this what you are talking about? Thanks for your reply!

          2. Hello Martin,

            Are you talking about how to change the size of the image? If it’s your query then I’m not sure whether it’s possible or not.

        2. No need for the size parts of the code; just use this and then resize with css if needed. Add the snippet to your product template file in the Sections directory.

  2. This is a really really great and helpful example..! Appreciate your efforts. Love this tutorial.

    1. Thank you so much Sweta 🙂

  3. Hi! Thank you so much for this explanation! It is excellent and I am already using it!

    However, I want to know how to create an IF statement for this exact situation. For example, if I have an image icon that I don’t want to appear on another product, I leave it blank, but on the product page, it shows up as “No Image”.

    Is there a way to make an IF statement with your code for IF there is a blank metafield, then “Blank”?

    Thank you for your help!

    Sebastian

    1. Will check it and let you know if we discover any solution for this.

    2. The same problem, did you figure out a solution?

    3. Hi
      You can do like this:

      {% if product.metafields.product.metafields.custom.extra_image_banner != blank %}
      {{ product.metafields.product.metafields.custom.extra_image_banner | img_tag }}
      {% endif %}

      where custom.extra_image_banner = Key of your field.

      Thanks
      Ahir Hemant

    4. Hi You can do like this:

      {% if product.metafields.custom.extra_image_banner != blank %}
      {{ product.metafields.custom.extra_image_banner | img_tag }}
      {% endif %}

      where custom.extra_image_banner = Key of your field.

  4. Hi Sebastian,

    Try below if statment (replace namespace_key with the name of your metafield, for example trust_badge)

    {% if != blank %}
    {{ product.metafields.my_fields.namespace_key }}
    {% endif %}

    1. I Jesper,

      I try your code but shopify gave an error message: This code has errors. Correct the syntax to save your custom Liquid. Any way to solve this?

      1. Please try again because for all others this code worked well.

  5. If I follow these steps the image appear over each other and not side by side in line like in your example. Is there a way to fix this?

    1. Hi there, Martin!
      I had the same issue and was able to get a response on the Shopify forum that worked: https://community.shopify.com/c/shopify-design/custom-liquid-to-display-side-by-side/m-p/1834872

  6. Hello, thank you for your review. When I create a custom Liquid and insert my custom image field and then insert text, the latter will not be aligned with the image. I will have a writing And a justified photograph on the bottom, I would need everything to be justified in the center. so as to have text and photos aligned in the center.

    What do I need to put in the Liquid to get this thing out?

    1. Sorry, I have no idea about this. Please ask this query in the Shopify community. Hope you can get a solution from there.

  7. Hi, may I know how to display the images if I set the metafield definition as File with multiple input (list)?

  8. Hi

    here is solution for Specific size for image

    {% if product.metafields.custom.extra_image_banner != blank %}
    {{ product.metafields.custom.extra_image_banner | image_url: width: ‘1920×367’ | image_tag }}
    {% endif %}

    Thanks
    Ahir Hemant

  9. Hi
    here is solution for Specific size for image
    {% if product.metafields.custom.extra_image_banner != blank %} {{ product.metafields.custom.extra_image_banner | image_url: width: ‘1920×367’ | image_tag }} {% endif %}
    Thanks
    Ahir Hemant

  10. You can change the size of Metadata images by using the img_url:

    {{ product.featured_image | img_url: ‘450×450’ | img-tag }}

    i hope you find this helpful

    1. This will give a syntax error because this is wrong. It should be : {{key | image_url: width: 450, height: 450 | image_tag }}

      1. ThankYouuuuuuuuuuuuuuuuuuuuuuu!!!! It Works.

    2. Oh this one was a live saver blog Thanks.
      Well about the size issue
      Here is the corrected one… You can use either one

      OR
      {{ product.metafields.custom.size_chart | img_url: ‘large’ | img_tag }}
      For Specific Size

      OR
      {{ product.metafields.custom.size_chart | img_url: ‘450×450’ | img_tag }}

  11. This is great, worked like a charm.

    I have a question-

    Does anyone know how to move/position the image around, for example if you want it more left or more right.

    Also, does anyone know how to add a Title next to or above the image, and move/position it to make it look good.

    Thanks.

    1. Please contact the Shopify support team for this.

  12. Hi Team, I’ve been trying to do this. But it’s coming with a syntax error… I don’t even know what this is. Help please.

  13. Hello Sagarika,

    Wonderful tutorials. I need to know if don’t have any images. The page showed ‘No image’ pic. Is there a way to hide if we don’t have an image either collection meta or product meta?

    Thank you in advance!

    Thank you!

  14. I can’t get this to work. I followed each step exactly and I keep getting a “No Image” message in my customer liquid block even though I have an image in the product. I am using the Showcase theme.

  15. Hi, I followed all the instructions but it is showing the namespace key code instead of the image that I uploaded in the metafield. Please let me know how to resolve it.

    1. This code is working in other stores. Please recheck once again.

      1. hello, I made the arrangements as you showed, but the images do not appear side by side, they come one after the other.

        1. Please recheck once again and try.

  16. How can I remove the “_small” from the image URL.

    Example: //cdn.shopify.com/s/files/1/0712/4307/1777/files/Bundles-Image_small.png?v=1678182333

    and if I remove the “_small” with the inspect tool it then becomes clear unlike when it has the “_small” in the url

    1. Please contact to Shopify customer team for this. They will guide you for this.

  17. Hi,

    Is it possible to add a metafield to a content field in a section? Instead of a custom liquid…
    I’m trying to add an image to a content field in a Text with image section on a homepage.

    1. Please contact Shopify customer team for this. I hope they can guide you well and provide this additional solution for your need.

    1. Hello Ram,

      Please let us know if you have queries related to this blog.

  18. I was able to add the custom liquid code just fine thanks to this tutorial. However, I cannot get the image to show when the block is added to the online web template for the store. I am using the Empire template. Everything worked as stated in this article, but I get the ‘No Image’ message. How would you recommend that I get past this challenge?

    1. Please contact to Shopify customer support team for this.

  19. According to Shopify Pro Support, you will now need to add a “.value” at the end of the call in order for the image to show up. Like this:
    {{ product.metafields.my_fields.namespace_key.value | img_tag }}

    Otherwise the image element will not be built correctly, resulting in a broken image.

    Hope this helps someone.

    1. Thank you for the information

  20. Hi Sajini,

    Quick question: which image resolution did you use (in pixels)? I’m trying to add pictograms but the quality is awful and i’ve tried 150x150px and 100x100px and it’s still very very low quality.

    Any help is welcome!

    Many thanks,

    M.

    1. I think we can’t change the size.

    2. Marine, I find that creating a 1in x 1in image in Canva and then downloading as an SVG file works best. I found that the PNG files tend to appear blury and pixelated. I hope this information can be helpful to you.

  21. Hi, how did you get the 3 icons next to each other? mine just show on top of one and other> thanks

    1. please check the steps once again and the alignment.

      1. Hi, I did and i tried to methods to change the layout but they didn’t work and still showed stacked 🙁

        1. I am not sure why this is happening to your store. For others it’s working properly. Please contact to Shopify customer team for this.

    2. Ste,

      I have a YouTube video up on my channel which shows how to have multiple images to align correctly. You need to use file list and not a single file when creating the metafield and the code is way different then for a single image.

  22. Hi, Love this article. But the problem i am facing is that i have different product and for those products i am making different product pages. But if i try to add custom liquid for different badge for another product then it applies to all product. How do make unique for different product pages?

    Regards:
    Akshit

    1. Please contact to Shopify customer team for this.

  23. let me know why not working metefieild here
    {% raw %}

    ${ card_product.metafields.custom._specification_brand_name}

    ${title }

    {% endraw %}

Leave a Reply

Your email address will not be published. Required fields are marked *